Michael Bazzell
from Extreme Privacy: What It Takes to Disappear
EXTREME PRIVACY WHAT IT TAKES TO DISAPPEAR
SECOND EDITION

EXTREME PRIVACY WHAT IT TAKES TO DISAPPEAR SECOND EDITION
MICHAEL BAZZELL
EXTREME PRIVACY: WHAT IT TAKES TO DISAPPEAR SECOND EDITION
Copyright © 2020 by Michael Bazzell
Project Editors: Y. Varallo, Ashley Martin, M.S. Williams
All rights reserved. No part of this book may be reproduced in any form or by any electronic or mechanical means, including information storage and retrieval systems, without permission in writing from the author. The content of this book cannot be distributed digitally, in any form, or offered as an dectronic download, without permission in writing from the author. It is only offered as a printed book in order to avoid invasive digital tracking.
First Published: June 2020
The information in this book is distributed on an "As Is" basis, without warranty. The author has taken great care in preparation of this book, but assumes no responsibility for errors or omissions. No liability is assumed for incidental or consequential damages in connection with or arising out of the use of the information or programs contained herein.
Rather than use a trademark symbol with every occurrence of a trademarked name, this book uses the names only in an editorial fashion and to the benefit of the trademark owner, with no intention of infringement of the trademark.
Due to the use of quotation marks to identify specific text to be used as search queries and data entry, the author has chosen to display the British rule of punctuation outside of quotes. This ensures that the quoted content is accurate for replication. To maintain consistency, this format is continued throughout the entire book.
The technology referenced in this book was edited and verified by a professional team for accuracy. Exact tutorials in reference to websites, software, and hardware configurations change rapidly. All tutorials in this book were confirmed accurate as of May 1, 2020. Readers may find slight discrepancies within the methods as technology changes.
| Introduction | 1 |
|---|---|
| CHAPTER 1: Ghost Addresses | 11 |
| PO Box / CMRA | |
| Personal Mailbox (PMB) | |
| Anonymous Mail Forwarding | 13 |
| CHAPTER 2: Private Mobile Devices | 17 |
| Cellular Telephones | 19 |
| Secure Messaging | 24 |
| Virtual Private Networks (Mobile) | 26 |
| Device Backup and Restoration | 28 |
| Secondary Devices | |
| Faraday Bag Selection and Testing | |
| Telephone Usage | 32 |
| Number Porting | 34 |
| Number Forwarding | 37 |
| Camera and Microphone Blocking | |
| Mobile Device Firewall | 44 |
| Pagers | 45 |
| CHAPTER 3: Private Digital Life | 47 |
| New Hardware (Apple) | 49 |
| New Hardware (Windows) | 56 |
| New Hardware (Linux) | 60 |
| Password Managers | 64 |
| Two Factor Authentication | 69 |
| Encrypted Storage and Backup | 71 |
| Browser Configuration | 74 |
| DNS Configuration | |
| Virtual Private Networks (Desktop) | 83 |
| Email Usage | 86 |
| Email Forwarding | 87 |
| Encrypted Calendar and Contacts | 95 |
| Content Archiving | |
| Traveling with Devices | 98 |
| Tor Browser | |
| CHAPTER 4: Nomad Residency | 105 |
| Nomad Definition |
| Texas Domicile 108 DMV 109 Residency Affidavits 110 Residency Renewal 114 CHAPTER 5: Legal Infrastructure 119 Trust Definitions 119 Living Trust - Declaration of Trust 121 Trust - Declaration of Trust 129 Appointment of New Trustee 135 Trust Amendments 136 Certification of Trust 138 Choosing a Trustee 141 Limited Liability Companies (New Mexico) 143 Articles of Organizations 146 Certification of Organization 147 |
|---|
| Residency Affidavits 110 Residency Renewal 114 CHAPTER 5: Legal Infrastructure 119 Trust Definitions 119 Living Trust - Declaration of Trust 121 Trust - Declaration of Trust 129 Appointment of New Trustee 135 Trust Amendments 136 Certification of Trust 138 Choosing a Trustee 141 Limited Liability Companies (New Mexico) 143 Articles of Organizations 146 |
| Residency Renewal 114 CHAPTER 5: Legal Infrastructure 119 Trust Definitions 119 Living Trust - Declaration of Trust 121 Trust - Declaration of Trust 129 Appointment of New Trustee 135 Trust Amendments 136 Certification of Trust 138 Choosing a Trustee 141 Limited Liability Companies (New Mexico) 143 Articles of Organizations 146 |
| Residency Renewal 114 CHAPTER 5: Legal Infrastructure 119 Trust Definitions 119 Living Trust - Declaration of Trust 121 Trust - Declaration of Trust 129 Appointment of New Trustee 135 Trust Amendments 136 Certification of Trust 138 Choosing a Trustee 141 Limited Liability Companies (New Mexico) 143 Articles of Organizations 146 |
| Trust Definitions 119 Living Trust - Declaration of Trust 121 Trust - Declaration of Trust 129 Appointment of New Trustee 135 Trust Amendments 136 Certification of Trust 138 Choosing a Trustee 141 Limited Liability Companies (New Mexico) 143 Articles of Organizations 146 |
| Trust Definitions 119 Living Trust - Declaration of Trust 121 Trust - Declaration of Trust 129 Appointment of New Trustee 135 Trust Amendments 136 Certification of Trust 138 Choosing a Trustee 141 Limited Liability Companies (New Mexico) 143 Articles of Organizations 146 |
| Living Trust - Declaration of Trust. 121 Trust - Declaration of Trust. 129 Appointment of New Trustee. 135 Trust Amendments 136 Certification of Trust. 138 Choosing a Trustee 141 Limited Liability Companies (New Mexico) 143 Articles of Organizations 146 |
| Trust - Declaration of Trust 129 Appointment of New Trustee 135 Trust Amendments 136 Certification of Trust 138 Choosing a Trustee 141 Limited Liability Companies (New Mexico) 143 Articles of Organizations 146 |
| Appointment of New Trustee |
| Trust Amendments |
| Certification of Trust |
| Choosing a Trustee |
| Limited Liability Companies (New Mexico) |
| Articles of Organizations |
| Operating Agreement |
| Limited Liability Companies (South Dakota) |
| Difficol Emplify Comparison (Court Dukota) manifestamental 137 |
| CHAPTER 6: Private Vehicles163 |
| Re-titling to a Trust |
| Re-titling as a Nomad |
| New Vehicle Through a Trust175 |
| New Vehicle as a Nomad |
| New Vehicle Through an LLC |
| New Vehicle Through an LLC as a Nomad |
| Insurance |
| Vehicle Choices |
| Vehicle Privacy |
| Vehicle Tracking |
| CHAPTER 7: Private Temporary Housing205 |
| Hotels |
| Places to Avoid |
| Rental Homes |
| Hidden Cameras and Unauthorized Entry216 |
| CHAPTER 8: Private Home Purchase221 |
| Home Considerations 222 |
| Alias Information 225 |
| Title Companies and Trusts | 227 |
|---|---|
| Home Purchase Timeline | |
| Home Purchase Issues | 235 |
| Neighbors | 237 |
| Private License Plate Readers | |
| Nomad Home Ownership | |
| CHAPTER 9: Anonymous Utilities, Services, & Payments | 245 |
| Prepaid Cards | |
| Privacy.com | |
| Checking Accounts | |
| Secondary Credit Cards | |
| Secured Credit Cards | |
| Alias Wallets | |
| ID Scanning and Copying | |
| Home Insurance | |
| Utilities | |
| Amazon | |
| Moving Services | |
| Appliance Purchases | |
| Medical Services | |
| Anonymous Purchase Complications | |
| Post-Purchase Considerations | |
| Virtual Currencies | |
| VIII Calledolo IIII III III III III III III III III | |
| CHAPTER 10: Private Home Network | 295 |
| Virtual Private Networks | 295 |
| Hardware | 296 |
| pfSense Installation | 298 |
| pfSense Configuration | 299 |
| VPN Configuration | 301 |
| VPN Kill Switch | 308 |
| DNS Servers | |
| Custom Configuration Scripts | |
| pfBlockerNG | |
| Secondary VPN | |
| Wireless/Portable Routers | |
| CHAPTER 11: Private Employment | |
| Traditional Employment | |
| Self-Employment | 340 |
| Nomad Business Registration | 341 |
|---|---|
| IRS Registration | |
| Financial Accounts | |
| Contractor Considerations | 345 |
| CHAPTER 12: Anonymous Pets | |
| Pet Acquisition | 349 |
| Pet Services | 353 |
| CHAPTER 13: Beyond Extreme | .359 |
| Name Change | 360 |
| Marriage Considerations | |
| Birth Considerations | |
| Death Considerations | 366 |
| Dual Citizenship / Dual Residency | 374 |
| CHAPTER 14: Damage Control | 387 |
| IoT Concerns | |
| Kindle and E-Readers | |
| DNA Kits | |
| Fitness Trackers | |
| Financial Data Aggregators | |
| Family Vulnerabilities | |
| Name Disinformation | |
| Address Disinformation | |
| Telephone Disinformation | |
| Business Disinformation | |
| Death Disinformation | |
| Monitoring | |
| Personal Data Removal | |
| Consumer Reports | |
| California Consumer Privacy Act | |
| Online Content Removal | |
| Proactive Online Content | |
| Credit Freeze and Fraud Alerts | |
| Mobile Device Tracking | |
| Working from Home | |
| Schooling from Home | . 465 |
| CHAPTER 15: Physical Privacy & Security467 |
|---|
| Home Privacy A67 |
| Home Privacy |
| Home Security469 |
| Firearms |
| CHAPTER 16: Advanced Private Digital Life477 |
| Virtual Machines |
| Live USB Operating Systems487 |
| Advanced Hardware 2FA489 |
| DIY VOIP495 |
| Alternative Android Operating Systems505 |
| RSS Feeds |
| CHAPTER 17: My Successes and Failures: Jane Doe |
| CHAPTER 18: My Successes and Failures: Jim Doe535 |
| CHAPTER 19: My Successes and Failures: Mary Doe549 |
| CONCLUSION565 |
ABOUT THE AUTHOR
MICHAEL BAZZELL
Michael Bazzell investigated computer crimes on behalf of the government for over 20 years. During the majority of that time, he was assigned to the FBI's Cyber Crimes Task Force where he focused on various online investigations and open source intelligence (OSIN'I) collection. As an investigator and sworn federal officer through the U.S. Marshals Service, he was involved in numerous major criminal investigations including online child solicitation, child abduction, kidnapping, cold-case homicide, terrorist threats, and advanced computer intrusions. He has trained thousands of individuals in the use of his investigative techniques and privacy control strategies.
After leaving government work, he served as the technical advisor for the first season of the television hacker drama Mr. Robot. His books Open Source Intelligence Techniques and Extreme Privacy are used by several government agencies as mandatory training manuals for intelligence gathering and privacy hardening. He now hosts the weekly Privacy, Security, and OS/NT Show, and assists individual clients in achieving ultimate privacy, both proactively and as a response to an undesired situation,
2ND EDITION PREFACE
The first edition of this book was written in 2018. After an exhausting legal review, it was delayed due to concerns from attorneys. It was finally authorized for release in 2019 and was quickly published after a brief update of the content. Almost immediately after publication, I began working on this second edition. There were many topics I wanted to include in the initial release, but they exceeded the scope of the first edition at the time. Since then, my other books related to privacy have all become out of print. Much of that content was outdated and was overdue to disappear. However, this presented an opportunity to update and combine all of my current works into a single collection. That is what I present here.
I only release a new edition of a book once I have met specific conditions. At least one-third of the book must be brand new content and the remaining material must still be relevant and current. This book contains an additional 200 pages of new content since the original release. Most of the previous writing was still applicable and only needed minor updates to reflect changes since 2018. If you have read the previous edition, you will find most of that original content within this book. However, I have restructured much of it in order to facilitate many new privacy strategies which complement the original text. Throughout the following 560 pages, I have added over fifty unique topics which present many new extreme privacy strategies. I have also included new chapters focused on physical privacy, advanced digital security, and additional client stories presenting new successes and failures as I try to make people disappear. To me, this feels like a whole new book.
I also dropped "In America" from the subtitle of the original book. I heard complaints from many international readers who believed including a specific country in the title was offputting. I agreed and removed it for this and other reasons. Most of the new content in this second edition is globally applicable. Over half of the book now applies to the entire world. I believe the remaining half, which focuses on my experiences in the U.S., can benefit everyone. My hope is that readers apply my strategies, which include LLCs, trusts, nomad registration, employment, anonymous purchases, and other U.S.-focused tactics, toward the opportunities available in their own countries. While this book will benefit residents of the U.S. more than anywhere else, the lessons should be digested by non-Americans for replication outside of my country. I can never present options for every location, and only include my own experiences. However, I hear from many international readers about numerous successes on their own turf.
My goal is to maintain this book with updates when at least one-third of it contains new information. Considering how quickly technology changes, and new threats toward our privacy emerge, this should unfortunately be an easy task.
I am excited to now introduce yet a new level of extreme privacy. ~ MB
INTRODUCTION
EXTREME PRIVACY
Maslow's hierarchy of needs prioritizes our most fundamental requirements as basic physiological demands, physical safety, and then social belonging. Many have simplified this as food, shelter, and love. Most of my clients adapt this to anonymous purchasing options, a ghost address, and a clean alias.
I should probably back up a bit here and explain some things about my career, I spent over twenty years in government service. After eighteen years in law enforcement as an investigator for various agencies, I spent four years focused on extreme privacy strategies as a major part of my privately-held company and as a contractor in the intelligence community. During the majority of my career, I was a sworn task force officer with the FBI, where I focused on cybercrime cases and creating a software application for automated Open Source Intelligence (OSIN'I) gathering. My time with the FBI made me realize how exposed we all were, and that privacy was dying.
In 2002, I developed a strong interest in privacy and eventually wrote a book titled Hiding from the Internet which helped people clean up their on.line lives and become more difficult to find. After working covertly with criminal hackers, I was concerned about a growing phenomenon called "doxing" which happened to many of my coworkers. Doxing is the act of publishing complete personal details about a person online. This usually includes full name, home address, telephone numbers, family members, date of birth, social security number, and employment details. Others can then use this information to wreak havoc on the person with prank calls, delivered packages, and occasionally personal visits. I did not want to ever be on the receiving end of this, so I took action to remove all publicly available details about me from the internet. I never expected it to become my occupation.
I began teaching large crowds about these techniques which went as far as completely disappearing from any public records and becoming "invisible". I was determined to perfect the art of personal privacy. My focus changed from removal of public information to intentional disinformation which caused confusion to anyone ttying to stalk someone whom I was protecting. Eventually, I developed complete solutions to starting over with a new life that could not be connected to the previous. Often intense and extreme, my ideas were not always accepted by every potential client.
I eventually left government work as I wanted to commit to a completely private life and continue to help others disappear. I was extremely fortunate to be asked to help write the first season of a new television drama called Mr. Robot. The idea was to make all of the hacking and technology realistic, which I believe we accomplished. The show received high accolades, including a Golden Globe award for best drama, which introduced many new opportunities for me with the press and online media. This led to additional conversations with A-JJst celebrities, producers, and other Hollywood moguls. When combined with my ten years of public speaking side-gigs to financial companies and other large corporations, I immediately had access to a huge audience of wealthy people with problems. Once my services were known within this circle, word-of-mouth kept me busier than I could have ever imagined. From nude photos being released on the internet to attempted abductions, I became known as the guy who "fixed" things.
Today, my primaty focus is on extreme privacy and completely disappearing from public records. Every week, someone contacts me with an urgent need to fall off radar. Something bad has usually happened, and there is a concern of physical safety. This is where my extreme antics are welcomed, and I execute a plan to make my client invisible to anyone searching for him or her.
I will never share the exact details applied to my own privacy strategy, but I have executed numerous examples throughout this book toward my own life before attempting on others. I always try to fail at a new technique while practicing against my own personal information before attempting with any client. Sometimes, there is not time for this luxury, and I must pull the trigger on the fly and hope for the best. I have definitely made my share of mistakes and I have numerous regrets when it comes to the techniques used to achieve this lifestyle. You will read about many of them here. There was no textbook for this and I had no one to consult with before trying to officially disappear on my own.
Many clients do not need to erase their entire lives. Some just need help with a specific situation. Lately, the majority of people who contact me have had something negative posted about them to the internet and they want it removed. This can be very difficult as most search engines ignore these types of removal requests. Some people I cannot help. A recent client was arrested and his mugshot was plastered across numetous websites. I cannot always erase those, but I disclose my methods later in this book. A surprisingly high number of women contact me aftet a former lover posts pornographic videos to adult websites in attempt to shame them for leaving. These are fairly easy to remove when enough time exists to scoU1' every source. Some clients present tricky situations such as defamatory comments on blogs and personal websites. These require a delicate touch, and most can be removed.
My most difficult clients are those whom I never meet. Occasionally, a very wealthy or extremely famous person will need my services. Most of these individuals meet directly with me and we start their privacy journey. However, some are too big to meet with me face-toface. Instead, I meet with teams of lawyers which are skeptical of my methods. They then communicate with an assistant to the actual client who then later speaks directly to the client. Much is lost in translation, and I am asked to clarify my strategy. This generates a lot of confusion and misunderstandings. Worse, the execution of my plan is done incorrectly and therefore is not successful. After a few meetings, I am dismissed and I never hear anything from them again.
On one occasion, a famous movie actor reached out about the purchase of a new home and did not want to have his name associated with the paperwork. He wanted it to be a retreat off the radar of the tabloids. I was only allowed to meet with his personal assistant. She seemed very competent at orchestrating his life, but knew nothing about privacy. She unintentionally misspoke to the real estate attorney, which I was not allowed to meet, and the closing paperwork included a single mention of the celebrity's name. Within weeks, an aerial photo of the estate was in a tabloid identifying the new owner.
There are many clients with which I decline my services. After a few years of providing privacy consultation as a "hidden" service, news spread of the successes achieved with a handful of well-known clients. This resulted in a huge increase of strangers contacting me through my website about their own situations. Many were ve1y honest about their true identities and even more candid about the scenarios with which they were seeking help. Others were very vague about everything and became concerned about me knowing too much about their situations.
One of these was an individual that went by the name "Nobody" through a throwaway email address. He asked if I could help him disappear to the point that no one in the United States could find him. He had a large amount of cash that he wanted to use to buy a house anonymously. He refused to provide his real name which is an absolute deal breaker. If I can't vet a potential client through various verification procedures, I am not interested in helping. I had considered immediately declining his request, but I was too curious about him. Was he Tom Hanks? Does he operate a hedge fund? How did he get all the cash and what was he running from? I played along for a while and convinced him that he should install a secure communications application called Signal on his mobile device. Signal allows users to communicate securely with other Signal users by providing full end-to-end encryption for all voice, video, and text communications. This prevents anyone from intercepting the connection and even Signal employees cannot identify the content of the communication.
I was not interested in talking to him through Signal, but I was counting on him making a common mistake when he installed the application. Signal uses your cellular telephone number by default when you install the service. You then give the number to other Signal contacts and begin talking securely. I did not ask him for his Signal number, because he would likely feel exposed by disclosing his actual cellular number, even if only used through Signal. Instead, I
gave him my Signal number and told him to send me a verification text within the Signal application. My Signal number was a Google Voice number that I dedicated solely for use on Signal. This way, no one could connect my Signal account with my real cellular account. The potential client sent the text, which arrived in my Signal application. It immediately revealed his true cellular number.
I provided this number to various telephone search services to which I subscribe and collected the results. Within less than a minute, I possessed a true name, home address, email address, and Facebook page associated with his cellular number. It belonged to the girlfriend of a fugitive wanted by the U.S. Marshals for many serious crimes including molestation of children. This is the reason I vet everyone. If I were to assist a federal fugitive, I could be prosecuted myself.
My gut said to simply stop communicating and walk away. I couldn't. I knew from the beginning that this was suspicious. The need to pay in cash and the desire to only disappear from anyone looking for him in the U.S. were red flags. After some brief conversation, I was positive he was the wanted pedophile fugitive. I told him that I could meet him in Los Angeles in a week. He should bring $5,000 cash for my retainer and have it in a Taco Bell paper sack. His girlfriend's previous home address was only an hour outside the city, so this seemed plausible for him to agree to the meeting. I picked a quiet location that would not have too many people around early in the morning on a Sunday. I told him I would be wearing a blue shirt and black jeans. I would have glasses and a trimmed beard. He volunteered that he would be in a rented BMW and wearing a red collared shirt with tan shorts. I then did something that may offend some readers. I immediately called a U.S. Marshal contact that I had made during a recent internet intelligence training that I had conducted in the Los Angeles area and let him take over.
To this day, I have no idea what happened on that Sunday morning. My guess is that an arrest was made, as that subject is no longer on the public fugitive list. Why the Taco Bell paper sack? It is a great way to identify the suspect in the case that multiple people fit the general description. Please know it is rare that I need to utilize this type of ruse in response to a solicitation by a potential client, but I refuse to have my services exploited by child predators. If it were a misdemeanor warrant for shoplifting food, I would have taken no action and you would not be reading this. However, with certain serious crimes there is a clear moral obligation to intercede. Also, it should be noted that when someone hires me to make them disappear, I need to learn most of their private details if I am going to effectively obfuscate them.
Other declined clients include those that I simply cannot help. Some have mental issues that have created unnecessary paranoia and a constant concern that they are being monitored. They often send me twenty-page emails that contain random thoughts that seem incoherent. I try to convince those people that they are likely not in any danger and should seek counseling to eliminate some of these stresses. Occasionally I follow-up, but rarely receive a response. Others are simply not ready to go the distance. They want to continue to use Facebook, Twitter, and Instagram while having an expectation of privacy during their new life. I do not believe that any of my clients can truly become invisible and still use social networks. Some of those who stay off the main social networks are still not ready to eliminate their online lives.
On one occasion, I helped a young woman remove revenge pornography from the internet. She had sent very intimate videos taken of herself with her telephone camera to a current lover with whom she would later end the relationship. He posted them online and I used various tactics to force removal. A month later, she sent similar videos to a new lover that posted them online during their relationship, and attempted to extort her after she left him. I removed everything, including cached copies on search engines. I encouraged her to stop trusting others with this sensitive content. Three months later, she asked how she could remove new photos of herself engaged in a recent sexual act from an adult website, posted by her latest exboyfriend. I wished her the best, but advised that I had exhausted my ability to keep her private. I encourage those who value their privacy to trust no one with nude photos. The internet will ensure they are conveniently published and stay online forever.
My favorite clients are the people who are ready to start over. Relocation is mandatory and alias names will be used daily throughout the rest of their lives. They will never associate their true name with any purchase or location ever again. They are prepared to embrace the additional effort it will take to properly respond to daily requests for their personal details. A trip to a dentist, chiropractor, barber, hotel, restaurant, or Starbucks will never be the same. They will immediately realize the number of personal details which are collected about them every day, and the impact of divulging accurate information on their personal privacy. This requires a strong desire to disappear and the discipline to maintain the lifestyle. They will be impossible to find if done right. This book is written for that type of person.
My previous books about privacy were mostly REACTIVE. I focused on ways to hide information, clean up an online presence, and sanitize public records to avoid unwanted exposure. This book is PROACTIVE. It is about starting over. It is the guide that I would give to any new client in an extreme situation. It leaves nothing out, and provides explicit details of every step I take to make someone completely disappear. Many readers are likely questioning the reasons someone would need to execute the exhaustive plans that I have created. Almost all of my clients fall into one of four categories.
The Wealthy Executive: This represents the majority of my work. After living a traditional life with their family's name attached to everything they do, something bad happens. Layoffs at the company launch death threats to the CEO or a scandal breaks out indicating that corruption rises all the way to the top. Whatever the situation, my client wants to disappear.
They want a safe place for their family to stay while things get sorted. This is surprisingly difficult. Hotels want valid ID, and social engineering attempts by journalists and enemies quickly identify the location of the client. I will explain many ways that I secretly hide people temporarily and permanently.
The Celebrity: My famous clients usually have one of two problems. They either made a mistake and now need something cleaned up (such as nude photos, inappropriate tweets, or inaccurate articles), or they want to buy a new home that will not surface on tourist maps. I will present many pages within multiple chapters discussing the options for completely anonymous home purchases. It will not be easy, but it is possible.
The Government Employee: At least once a week, I am contacted by a police officer or other government employee that is in immediate danger. He or she is involved in a highprofile shooting, court case, or cartel investigation, and the spotlight is on. People are looking to cause problems and the client finds their home address on hundreds of public websites. It is too late to clean-up. It is time to move, and it is very important to be strategic about the names associated with any lodging.
The Victim: This is usually my most cooperative and eager client, It is also usually a woman. She finds the courage to leave a physically abusive relationship and she knows that her safety depends on her disappearing. I have had clients who were victims of attempted murder who know they must now live an anonymous life. This requires a long-term game plan, and each step of the execution must be perfect. Their life is relying on anonymity.
I am fortunate that I can now pick and choose the clients that truly need the help and will successfully execute the plans that I create. While I rarely meet new clients due to a series of fortunate events, and most come to me to "fix" something, the final result after I finish my work is usually positive. Some of my clients have had devastating events impact their lives, but they have moved on and are now happily invisible. It has not been all roses. I have made many mistakes and learned expensive lessons about my privacy strategies. Some of my less than optimal ideas have landed me in hot water, and even in physical police custody during one unfortunate event (which is not discussed here). I hope these lessons assist others with properly executing their own strategies and not replicating my mistakes.
Some will think that this book will hide them from the U.S. Marshals or prevent them from serving a pending prison sentence. It won't. I know the groups that will be in charge of hunting you. They are good. They will find you. Even fugitives who escape to the woods without any possessions get caught. This is not that type of book. This is for the increasing number of individuals that no longer want their home address on Google; data mining companies to build detailed profiles of them; or health insurance companies to snoop on their private purchases. They are tired of companies "listening" to their devices through metadata and questionable
permissions. They simply want out of the system which allows data within their digital lives to determine how they are treated by large corporations and governments.
When I was a child, there was a single choice you could make which either made you private or public. You could specify that your telephone number be unlisted. This action removed you from the telephone book, for a small fee, and made you practically invisible. This is laughable today. The moment you deed your home in your name, it is public information on the internet. Did you start electricity services at your new rental home in your real name? Within days, data mining companies replicate these details; append your social networks and family members; neatly package your profile into a sellablc product; and offer it to any new startup looking to target you with advertisements. It is a mess, and I believe we should take steps to stop this behavior.
The advice within this book is NOT to move to the woods and cease contact with everyone. It is quite the opposite. I believe that you can lead a normal life, including healthy relationships, without making personal details public. There will be a balance of enjoyable living and refusal to submit to the standard abuses of data collection. As I navigate through the book, there will be many times which you can choose the level of adoption. While I will always present the suggested extreme methods, there will be opportunities to slowly slide into privacy. Please read the entire book before executing any strategies of your own.
It is highly unlikely that you will need to completely disappear. Hopefully, you get through life without the requirement to hide. However, I ask you to consider all of the strategies presented here. While they may not all apply to you, there are many steps you can take to better protect your personal privacy and security. The book is written in chronological order of every step that I take with a new client requiring the full treatment. It is presented as if you are in immediate danger of losing your life, and people are trying to find you. It attempts to put you back into a normal life without the need to constantly look over your shoulder. Many of these tactics are extreme. You may laugh out loud a few times. Your family and friends may think you are crazy. However, if you ever need to disappear, you will be prepared.
The information shared in this book is based on real experiences with my actual clients. The following stories are all true, with the exception of changed names, locations, and minor details in order to protect the privacy of those described. Every subject referenced in this book has given both verbal and written consent to appear in the content, and possesses an interest in helping others in similar situations. I have refused to share their true identities with anyone, including my publisher, legal advisors, and other clients. I take my clients' privacy very seriously.
Finally, you will see the following statement a few times throughout this book. It was required by my legal team, but I agree with every word.
I am not an attorney. I am not YOUR attorney. You should not replicate anything I discuss in this book without first consulting an attorney. The following is not legal advice. It is not any type of advice. It is merely explicit examples of the actions I have taken to make myself and my clients more private. Your scenarios will be unique from mine and your privacy plan will require modification from mine. Seek professional legal advice.
CHAPTER ONE
GHOST ADDRESSES
Most privacy enthusiasts already have a United States Postal Service (USPS) Post Office (PO) box. This is a great layer of privacy for mailings in a real name that you do not want associated with your home. I have possessed many PO Boxes over the past two decades, but I will never use one again. The requirements for obtaining a PO Box have not changed much, but the residential enforcement has increased substantially.
Postal Service form 1093 is required in order to obtain a PO Box. This form explains that valid government identification must be provided, which seems acceptable in my view. Section four of this form is where I begin to get frustrated. This section requires your current home address, and this information must be verified by a postal worker. The verification is usually made via a delivery person who can confirm the applicant receives mail in that name at the residence. In other words, you must receive mail in your real name at your real address in order to obtain a PO Box to receive mail. If you cannot obtain verification of this, you will not receive your box. This means that a homeless person cannot obtain a PO Box~ which seems to be an ideal need for the service.
Over the past year, I have seen enforcement of a confirmed home address at an all-time high. In 2018, I was assisting a client with the purchase of a new home in a city with which she was unfamiliar. She needed a PO Box in order to receive important documents and payments, and had not yet found a home she liked. The hotel where she was staying did not allow daily mail to guests. I entered the local post office and asked for an application to rent a PO Box. The employee immediately asked if I had a local address. I advised I did not and that I was house shopping and will be here a few months while I decide. I was shot down right away and told I could not have a PO Box unless I had a local address. I caved a bit and said that my local address is currently a hotel. No dice. This seems ridiculous, and is becoming a common result when I enter a post office. I have quit trying. Instead, I rely heavily on Commercial Mail Receiving Agencies (CMRA).
A CMRA may be better known as a UPS store or a mom and pop style shipping store that provides mail boxes. These services will usually charge a higher fee than the post office, but the verification requirements are almost always less demanding. Additionally, the service is usually superior and there are less restrictions on deliveries from UPS, FedEx, and other services. You will still need to complete a USPS form within the UPS system, but the address verification is usually waived. You must provide the names of all people who might receive
mail at this box. In my experience, UPS stores are not as strict about this as USPS PO Boxes. I have never had a piece of mail in a random name refused at a UPS store, but this has happened often at the post office. If you obtain a UPS box, I highly recommend adding the name of a generic LLC to the list of potential recipients. LLCs will be explained later. This will give you an option to have packages delivered to your UPS box in the name of the LLC, or variation of it.
In 2018, I opened over a dozen UPS store boxes on behalf of clients. In every situation, the only identification shown of my client was a passport and utility bill. The passport does not possess a home address, and the utility bill displays a former address which will no longer be accurate after a new home is purchased. In every scenario, the address provided was not local to the area. I received no resistance from the staff, and walked out with a new box and key that day.
A UPS box is not a ghost address. It is a very obvious commercial mailing address which will not pass for a true residential address within systems that scrutinize this type of data. While most UPS stores advertise that they provide a residential address, this is mostly marketing. At a post office, they demand that you use "PO Box" within the mailing address, and a UPS store allows you to use your box number as "suite", "unit", or other possibilities. However, this does not fool big brother.
If you try to open a new bank account and provide a PO Box or CMRA box, you will likely be denied. If you try to use the UPS box on your driver's license, expect failure. Practically every CMRA agency address has been identified within a database that is used by most financial, government, and related institutions. The moment you place a CMRA address within a credit card application, it is flagged for review. Therefore, a simple PO Box or UPS box is not sufficient for our needs. We need a true ghost address that appears like a residential location; allows us to receive mail sent to that address; and never requires us to physically be present at the location. We need a PJVIB.
A Personal Mail Box (PMB) is much more than a simple PO Box address. It provides you a true residential mailing address, which is often accepted by institutions that otherwise block CMRA and PO Box addresses. It also allows the collection of mail and distribution to a second address of your choosing. It is basically your new permanent personal address for any mail delivered in your real name. A PMB is a staple for eve1y client. It is also a vital step toward advanced privacy techniques such as obtaining proper vehicle registrations, driver's licenses, passports, and other identification documents. All of this will be explained in upcoming chapters.
Most states have companies which will provide a PMB, but I only recommend South Dakota and Texas. I had previously considered Florida as a candidate for PMBs, but I no longer endorse this option. Obtaining a PMB is a small part of a larger privacy strategy which will be explained later, and I have had complications including Florida within that strategy. Therefore, I will focus on the only two states where I have continued success.
South Dakota and Texas are very friendly to full-time travelers such as those who live in an RV or nomadic people who explore the world year-round. This has spawned a business opportunity for companies wishing to cash in on the needs of these travelers, such as mail service. This chapter will only discuss your mailing needs, while future pages will explain how you can take this to the next level. I encourage you to finish the entire book before committing to a specific state or provider.
I do not have much preference of one state over the other for PMB services. Most clients choose the state that makes the most sense for them geographically. Clients in the northwest and near the Rockies tend to use South Dakota while clients in the south or east choose Texas. Regardless of the state, I highly recommend PMB services by a company called Escapees. Escapees is a Texas business, but they have a satellite option in South Dakota as well. Please note that I am NOT a sales affiliate of Escapees and that I have no financial interest in the company. I have tested many PMB services, and Escapees has been the most appropriate for the needs of my clients. Many of the PMB services I have tested possess awful security protocols, and Escapees has been the lesser of all evils when it comes to digital protection of their assets. The following will walk you through the steps I take on behalf of a client to establish a new residential PMB.
First, download the Escapees Mail Service Agreement for the state of your choice from their website at escapees.com. The default service is in Texas, but they recently added a South Dakota option . .At the time of this writing, the forms were at the following addresses.
South Dakota:
escapees.com/wp-content/uploads/2018/08/303w_mail_setvice_agreement_sd_1017.pdf
Texas:
escapees.com/wp-content/ uploads/2018/08/303w _mail_setvice_agreement_tx_l 017 .pdf
I encoutage my clients to choose the lowest tier (Categot:y .A) of service plus the mail scanning feature. This allows Escapees to provide you with a unique PMB address which can collect and state any incoming mail, and be shipped to you practically any way desired. You can schedule mailings of all collected mail to any address, such as a UPS box or hotel. The scanning feature provides an email with a digital scan of the envelope of all incoming mail. This allows you to be informed when anything important arrives which you want forwatded. Be sure to select the option to allow Escapees to sign for packages on your behalf. Part of this application is U.S. Postal Form 1583, which allows Escapees to accept and forward your mail. Most of this is self-explanatory, but I want to highlight a few important areas.
Box 2 must include any names which may receive mail. This is not the time to be vague. You should include nicknames and maiden names. You should also include the names of at least one trust. Later, I will explain how to use trusts as a layer of privacy within ownership of assets. If you have no trusts listed, mail sent to those trusts might be returned. In my experience, if you have at least one trust title listed here, even if it has not been established yet and is different than the trust name you will later use, it increases the likelihood that you will receive mail addressed to any trust at that PMB.
Box 8 requires a current home address. This can be any mailing address that you currently possess, and I have never witnessed any verification process. Since I assume that you will be moving in the near future in order to obtain true privacy, this can be your current home address.
The instructions for Box 9 indicate that you must be a current Escapees member. This is not actually true. You must first submit a copy of at least one government photo ID. I encourage you to submit a copy of your passport or passport card, as these do not contain a home address on them. The second required ID does not need a photo, but must have some type of unique number that can be tracked to you. This can include a military ID, Driver's License, or AARP card. For most clients, I submit the driver's license, especially if he or she will be moving soon to a new address.
The form must be signed in front of a notary. The application will be rejected without this. Once the form is complete, and you have included some form of payment, it takes about a week to receive your welcome packet including your new PMB address and number. Note that a credit card is accepted on the form, but please use a masking service as discussed later. Your new address will appear as one ( or both) of the following.
316 Villa Dr. #143 Box Elder, SD 57719
101 Rainbow Dr.#143 Livingston, TX 77399
One benefit to using the Escapees South Dakota option is that you actually receive two mailing addresses. The South Dakota address can be used later for a driver's license and vehicle registration while the Texas address can be used as a traditional PMB. This comes at a cost. Every piece of mail that must be forwarded from South Dakota to Texas, before being forwarded to you, extracts $1.00 from your postage balance. If you plan to eventually obtain a South Dakota driver's license, vehicle registration, or business license, you should choose the South Dakota option. If not, choose Texas. If you plan to eventual1y obtain a Texas driver's license, vehicle registration, or business license, you should choose the Texas option.
If you like the idea of having two ghost addresses in two separate states for the same price as one, South Dakota is for you.
You can now begin changing your mailing address for anything important to you, This includes your banks, brokerage firms, credit cards, and anything else that does not care that you reside in a new state. At this point, you are not a resident of South Dakota or Texas, you simply possess a mail fotwarding service. As you update your mailing address with various institutions, they will begin to report this change to the major credit bureaus and data mining companies. Consider filing an Official USPS Change of Address form at your local office. Choose the "Permanent" option and list all of your household members. This allows the USPS to intercept mail coming to your current home and forward it to your PMB. Please note this cannot be reversed, so consider your options carefully.
Within a month, your credit report will likely show this new address, as will premium services such as LexisNexis and CLEAR. This is desired. We want your name associated with this new ghost address. We want your trail to start throwing people toward a mail receiving company instead of a physical location where you reside. This is just the first step, but a big one.
From this point forward, you should give out your new PMB address in situations when you would have othe1wise given a PO Box or home address. Exceptions to this include your current driver's license, vehicle registration, and insurance. We are not there yet, but this will be explained later. Think of your new PMB as a PO Box that happens to be far away from you. When you receive a notification of new mail, and want to have it sent to you, it is time to consider your mail forwarding strategy. Most people who use this type of service are not privacy-minded. They simply have the mail from their PMB sent to their home, a friend's house, or another address with associations to them. I urge you to consider a more private option. I never have my PMB mail forwarded to any address where I actually reside, This may be overkill and paranoid, but for good reason.
In 2017, a client notified me that her stalker had contacted her recently, identifying her current home address. This seemed impossible to me. I had taken every precaution. There was no reference to her address online, and her name was never associated with her residence. It was only after he was arrested and interviewed that I found out the mistake that was made. She was having her PMB mail sent directly to her house. He called the PMB provider, requested to schedule a mail delive1y on her behalf as her husband, and politely asked where the previous shipment was delivered. The employee read the address back to him with no hesitation. This is a reminder that all PMB companies carelessly give out sensitive details if anyone asks.
This was an extreme privacy violation and should have never happened. Almost all PMB companies have policies prohibiting this, but we are all human. We make mistakes, and are prone to social engineering attacks. I took responsibility in this case, as I did not make it clear
enough to never have your PMB mail sent to your home. You should have a plan for the final destination of your forwarded mail, and this will vary for different scenarios. If you travel constantly like I do, sending your PMB mail to a hotel is ideal. It is a temporary location that will not be applicable to you long term. This can get tricky if you stay in hotels under an alias (as discussed later). If you use your real name, this is fairly simple.
Earlier, I explained a CMRA option, such as the UPS store. These are great for receiving your PMB mail. If you choose this route, I encourage you to find a store located a town or two away from your residence. Getting too close could reveal more information about your home than you desire. This provides a safe local storage area for your mail.
Let's recap our current situation. You have a box at a UPS store under your real name. This is located fairly close to you and is a place you can have any mail sent. You also have a PMB that collects important mail in your real name and forwards to your UPS box. This can be used for situations that typically block CMRA services, such as banks and credit cards. These are the only two addresses where any mail should be delivered in your true name.
While these may not seem like the traditional ghost addresses used in previous decades, they are much more powerful. In 2012, I possessed a ghost address in the southwest portion of the United States. It was a physical structure, somewhat abandoned, but could be used for official purposes. Eventually, the building was sold and I no longer have access to it or any mail sent there. Any shared building services disappeared, leaving me stranded. There are niche communities that have much more intense options such as mail drops in storage closets or back rooms with dedicated street addresses. However, these are quite expensive and only best used short-term. A PMB is a permanent solution which includes benefits unavailable within other privacy-tailored services. Later, I explain how to use this address on your vehicle registration and driver's license. It can become your confirmed physical address, yet you will never step foot at the location.
Escapees Update: Numerous readers contacted me stating that Escapees has inconsistent pricing and can be a wildcard. I encourage you to research Americas Mailbox, which is also in South Dakota. For some, it may be a better (and more affordable) alternative. I explain how I use their service later in the Private Employment chapter. There are benefits to each service, and you should do your own homework. I know many people who have replicated the instruction here with Americas Mailbox as their provider, and have been happy with the service. The only benefit of Escapees is the dual Texas and South Dakota options.
International Considerations: Most countries possess some sort of postal box delivery option. UPS stores can be found abundantly within the United States and Canada. Most European post offices provide various levels of rented boxes. I encourage you to investigate all options within your country of residence.
CHAPTER Two
PRIVATE MOBILE DEVICES
An important step toward completely disappearing is updating all online devices and accounts. Some privacy enthusiasts will tell you that you cannot possess a cellular telephone and still expect any privacy. They have a point, but that is unrealistic. If I informed a client during an initial meeting that he or she could never use the internet again, I would have no more business. My goal is to allow you to enjoy the benefits of technology, but while providing minimal legitimate data to the companies that benefit most from your usage.
Throughout this entire book, please remember that it is designed for the reader in an extreme situation. I will assume that your physical safety is in jeopardy, and that making any mistake is life or death for you. I will treat you like a client who is running from a homicidal former lover that is determined to kill you, I will never consider costs of products, as your safety is more valuable.
I should present the bad news now. If you want extreme privacy, you need all new devices. Your current laptop, cellular telephone, wireless router, and anything else that connects to the internet must go. Clients will ask me if they can simply reformat the drive or hard reset the mobile device, and my answer is always no. Consider the following argument.
Assume that you are a hardcore Apple user. You have a MacBook laptop and an iPhone device. Every Apple product possesses an embedded serial number. This number is associated with your Apple account. Both mobile and laptop devices constantly communicate with Apple servers, supplying the identifiers associated with your devices. Hard resetting (wiping) an iPhone does not reset the serial number. Apple still knows who you are. Creating a new Apple ID for use on these devices does not help. Apple maintains a log of all Apple accounts connected to any device. A court order to Apple, or a rogue employee, can immediately associate your new account to your old, and all of your accounts to all of your hardware. This includes location data and IP addresses. There is simply no way around this. This also applies to most Microsoft and Google products.
Therefore, we obtain new equipment. It is time to replace your mobile device, For my clients, I arrive with the new equipment in order to ensure it is not associated to them at the time of purchase. I pay cash at an Apple store, provide no personal details, and walk out with clean equipment. My image (barely visible under my cowboy hat) is stored on their surveillance system for years, but is not the client's presence. If you plan to buy new hardware with cash,
you may want to find a nominee that does not care about privacy to go in the store and make the purchase on your behalf. During a phone call to an Apple store on my podcast, a manager admitted that eve1y store's surveillance footage is routed to a central collecting location, and stored for an undetermined time. I assume forever.
Some advocate for buying used devices in order to further confuse the systems that collect user data. I do not endorse this. You never know what you are buying. What if the previous owner was a drug kingpin being monitored by the DEA? A court order to Apple shows the DEA agent that the device is now being used by a new account. They would have the legal authority to monitor you. We can prevent this extremely rare situation by purchasing new equipment.
We should probably have the Apple vs. Google discussion. There are likely hardcore Android users reading this that refuse to use an Apple product. They refuse to pay the "Apple Tax" by switching over to another ecosystem. I get it. I am not an Apple fanboy, but I believe the operating systems and hardware on the Apple platform are more secure and private than anything by Microsoft or Google, including Android. I do not like the constant data transmissions that Apple collects and stores about your device and usage, but it is not as bad as the data collection and usage from Microsoft or Google products.
I could fill many books with the unique steps taken to replace all of my clients' hardware and online accounts, but it would likely bore the majority of the audience. Instead, I will abbreviate as much as possible, focusing only on the key elements of each phase. This section is intended to be a "crash course" for the client that is ready to start over and begin a new private life, leaving all connections to previous devices and accounts behind. This will be presented in several break.outs for each type of device. These sections will be simplified, and there are many rabbit holes that can be further investigated online through the resources on my website at https:/ / inteltechniques.com.
Overall, this is not a digital security book, it is a privacy guide. However, I want to acknowledge that you cannot have privacy without digital security and vice versa. There are unlimited ways to configure countless mobile devices, laptops, desktops, operating systems, applications, and anything else with a digital display screen. The next two chapters present only the mandato1y changes I implement during a full privacy reboot. You will likely possess numerous additional devices that are not mentioned here. Please use the underlying messages within these chapters to make the best decisions about your own digital life configurations.
Let's start with the most important device to replace, your cellular telephone. If you apply only one piece of this book toward your life, I believe it should be a new anonymous mobile device with anonymous setvice. It is the single tracking device that we all purchase and voluntarily carry with us eve1ywhere. We should make it as private as possible.
Private Cellular Telephone Crash Course
My clients each receive a new telephone with new anonymous service activated. Unless they absolutely insist on an Android phone, I issue new iPhones by default. I believe the privacy and security of an iPhone is far superior to any stock Android device. Additionally, my clients are usually most familiar with the iOS environment. I purchase the phones with cash at an Apple store and leave without accepting Apple's activation and setup services.
I create new Apple accounts from within each phone through the prompts presented after initial boot. You can typically delay the Apple ID requirement during the first setup screen, but an account is required in order to download any apps. I provide a generic name, forwarding email account, hotel address, and secure password generated by my password manager (more details on all of this later). If forced to provide a telephone number, I supply the number assigned through the carrier to the device. This may seem reckless, but Apple collects this data from the device regardless. In a moment, I explain my preferred pre-paid cellular provider (Mint Mobile), which can be purchased without providing a true name. The SIM can be activated online if you are unable to install the app due to the lack of an Apple ID account. You will need internet access via Wi-Fi during both processes. I prefer to use public Wi-Fi without a VPN in order to avoid fraud triggers. Conducting all of the setup processes while connected to open Wi-Fi at an Apple store parking lot is ideal. If you plan to purchase apps, obtain a prepaid iTunes gift card with cash from a grocery store. This is usually not necessary because you should possess minimal applications and only those absolutely required.
For extreme privacy, this device should never be configured from your home, Most phones have location services, Wi-Fi, Bluetooth, and cellular connectivity enabled by default. This could expose your account and associate it with your residence. I will explain in a moment how I isolate my phone from my home.
Immediately disable all iCloud services within the device. This will prevent accidental exposure such as emails, contacts, calendars, and notes from being stored within Apple's cloud storage. While I do not recommend using Apple's stock iOS applications for any of these services, it is easy to upload data unintentionally. You can access these settings from the iOS Settings app > Apple Account > iCloud. You should have the option to completely sign out of iCloud and the final result should display "Off" within this menu. Hopefully, you were never signed in. Some may question my distrust of iCloud. A more appropriate claim would be that I don't trust any cloud storage services for my clients. We have all heard about various breaches which exposed celebrities' personal photos and email messages. These occurred due to the convenience of free cloud storage. The only way to truly prevent this is to block any data from leaving the device. I will discuss solutions in a moment. Most of my clients are highly targeted due to their fame, so I insist on completely disabling iCloud or any other storage solution.
The next priority is managing the privacy settings of each application. You must give your applications reasonable access to only the settings they need in order to perform their desired task. Navigate to Settings > Privacy and conduct the following modifications.
- Location Services: Turn to the "Off" position. Change this only when in need of a mapping service. Disable individual permissions if you plan to use this feature.
- Contacts: Limit the applications which should have access to your contacts. Services · such as communications apps must see your contacts in order to connect you to other people, but other apps should not have access.
- Calendars: If you do not use the stock Calendar app (I do not), then this can be disabled within eveiy application presented.
- Photos: If you never share photos through any apps, it is safe to disable this within every program. It can be enabled if you change your mind.
- Microphone: This should be limited to the applications which truly need access to the microphone to perform their intended function, such as voice messaging applications.
- Camera: This should be limited to the applications that truly need access to the camera to perform their intended function, such as messaging applications which you wish to share photos and videos from your camera. Disable any app which should not have the authority to access your camera.
- Health: Disable completely.
- Homekit: Disable completely.
- Motion & Fitness: Disable completely.
- Siri: Disable and delete all Siri options and data at the following locations: Settings > Privacy > Analytics & Improvement > Improve Siri & Dictation Settings > Siri & Search > Siri History > Delete Siri & Dictation History
Under Settings > Touch ID & Passcode, select Change Passcode. The default option is a maximum of six numbers, which I believe is insecure. Select the Passcode Options and then Custom Numeric Code. This will allow you to set a longer passcode. I recommend a minimum of twelve numbers. Many people ask about the security of the Touch ID option. I do believe it is secure, and Apple does not receive an image of your fingerprint. Your device creates a mathematical value based on the print, and only looks for a match when it is used. It is only as secure as your passcode, since either can unlock the device. Your decision to activate Touch ID is personal, and most of my clients demand it. I only ask you to consider the following threats.
• Forced Print: If you are placed under physical duress, you could be forced to use your finger to unlock a device. This is extremely rare, but I have had clients who were victims of kidnapping and abduction. These unfortunate incidents weigh heavily on this decision.
- Legal Demands: Some courts have ruled that providing a passcode is not always required as part of a search warrant to search a device, but a fingerprint is. You can refuse to tell your code, but may be physically forced to give up your fingerprint.
- Apple Face ID: I would never consider using this. Although Apple does not store your image, it has been proven vulnerable using images of faces to unlock the device.
As I stated previously, I never use cloud storage for sensitive information such as personal photos and videos. However, I respect the need to possess a backup of this data, especially when our mobile devices likely create and store every image we capture. Since most clients possess a new iPhone and Apple computer, I encourage them to manually backup all content via USB cable. The default Apple application for photo backup is Photos, but I prefer not to use it. Instead, I use the stock application titled Image Capture. Tius minimal software does not attempt to connect to Apple servers and has limited functionality. Upon connecting an iPhone to an Apple computer, I conduct the following.
- Launch Image Capture and select tl1e iPhone in the upper right.
- In "Import To" option, select the folder on your computer which will store all images.
- Select "Import All" to copy all images and videos to the computer.
- If desired, select all images, right-click, and permanently delete from the device,
You now have your photos and videos on your computer, and I suspect (hope) you are conducting backups of your data to an external device (a tutorial is in the next chapter). By maintaining all of your personal data locaUy on machines in your possession, you completely eliminate the ability to "hack" into your iCloud and steal your content. You are not buUetproof yet, but an attack would be extremely targeted and difficult. Note that connecting your new iPhone to your new Apple computer creates a known connection of these two devices with Apple. The risks are minimal since both devices are new with no association to your true identity.
Now that your device is configured with your new Apple account, your privacy settings are tweaked, and your device is more secure, you will need cellular service. In major metropolitan areas, I use Mint Mobile as the provider. Mint is a T-Mobile reseUer, and only offers prepaid plans. I choose them because they are very affordable, do not require user verification, and allow prepayment up to a year. At the time of this writing, the lowest monthly unlimited plan was $15 including a free SIM card. I only need the data, as my clients will never use their real T-Mobile issued number for calls or texts.
You can obtain SIM cards from Mint directly from their website, Amazon, or Best Buy. The cards are free if you purchase a package directly from Mint and $5 for two cards if you purchase from Amazon. I purchase dozens of 2-packs from Amazon using an anonymous
account and ship to an Amazon Locker (more on that latet), but this may be overkill for your needs. If you only need one or two devices activated, I recommend purchasing the Mint Mobile Starter Pack online from Amazon or in-store from Best Buy. The following are two recommended strategies.
Best Buy: If you are near a Best Buy store, this is the easiest and most private option. Most stores carry the "Mint Mobile $5 Prepaid SIM Catd Kit" with a SKU of 6310600. At the time of this writing, the cost was $1.00 and each included $5.00 in Mint Mobile credit. I have been able to purchase dozens at a time.
Amazon: Purchase an Amazon gift card with cash from a physical store, such as a groce1y stote. Create a new account on Amazon using alias information and an address of a hotel near you1· location. Apply the gift card to the account and purchase the Mint Mobile Starter Pack. Choose a nearby Amazon Locker for the delive1y address. Once your cards arrive, obtain them from the locker.
After you possess a Mint Mobile SIM card, install the Mint Mobile app on the device you recently configured. This should be done away from your home. If possible, use public Wi-Fi. Insert the SIM card and activate the card through the app. This provides you one week of free service to ensure the coverage is acceptable to your needs. It is using T-Mobile service, and I have found the coverage much better than years past. Once you are convinced that Mint Mobile will work for you, select a package within the app. I use very little data, so the 3GB LTE (unlimited at slower speeds) is plenty for my needs. You can prepay for three, six, or twelve months. The longer you commit, the cheaper the price. The lowest package can be purchased for $15 monthly at the yearly commitment. The upcoming chapter on anonymous purchases offers payment options.
Now that you have a new device with a new data plan, you are set. Install only the apps you need, and proceed with private use. Since you should never use the number provided from your cellular company, you will need a way to make and receive standard telephone calls. I currently use MySudo (mysudo.com) for most non-secure communications, such as incoming and outgoing telephone calls. This app provides up to nine profiles, and each profile possesses a unique telephone number, email address, and contact list. This service allows me to possess multiple phone numbers on one device, and each can be used for incoming and outgoing calls and text messages.
MySudo does not need your name, email address, or telephone number. The installation is unique to your hardware. MySudo only knows you by this "fingerprint", which has no association to your true identity. You should be able to obtain a free trial, and purchase any premium plans anonymously using the methods discussed later. In the interest of full disclosure, I was an advisor for, and currently possess shares of the parent company, Anonyome Labs. I explain more about my usage of MySudo later in this chapter.
Many readers may be asking why I never use my number assigned by the service provider. I believe that you should never know the number assigned to the phone and never give it out. There are many reasons, but I will present some strong threats.
Friends & Family: When you give your telephone number to your friends and family, they will likely store it in their contacts and associate your name with the entry. Someone will then download a nefarious app which requests access to the contact list, sending the contacts to online databases which can be queried. We have seen this with several apps in the past, including caller ID services such as TrueCaller and Mr. Number, which shared private contact details with the world. Lately, services such as Twitter and Llnkedln are the bigger concern. Have you ever received an email from Linkedln asking you to connect with someone you knew? This happens when that person agrees to share their contacts, including email addresses and telephone numbers, with the service. Twitter also wants to obtain these details from any members willing to share them. It only takes one instance to make your cell number publicly attached to your true name. Giving out Voice Over Internet Protocol (VOIP) numbers, as discussed later, can be easily burned and replaced, eliminating the concern of this threat.
SIM Swapping: If I know your true number and I want to take over your account, I can perform a SIM swapping attack. This transfers your number and account from your current device to my device. I am now you. If you use your true number as part of two factor authentication (2F A), I now have that second factor required for login. It is much more difficult to takeover a VOIP number than a standard cellular number.
Tracldng: If I know your cell number, I have the one piece of data needed in order to identify your device and location hist01y. This is all stored by your cellular provider, but a court order, data breach, or social engineering attack could easily identify your whereabouts at all times. A VOIP number does not have the connection to your provider necessary in order to retrieve this data.
Logging: Every major cellular telephone carrier logs every call, text message, and data transaction which occurs on your device. Furthermore, they log your location during all activity. Most of this information is kept for years and is available to employees, criminals, law enforcement, and the public whenever a data leak occurs.
Regardless of your threat model, you are prone to becoming the victim of at least one of these issues. I hope that you now possess an interest in eliminating these threats. Since I never use my cellular number for any communication, I need better options ready on my device.
Secure Messaging Crash Course
You should now have a new device that has no connection to you. It possesses prepaid cellular service with no name attached. Since you do not use the number provided by Mint Mobile for any communications, there is no history of your calls and messages. If I wanted to attack you through your mobile device, I have no information to begin my hunt. All of your outgoing calls are made through MySudo, which does not know your true identity. While any mobile telephone is a tracking device which always possesses some type of digital trail to the owner, you have created numerous layers of privacy which will keep you protected from traditional attacks and monitoring. We now need to harden your communications.
Secure Messaging: There is nothing I can say about secure messaging applications that has not been said elsewhere, and I suspect that anyone interested in privacy has already adopted a favorite service. However, a book on privacy would not be complete without mention here. Standard SMS text messaging leaves a huge amount of metadata within the systems of your cellular provider, and they can access the content of the messages. Cellular companies store years of this data, which can then be released intentionally ot accidentally. My requirements for a secure communications service include the following.
"Zero knowledge": This means that the provider cannot allow the content of the communications to be intercepted or accessed by any intetnal employee or third-party. Trusted providers have no ability to view the contents of your communications because the level of encryption from your devices prevents them from any ability to access your data.
Message Expiration: SMS messages leave a histotJ with cellular companies. Secure communication services give you more control. Reputable services allow you to set an expiration of your messages. Once the expiration passes, the messages disappear on your device and the recipient's device. This is not bulletproof, as screen captures or exports can create additional copies, but it provides a basic layer of protection.
Encrypted Voice Calling: When I need to talk with a client, I only use services which provide true encrypted calling. This prevents wiretapping and other technologies from intercepting and recording my call. There is still a risk that the other party could record the conversation, but interception by a third-party is very unlikely. Compare this to a traditional telephone provider which can intercept any call.
There are a large number of secure messaging types of apps emerging. I will disclose those which I use and recommend, in the order of my preference.
Wire: This is my preferred secure messenger over all others. While not perfect, it offerfeatures currently unavailable in all other providers. Wire is free for personal use, and h·
adopted a large audience of users within the privacy community. An email address is required to create an account, but can be a forwarding account such as a Blur or AnonAddy masked email address. A ProtonMail address may be more appropriate for long-term access. Wire has native applications for iOS, Android, Windows, and mac OS. If you are using any other system, you can also connect via their website. Regardless of your connection, you can communicate via text, audio, and video across all platforms. This is a rarity.
Wida: This was one of the earliest secure communications applications and it works very well. I have numerous contacts that use this service and it is often at the top of the list for new clients seeking only text and voice options. The voice calling feature can be used from the desktop application, and a mobile device presence is not required. I typically seek services which I can use from my desktop when desired.
Signal: There are many things I do not like about Signal, but it seems to still have the largest user base. Therefore, I must keep it within my arsenal. I would rather communicate over Signal than SMS text, and many people in my life possess Signal as their only secure option. Signal requires a telephone number in order to create an account which is a huge privacy violation. You must give out this number in order to communicate with others securely. If you choose to use Signal, you should create an account associated with a VOIP number, such as a MySudo or Google Voice number. I prefer MySudo for this if you have access to an account. Google Voice should be your second consideration. Once you have an account, you have access to secure text, audio, and video communications. Signal has a desktop application, but it only supports text communication.
Session: I really like Session. It is truly anonymous in that it assigns a random username (Session ID) and never asks for a telephone number, email address, or any type of verification. The reason it is below Signal is because of low adoption (it is a much newer service). If my contacts jump into Session as a form of secure messenger, I would begin transitioning more clients to it. At the time of this writing, it only allowed text communication and no voice or video calling options.
MySudo: MySudo offers free secure communications within their network. This includes text, audio, and video. If the majority of your contacts have MySudo, then this may be the only option you need. It is lowest on the list because oflower adoption and no ability to place calls through a browser or desktop application. Fortunately, the Android version was released in 2020. If this brings in a flock of new users, I would happily place this service above Signal.
Overall, you should adopt whichever secure service will be used by those in your circles. If no one in your life is using secure communications, you have an opportunity to select the best service for your needs and start recruiting people to it. If everyone in your life already uses a pecific service, jump on board.
VPN Crash Course (Mobile)
Virtul! Private Networks (VPNs) provide a good mix of both security and privacy by routing your internet traffic through a secure tunnel. The secure tunnel goes to the VPN's server and encrypts all the data between your device and that server. This ensures that anyone monitoring your traffic before it reaches the distant server will not find usable, unencrypted data. Privacy is also afforded through the use of a distant ser<rer. Because your traffic appears to be originating from the VPN's server, websites will have a more difficult time tracking you, aggregating data on you, and pinpointing your location. I break this down further in the next chapter.
Virtual Private Networks are not a perfect anonymity solution. It is important to note that VPNs offer you privacy, not anonymity. The best VPNs for privacy purposes are paid subscriptions with reputable providers. There are several excellent paid VPN providers out there and I strongly recommend them over free providers. Free providers often monetize through very questionable means, such as data aggregation. Paid VPN providers monetize directly by selling you a service, and reputable providers do not collect or monetize data. Paid providers also offer a number of options that will increase your privacy and security. I currently endorse Proton VPN as my "daily" VPN, and PIA on firewalls (explained later). I will always maintain a direct link to the most affordable subscription on the "Links" page on my website. The current rate for PIA is $42 per year while Proton VPN ranges from free (slow) to $95 per year (fast). Both include unlimited use and connection to multiple devices. Configuration of a VPN on your mobile device can be extremely easy or somewhat challenging, depending on your level of paranoia. Let's approach this from three levels.
Basic: For most readers, and almost every client I have consulted, I recommend sticking with the standard application provided by a VPN company. Whether this is a larger provider such as PIA and Proton VPN, or a smaller supplier such as Mullvad, the apps provided directly from the company should suffice for your needs. These can be downloaded from the App Store or Google Play. Once installed, simply provide your account credentials and launch your VPN connection. This was my personal choice for many years.
Intermediate: Many VPN apps are closed source. This means that we cannot truly know what the app is doing behind our backs. While most reputable VPN companies have our best interests in mind, we must always be cautious. In 2019, PIA announced they were being purchased by a company called Kape Technologies. Kape has been accused of injecting spyware/malware into its apps in the past, which has worried many PIA users. This is one of many reasons I encourage people to research the Open VPN application. This free opensource mobile app, allows you to configure multiple VPN clients within one location. If you have subscriptions 1 ') more than one service, you can configure each within the app and selec'
the desired provider and server upon each connection. Configuration will require some research, but most VPN companies provide explicit instructions for this option.
Advanced: The downside to the two previous options is that a third-party service is required for your VPN connection. You must install some type of application in order to execute the VPN connections. Another option is to manually configure your VPN through your mobile device's system settings. With iOS, I can sp{/cify the exact VPN details and make a connection without any third-party software. In my experience, PIA refuses this type of connection, but Proton VPN encourages it. At the time of this writing, full instructions were available at https://protonvpn.com/support/protonvpn-ios-manual-ikev2-vpn-setup. This option uses the IKEv2/IPSec protocol, which is built into iOS. Most will agree that Open VPN provides slightly more secure encryption, but it requires a third-party app. IKEv2/IPSec does not require an app, but has slightly weaker encryption.
What should you choose? If the terms Open VPN, IPSec, and IK.Ev2 mean nothing to you, then you should stick with the basic option. It offers a very secure environment, but you may give up a bit of privacy in rare scenarios. Fortunately, both Proton VPN and PIA have made all of their applications completely open-source. This makes it much more difficult to hide malicious programming within the code. If you do not want to install third-party apps and want to use a VPN directly through your mobile operating system, the advanced option may be desired. I encourage you to test them all and learn the protocols. Overall, ANY of these options, while using a reputable provider, beats no VPN at all.
My VPN policy is quite simple, but my opinions about VPN companies can be complex. Any time that I am connected to the internet from my laptop, desktop, or mobile device, I am connected through my VPN. I know that my internet traffic is encrypted and originating from an IP address not associated with me. I never deviate from this policy. I believe that every reader should consider a paid VPN. In a later chapter, I will present a more hardened home solution for a constant VPN in your home. In the next chapter, I share more insight on the use of VPN s for privacy.
What do I use? I rely 100% on Proton VPN through their app on my mobile device and laptop(s) while I am traveling. I trust them more than most commercial options and I believe their business model is the most transparent. Being hosted in Switzerland provides some aspect of privacy from vague government intrusion, but international servers could always be compromised. I only rely on PIA for my home firewall as a catch-all masking service with great speed. I provide explicit details on that later in this book, and any updates in regard to recommendations will be posted on my website at https: / / inteltechniques. com/ vpn.html. Throughout the remaining chapters, I will present much more information about VPN usage and services.
Device Backup and Restoration Crash Course
Once your device is configured exactly as desired, you may wish to make a full backup to an Apple computer. This allows you to easily restore your configuration to a new device if something should happen to your current phone. This has saved me much frustration after a device participated in a full wash cycle while left in a coat pocket. This requires you to open iTunes on your new Apple computer, connect the mobile device via USB, and conduct the following.
- Click the small phone icon in the upper left.
- Click Summary in the left menu.
- Under Backups, click Back Up Now.
If you are using macOS Catalina, you will find this option in the Finder application. The process should be the same. This will create a clone of the operating system and configuration within the iTunes app (or Finder) on the computer. If you do not possess an Apple computer, you could use iTunes installed to a Windows machine. If you want extreme privacy, you could set up a Windows virtual machine on a Linux host, disable all internet access to the Windows VM, install iTunes within the Windows VM, and connect your mobile device to the iTunes installation. Regardless of the way you do this, having a backup of your mobile device will be a huge benefit if you ever need to replicate your configuration onto a second device. This is vital for my clients, as I will not be with them when a disaster happens.
In late 2019, I purchased a new iPhone for myself. Usually, I would make a fresh start with a new Apple ID, but I wanted to test my backup strategy. I turned the device on; chose the iTunes connection option; connected it to my MacBook Pro; launched iTunes; selected the device; and chose the option to "Restore Backup". Within a few minutes, I possessed a new iPhone which was identical to the previous device. All software, configurations, and settings were present. I insist that all of my clients possess a valid backup of their device, ready for easy restoration.
You may have noticed that my iPhone backup and restoration instructions require the Mojave edition of macOS instead of Catalina. I have had many problems with Catalina, and avoid it for now. Upgrading will eventually be unavoidable. Currently, Apple supports Mojave and provides security patches. Catalina blocks any 32-bit applications and enforces aggressive changes in the disk structure. It has "broken" many applications. By the time you read this, Catalina may be old news. I plan to stay on Mojave until it is no longer supported by Apple (likely after 2023).
Secondary Device Crash Course
' Your new private iPhone may be all you need in regard to a mobile device. Most people carry it with them everywhere they go and leave it connected to the mobile network at all times. I believe this is risky behavior and a desire for extreme privacy will require you to take more extreme action. My primary mobile device has never entered my home and has never connected to a cellular tower within five pill.es of my house. While unlikely to happen, it prevents my phone from announcing my home location. If someone did figure out my mobile number, and paid a bounty hunter to locate my device, it would not lead anyone back to my home. The last known location would be a busy intersection with no connection to me. You can accomplish this and still possess a mobile device in your home with all of the communication apps you need with the following instructions.
When I am traveling, my phone is always by my side and is my primary means of secure communications. When I return home, things change. When I am about five miles away from my home, at a very specific location, I drop my device into a Faraday bag. This shielded pouch prevents any signals from reaching or leaving my phone. It stops communications with cellular towers. The device stays in this bag until I am at least five miles from my home heading out on another trip. Since the phone is never connected to any network while near my home, it cannot reveal the location of the device (or my home).
While at home, I can still possess a mobile device for my secure communications. I use an iPod Touch for this. The iPod Touch possesses the same iOS operating system as the iPhone. It connects to my wireless network in the home (behind a firewall with VPN as discussed later) and has internet access. It possesses a unique Apple ID never used on any other device. My secure communication apps, such as Wire, work the same as on my primary phone. MySudo possesses the same telephone numbers for incoming and outgoing calls. Since I do not use any Apple services on either device and rely on trusted third-party applications, Apple does not know that I am the owner of both devices.
The hiccup with this plan is the one-time setup of the communications. In order to replicate an installation of MySudo, and share the same numbers across both devices, both devices must be active at the same time. I must scan a barcode from my primary device with my iPod Touch. Both devices need internet access during this process. Therefore, I set all of this up on public Wi-Fi before taking the iPod Touch to my home. This is a one-time exception.
First, I enable power on the iPod Touch at any library with free Wi-Fi and allow my cellular telephone to be connected to a cellular data connection. I configure everything on the secondary device as needed, which will require access to the primary device to allow these connections. I then "forget'' the Wi-Fi network on the iPod Touch. An optional step here is ·o tell the device to forget all networks, if desired. I then turn it off completely.
Upon arriving home (with my cell phone in a Faraday bag), I connect the iPod Touch to my home Wi-Fi (behind a VPN firewall as explained later) and it never leaves the house again. This t;econdary device replicates all communications options I need. Aside from lack of a cellular-provided number and service, it appears identical to my "phone".
Another issue with this plan is the installation of Signal on the secondary device. Unlike username-based services such as Wickr and Wire, Signal relies on a telephone number. Furthermore, it only allows usage on one mobile device at any given time. However, it provides a desktop application which can be used on multiple machines. Therefore, my secondary mobile device (iPod Touch) does not possess my primary Signal account, but my primary laptop does. I can send and receive text messages over Signal while using this laptop. This prevents me from making calls through my primary Signal account while at home, but it presents an opportunity to introduce people to better communication alternatives. Almost all of my secure calls from home are placed over Wire or Wickr. If a client insists on a call through Signal, I can connect through a secondary Signal account from the iPod Touch. I just need to let them know the call may be coming from an unusual number.
I insist on preventing any devices from connecting to any cellular network while in my home. These connections can immediately identify someone's location. The iPod Touch has no cellular connectivity. It never leaves the home and never connects to any other network. I think of it as my landline which only functions in the home. If you possess an anonymous telephone with prepaid service and an anonymous Wi-Fi only device, both of which have no connection to your identity or each other, you have an amazing layer of privacy protection.
If you go through the troubles of obtaining an anonymous home as discussed later, these steps are vital so that you do not expose yourself. Airplane mode is not enough. System updates often disable airplane mode on reboot. It only takes one accidental connection to create a permanent record of the location of a device. These steps prevent unintentional exposure that could ruin all of your hard work.
Some readers of the previous edition expressed concerns of Apple eliminating the iPod Touch from its lineup of mobile devices. Fortunately, they released a 7th edition in 2019. This device supports the current version of iOS (13). Based on previous support models, I expect the latest iPod Touch to receive support updates through 2023. You should note that all iPod Touch models lack Touch ID, Face ID, 3D Touch, NFC, GPS, an earpiece speaker and a noise-canceling microphone. However, all communication functions work well with a set of earbuds which contain an in-line microphone (such as those included with most older iPhones).
Faraday Bag Selection and Testing
' I insist on thoroughly testing any Faraday bags I purchase. Over the past ten years, I have acquired at least five bags which failed to prevent signals from entering or escaping the sleeve. Some may place their device in a bag, seal it, and call the phone number of the device to see whether it rings or forwards the call to voice mail. I do not believe this is an accurate test as you are relying on the signal strength of ;th_e nearest tower. A test in a rural area may be successful while that same test in an urban city could fail. Also, a failed call due to poor coverage may provide false assurances of the functionality of the bag. Instead, I rely on Bluetooth as my primary signal test. I can control the test better and apply strong local signals. The following is my routine with a $15 small, portable, battery operated Bluetooth speaker.
- Connect the mobile device to the speaker via Bluetooth.
- Play music from the device to the speaker.
- While music is playing, drop the mobile device into the bag and seal it.
- After the previous test, with music playing, drop the speaker into the bag and seal it.
In both scenarios, the audio should stop a few moments after sealing the bag. With some devices, the audio may play a while before stopping due to buffering. Now we should test other wireless signals.
- Connect the mobile device to Wi-Fi.
- Stream an internet radio station from the mobile device through the internal speaker.
- Drop the mobile device into the bag and seal it. The audio should stop.
- Disable Wi-Fi and enable a cellular data connection.
- Stream an internet radio station from the mobile device through the internal speaker.
- Drop the mobile device into the bag and seal it. The audio should stop.
In my experience, a poorly constructed Faraday bag is more likely to block cellular or Wi-Fi signals than nearby Bluetooth frequencies. I have yet to see a successful Bluetooth blocking test reveal that cellular frequencies were allowed. Therefore, Bluetooth is my baseline to detect the function of all Faraday bags. I also believe you should test the other connections as explained above. In my opinion, a Faraday bag should never be used before thorough testing. If your bag begins to show wear, repeat these tests. If your bag does not function properly 100% of the time, there is simply no point in using it at all.
Telephone Usage Crash Course
Now fb.at you have an anonymous telephone and isolated Wi-Fi only "Home" phone, we should have a conversation about usage on both. I believe that we should all use mobile devices as they were originally intended, as a means of necessary communication. I do not believe privacy-conscious people should ever consiq.er a mobile phone as an entertainment device. It should not be used for games, video streaming, or extensive web browsing. We should be very reserved with the applications installed on these clean devices. My two devices are almost identical as far as application presence. While they have unique Apple IDs, the usage and setup are quite similar. Each device contains the following apps.
Telephone: As explained previously, I rely heavily on the MySudo app on both devices. It allows me to replicate my account on my second Wi-Fi device so that I can make and receive calls and text messages from all nine of my profiles and numbers. If you are unable to use MySudo, or prefer to host your own VOIP solution, I explain another strategy in Chapter Sixteen. While everyone will have their own use cases, my partial usage is as follows.
- 1: Personal (Real Name): This is for friends and family who do not use secure communications (telephone only). When they adopt MySudo, I can still use this line for encrypted communications.
- 2: Google Voice Forwarding (Real Name): All of my old Google Voice numbers forward all calls and text messages to this single number (explained later). I can now answer all 35 of my old numbers in case a call should come through. This is beneficial when friends and colleagues from many years ago try to contact me through an old Google Voice number which I have given them. Google knows these were all me.
- 3: Home (Alias Name): This name, number, and email address are unique to anything that involves my home. Utilities, services, maintenance, neighbors, and all housepurchase paperwork connects to this profile. When that line rings, I know to answer as my home alias.
- 4: Business (Real Name): When I need to deal with any business-related phone call, I use this profile. This number has been leaked to business lookup websites. The email address is used for any business-related registration I must complete which will ultimately send me spam.
- 5: PMB (Real Name): You previously learned how a PMB in another state can help create a great layer of privacy. This number is local to the area of my primary PMB and allows me to really "sell" it.
- 6: Social (Alias Name): As mentioned previously, being anonymous does not mean you can't live a normal life. This number is used for any social activities near my home. New friends I meet under my new alias have this number for me.
- 7-9: Due to my own privacy concerns, I will not disclose the specifics of these accoun
Email: I use the standard ProtonMail application and connect my premium account to each device. This allows me to send and receive secure emails from multiple ProtonMail addresses as well as accounts associated with domain names which I own. I explain ProtonMail further in the next chapter.
,
Secure Messengers: The messengers mentioned previously are acceptable on all of my devices. I keep them all ready in case a clidt has a preference.
VPN: My clients all have the Proton VPN app on their devices, but I choose to program my Proton VPN settings manually and use the devices' built-in VPN option. At home on Wi-Fi, I connect to my firewall with forced built-in VPN and a VPN connection is not necessary on the iPod Touch (as explained later).
These apps allow me to communicate securely via email, encrypted text, encrypted voice, encrypted video, and traditional telephone service. I have every avenue of communication covered, and each device allows full use through all of my accounts. The end user does not know which device I am using. My cellular service provider knows absolutely nothing about my activity, only the amount of data used. T-Mobile also has no record of any calls or text messages, and does not know the name attached to the account.
Web Browser: Your choice and configuration of a web browser on your desktop computer is very important. Your options within the Apple iOS operating system are limited. Apple mandates that any third-party browsers rely on its own rendering engine. This means that every browser on an iPhone is still using Apple's code, regardless of the brand. Chrome, Firefox, and every privacy-themed option is· ·still using Apple's internal browser software. However, I believe there are better alternatives than the stock Safari application. I prefer Firefox Focus for all web browsing from my mobile devices. Firefox Focus provides three key features which I find useful.
- Easy History Removal: A trash can is present next to the URL bar at all times. A single click on this icon removes all internet history, search queries, and active pages from the application, This is much easier than opening Apple's Settings menu, scrolling to Safari, and then clicking the "Clear History" option.
- Tracking Protection: Firefox Focus offers embedded tracking protection from various online trackers and analytics. Furthermore, you can allow Firefox to force Safari to share these blocking settings. This way, when an application opens a link within Safari, you have some additional protection,
- Simplicity and Speed: I believe Firefox Focus offers the most simplistic and speedy web browsing experience out of all of the popular options.
Number Porting Crash Course
Now thit you have a new mobile device with new anonymous service, you likely need to make a decision about your previous device and service. You could cancel the account and lose the number forever; keep the plan and check the old device occasionally for missed calls and messages; or port your old number to a Google Voice account. I prefer porting over all other options, but let me explain why before providing instr~ctions.
If your old device is out of contract, you have the right to discontinue service. If it possessed a prepaid cellular account, you can suspend the service and simply stop using that plan. Most readers likely possessed a device with a contract through a traditional carrier. If you are still under contract, it may be more affordable to keep the plan until it expires. If it is a newer contract, it may be more affordable to pay an early termination fee. Regardless, at some point the plan will be discontinued. When that happens, you lose all access to that number. Any incoming calls and messages will be lost, and you will not be able to use that number for any sort of verification process, such as calling your bank to make changes to an account.
Ido not believe you should ever lose a telephone number that has ever been important to you. When you change your number and start providing a VOIP number, such as a MySudo or Google Voice number, it is unlikely you will remember to contact everyone that has your old number. This can lead to missed calls from old friends or lost text message reminders from services you forgot to notify. Worse, someone will eventually be assigned your old telephone number if you do not maintain it. That stranger will start receiving calls and messages meant for you. Think about any time you obtained a new telephone number. You likely received messages meant for the previous owner.· A. mischievous person could have some fun with that.
I will assume that you are ready to port over your old number to a new permanentholding place. If you are out of contract, you are in the clear. If a contract exists, you will be held responsible for any early termination fee. I have found that notifying your current carrier and providing a new physical address as your new home which cannot receive their service is sufficient for waiving any fees. I have yet to find a carrier that can provide service to the following address, in case you find this information to be helpful.
10150 32nd Avenue NW, Mohall, ND 58761
The most important first step is to not cancel your service with your old carrier. If you do this, the number is lost and you have no way to port it over. Your account must be active and in good standing in order to port your number to another service. Once you successfully port the number over, that action will terminate the original account. This may make more sense after we walk through the process together. In the following scenario, you have recently
Number Porting Crash Course
Now that you have a new mobile device with new anonymous service, you likely need to make a decision about your previous device and service. You could cancel the account and lose the number forever; keep the plan and check the old device occasionally for missed calls and messages; or port your old number to a Google Voice account. I prefer porting over all other options, but let me explain why before providing instructions.
If your old device is out of contract, you have the right to discontinue service. If it possessed a prepaid cellular account, you can suspend the service and simply stop using that plan. Most readers likely possessed a device with a contract through a traditional carrier. If you are still under contract, it may be more affordable to keep the plan until it expires. If it is a newer contract, it may be more affordable to pay an early termination fee. Regardless, at some point the plan will be discontinued. When that happens, you lose all access to that number. Any incoming calls and messages will be lost, and you will not be able to use that number for any sort of verification process, such as calling your bank to make changes to an account.
I do not believe you should ever lose a telephone number that has ever been important to you. When you change your number and start providing a VOIP number, such as a MySudo or Google Voice number, it is unlikely you will remember to contact everyone that has your old number. This can lead to missed calls from old friends or lost text message reminders from services you forgot to notify. Worse, someone will eventually be assigned your old telephone number if you do not maintain it. That stranger will start receiving calls and messages meant for you. Think about any time you obtained a new telephone number. You likely received messages meant for the previous owner. A mischievous person could have some fun with that.
I will assume that you are ready to port over your old number to a new permanent holding place. If you are out of contract, you are in the clear. If a contract exists, you will be held responsible for any early termination fee. I have found that notifying your current carrier and providing a new physical address as your new home which cannot receive their service is sufficient for waiving any fees. I have yet to find a carrier that can provide service to the following address, in case you find this information to be helpful.
10150 32nd Avenue NW, Mohall, ND 58761
The most important first step is to not cancel your service with your old carrier. If you do this, the number is lost and you have no way to port it over. Your account must be active and in good standing in order to port your number to another service. Once you successfully port the number over, that action will terminate the original account. This may make more sense after we walk through the process together. In the following scenario, you have recently
purchased a new device, executed new prepaid service, and you still possess your old phone with the original set-vice still active.
As you may recall, I am not a fan of Google products from a privacy perspective. However, Google Voice is our current best option for porting numbers. MySudo would be preferred, but they do not support number porting at the time of this writing. You might look into that option as it could be available by the time you read this. Once we have the process in place, there will be no need to log in to the Google account, and you will never do so from your new clean device. Google will receive information about your communications through their service, but I do not see it as any worse than your previous telephone carrier possessing the same data.
The first consideration is to identify which Google account to use for the porting. If you have never had a Google account, you have no choice but to create a new one. Many people may think that a new account should be mandatory for this procedure, but I have a different view. Google can be cautious when it comes to new accounts. If you create an account from a VPN using a burner email address, Google might find this suspicious and suspend the account until you upload government identification proving your identity. I find this invasive. I respect their need to block usage from spammers, scammers, and other crooks, but I do not want to have my own account suspended. If you already have a Google account established in your true name, and your old phone was also established in your true name, I see no reason why you should not pair these together.
Remember, our goal is to configure a system to receive calls and messages from a number that was already associated with your true identity. Connecting this to a Google account under your true identity does not gain or lose much privacy at this point. I would rather attach your old number to an aged Google account that has very little risk of being suspended due to questionable activity than to connect it to a brand-new account which will be scrutinized by Google.
If you have an old Google account in your name, I suggest using that. If you have no account, I would create an account in your true name. This may sound ridiculous from a privacy perspective, but if it gets suspended, you have a much better chance unlocldng it when you are the person with whom it is registered. It will receive extremely minimal use, and Google will collect very little information from it. Let's get started.
Find your billing account information from your current service provider, such as your account number and PIN. You need this information to complete your port request.
Within a web browser while protected by your VPN, navigate to voice.google.com.
Sign in with your Google account credentials if you are not automatically logged in.
If you haven't used Google Voice on your account before, set up a new Google Voice account. You'll be ptompted to pick a new number, but your ported number will soon replace it, so it won't matter what that number is. You can use your old cell number as your verification number, as it is still active on the old device.
At the top left, click "Menu", "Legacy Google Voice", then "Settings".
Click the "Phones" tab.
Next to your current number, click "Change/ Port".
Select "I want to use my mobile number". Follow the onscreen instructions to set up your new number and pay. Google will charge a $10 fee for the porting. You might be charged a $20 fee to port your mobile number to Google Voice from some mobile service providers, such as Verizon or AT&T. Prepaid credit cards or Privacy.com catds should be accepted for payment without any issue.
Continuously check the status of your numbet potting. Numbets typically take from 48 to 96 hours to port.
Don't cancel your phone plan until Google notifies you the port is complete. To verify the port, they will call your phone with a code. After the port is finished, your service provider will cancel your phone service.
If you have multiple numbers on the original account, check with the service provider first to find out about their policies. If you want to keep the plan and get a new mobile number, confirm that with the service provider.
Once you see your old number which was previously attached to your cellular telephone appear as your new number in the Google Voice account, the porting is complete. Test this by completing the following steps.
- While logged in to your Google account, navigate to mail.google.com.
- Navigate to www.callmylostphone.com and enter your telephone number.
- On the Gmail screen, you should see an incoming call.
There is no need to answer this call, you just want to make sure that the number can receive calls through Google Voice. You are finished with this step. If anyone from your past calls your old number, you have a way to receive notification of the call. This applies to text messages as well. You have control of the number. If you need to make a call from that number, such as to prove your identity to a bank, you can make calls from the Gmail or Voice pages while logged in to the Google account in a web browser. Having the ability to occasionally check the Google account may be all you need. Personally, I do not like logging in to Google products, so I take advantage of their fotwarding options, as explained next.
Number Forwarding Crash Course
I mentioned previously that one of my M ySudo profiles is for Google Voice forwa1·ding. Over the years, I have accumulated many numbers from Google Voice. Some of these are heavily associated with my true name. As an example, I used a Google Voice number when I worked as a Detective at a police department. We were all required to disclose our cell numbers on a callout list, and I only provided a Google Voice account. To this day, I hear from former colleagues through that number. Many of them assume it is my cell number, and I have no need to correct them. While I have moved all of the people with whom I continuously communicate over to better options, this Google number still receives a lot of activity. The following explains how I interact with these numbers without using the official Google websites or apps.
First, let's assume that you are a MySudo user and that you have a profile dedicated to Google Voice numbers. After that, I will present a completely free option. In MySudo, you have a random telephone number of 202-555-1111 and email address of google@sudomail.com assigned to the profile. Any calls to that number will ring your phone through MySudo and incoming emails will be received within the MySudo application. Your telephone carrier and manufacturer will not know of these calls or messages. For extra protection, disable iOS Call Integration within the Calls option in the Settings menu. This prevents calls from appearing in the Apple call history.
- In your web browser, navigate to voice.google.com, click on the left menu, and select "Settings". Your Google Voice number should be the old cell number which you ported into Google.
- The "Linked Devices" section should either be blank or possess the same number as your previous cell number. Remove any numbers within this block by clicking the "X" next to each.
- Add a new linked number and enter the MySudo number mentioned previously (202- 555-1111).
- In the "Messages" section, ensure that messages are forwarded to the Gmail account connected to this profile.
- In the "Incoming Calls" section, ensure that calls are enabled.
- In the "Calls" section, ensure that "Get email alerts for missed calls" is enabled.
- In the "Voicemail" section, ensure that "Get voicemail via email" is enabled.
You may have noticed that Google allows voicemails and missed call notifications to be delivered to the forwarding telephone number. I have found this to be unreliable, and only trust the email option. Let's pause and think about what is in place now. If anyone calls your old number, the call is routed through Google Voice and then to your MySudo number. Your phone will ring as normal and you can accept the call. The caller ID will show the number calling you. If you decline the call, the caller will be sent to your MySudo voicemail. If you simply do not answer, it will be sent to the Google Voice voicemail. If he or she leaves a message on the MySudo voicemail, you will see it within the app. If the message is left within the Google environment, your Gmail account will receive the audio and text version of the call. If someone sends you a SMS text message to this old number, it will be received in the Gmail account as well. Now, let's forward those messages in order to prevent checking the Gmail account at all.
- Navigate to gmail.com while logged in to the account associated with the old number.
- Click the gear icon on the right and select "Settings".
- Click the "Forwarding and POP/IMAP" option in the upper menu.
- Click "Add a Forwarding Address" and enter the email associated with your MySudo profile as discussed earlier (google@sudomail.com).
- Google will send a confirmation email to your account.
- You should now have the option to select "Forward a copy of incoming mail to" and choose your MySudo email address in the drop-down menu. Choose "Delete Gmail's copy" and save your changes.
Now, when someone leaves you a voicemail or sends you a text message to the Google Voice number, it will appear in your MySudo profile and Google will delete the original after 30 days. You can now receive calls, voicemails, and text messages from your old number within your MySudo application without ever logging in to Google again. You can also respond to text messages via your MySudo email address and the recipient will only see the previous cellular number that is now assigned to Google Voice.
It is vital to test all of these options before relying on them. If you have MySudo, test all calling and texting options from another profile and make sure that everything appears as desired. If you do not have MySudo, let's repeat the entire process with alternative options.
- In your web browser, navigate to voice.google.com, click on the left menu, and select "Settings". Your Google Voice number should be the old cell number which you ported into Google.
- The "Linked Devices" section should either be blank or possess the same number as your previous cell number. Remove any numbers within this block by clicking the "X" next to each.
- In the "Messages" section, ensure that messages are forwarded to the Gmail account connected to this profile.
- In the "Calls" section, ensure that "Get email alerts for missed calls" is enabled.
- In the "Voicemail" section, ensure that "Get voicemail via email" is enabled.
If anyone calls your old number, the call is routed through Google Voice and then immediately to voicemail (unless you are logged in to Google Voice via web browser). If he or she leaves a message, your Gmail account will receive the audio and text version of the call. If someone sends you a SMS text message to this old number, it will be received in the Gmail account as well. Now, let's f01ward those messages in order to prevent checking the Gmail account at all.
- Navigate to gmail.com while logged in to the account associated with the old number.
- Click the gear icon on the right and select "Settings".
- Click the "Forwarding and POP /IMAP" option in the upper menu.
- Click "Add a Fo1warding Address" and enter your ProtonMail email address associated with your real name (this will be discussed in the next chapter).
- Google will send a confirmation email to your account.
- You should now have the option to select "Forward a copy of incoming mail to" and choose your ProtonMail email address in the drop-down menu. Choose "Delete Gmail's copy" and save your changes.
Now, when someone leaves you a voicemail or sends you a text message, it will appear in your ProtonMail account and Google will delete the original after 30 days. You cannot receive calls, but will be notified of voicemails and text messages from your old number without ever logging in to Google again. You can also respond to text messages via your ProtonMail email address and the recipient will only see the previous cellular number that is now assigned to Google Voice. Again, this should be tested before actual use.
I have replicated this process across all of my old Google Voice numbers. This may seem sloppy, as Google now knows I am the owner of all of the accounts. My stance on this is that it likely does not matter. Google probably already knows. Their heavy use of browser fingerprinting, analytics, and IP documentation allows them to know when people use multiple accounts. Since I no longer have these numbers as part of my normal usage, I consider them all "burned" and only wish to have the ability to receive any notifications. If you call or text any of my old numbers, my primary device receives the communications through MySudo. I never use these accounts to make any outgoing calls or texts, only incoming content from those that do not know my true number(s).
There is one small annoyance with this plan. You can no longer call out from your old Google Voice numbers unless you log in to a Google account. I try to avoid this. If I really need to place a call, and the caller ID on the other end needs to be an old Google Voice number, I will use FireRTC (firertc.com). This service allows you to create outbound VOIP calls from within your web browser. Accounts are free, and you are limited to one telephone number per account. However, the telephone number assigned to you is not what you will use as your caller identification. When configuring your account, you can choose any legitimate telephone
number as your caller ID. This allows you to appear to be calling from a known Google Voice number if desired.
There are many uses for this service. Imagine that you contact your credit card company in reference to your account. The cellular telephone number that they have on file is your previous Google Voice account that you do not wish to access. For security purposes, they mandate that you contact them from a known number to protect your account. You could change the caller ID within FireRTC to match your previous Google Voice number and repeat the call. This could also be used to prevent unwanted return calls by choosing an outgoing public number such as large library or corporate office. Remember to never use this for anything illegal or to attempt any type of fraud. A proper court order to FireRTC will immediately disclose your IP address and account information. Please be responsible.
Android Options
All of the content in this chapter preceding this point is the advice I present to my clients. While I find iOS the easiest option for a general audience, I respect that there are situations when an Android device is justified. In fact, I have an Android with me during all of my travels, which I will explain in a later chapter. Until then, let's consider a few reasons you may not want an Apple phone.
- Apple has a completely dosed-source operating system. We have no idea what is going on behind the scenes. While I believe it is in their best interest to protect their customers, the entire ecosystem could be one huge piece of malware collecting all of our data for nefarious use.
- You cannot opt-out of the Apple ID requirement when using an iPhone. Installing any apps or updates requires you to possess an account, which documents and stores many details about your device, account email, apps, podcasts, and other usage. This is unsettling, and one reason I insist on purchasing and registering phones anonymously.
- Apple devices are expensive. While you can usually find a decent refurbished model for half of the price as new, you will never find devices cheap enough to be used as true "burners".
I absolutely refuse to use or provide a stock Android mobile device from a major manufacturer such as Samsung or Motorola. The data collection from Google is intense and the stock apps are full of privacy invasions. When I need to use Android, I rely on a custom ram called LineageOS (lineageos.org). Chapter Sixteen provides an example of a complete installation and configuration process.
Linux Phones
In 2020, I saw the emergence of two privacy-respecting Linux telephones from Purism (puri.sm) and Pine64 (pine64.org). Both offer the ability to physically disable the cameras, microphones, and communications hardware. This alone is a huge feature for us. Both devices possess Linux operating systems which provide enhanced privacy and security. On the surface, these devices sound perfect. Unfortunately, this is not the case. Both devices rely on your cellular service provider for calls and communication. VOIP is possible, but extremely limited. Google Voice and MySudo will not work with these devices. At the time of this writing, Wire, Wickr, Signal, ProtonMail, Tutanota, and Fastmail do not support the operating systems. This eliminates the vast majority of features I require in a mobile device. I truly hope that the future presents a scenario where a Linux phone meets all of my needs. Until then, I do not recommend these devices.
Camera and Microphone Blocking
Our mobile phones are designed to make life simple and fun. Most devices possess two cameras and numerous microphones. Selfies, high resolution photos, and speakerphone calls are simple thanks to the hardware present. However, these features can be used against us. Malicious software can enable a microphone or camera without out· knowledge. The most recent iOS and Android operating systems possess protections from this type of misuse, but bad things can still happen. In 2019, Facebook was caught secretly enabling the front camera of mobile devices while users were viewing their feeds within the app. Most social network apps circumvent security software by convincing you to authorize the necessary permissions to access your microphones and cameras. If you possess apps from Facebook, Amazon, and other providers, you will likely find that they all have unlimited access to your microphone and camera. Because of intentional and accidental exposure, I embrace camera and microphone blockers for the devices of all clients (and my own).
Camera blockers are easy. Much like a laptop, you can cover your mobile device cameras with black electrical tape or a dedicated sticker. Both the EFF and Silent Pocket offer reusable stickers designed to block embedded web cameras. The EFF versions may be a bit large for your mobile device, but the Silent Pocket option provides multiple sizes and colors. At a minimum, I encourage people to consider covering the front-facing "selfie" camera, as blocldng the rear camera would also prevent any intentional photos. Due to paranoia, I keep both of my cameras covered until I need to use them, There are sliding metal products which easily enable the camera when desired, but I have found all of these to be poorly made and unreliable.
Microphone blocking can be tricky. Modern iPhones possess four unique microphones, none of which can be easily disabled. If a rogue app or virus began listening to your conversations,
you would never know. The only fool-proof option would be to destroy each microphone, but that would make the device much less usable. Our best consideration is to "plug" the microphones. First, we must understand how microphones are chosen by system applications.
Think about your current mobile device. If you make a call and hold the phone up to your ear, you likely hear the other person through the small speaker near the top. The other party hears you through a microphone near the bottom. If you enable the speakerphone, you now hear the person through the speakers at the bottom. They hear you through the microphones at the bottom. Now imagine plugging in a set of earbuds with an inline microphone. You now hear the other person through your earbuds and they hear you through the microphone within the cable. The operating system of the device detects all of this activity and adjusts the input and output based on your actions. Let's focus on that inline microphone attached to your earbuds.
When you attach any type of headset which includes a microphone, your device detects this and switches the default microphone to the headset. It does not disable the other microphones. It only "listens" to the microphone which is plugged in. Now imagine if the microphone within the headset was broken. If you made a call through these earbuds, you would hear the other party, but they would not hear you. The device is only listening for the microphone plugged into the phone. If you have an old set of earbuds you do not wish to use again, consider the following experiment. Cut the cable directly below the in-Jine micrnphone, but above where the cable splits for each ear. The remaining earbud will still work, but there is no microphone. The phone believes a microphone is present due to the plug structure. The phone enables the missing headphone microphone as the default and no one will be able to hear you on calls. This is the design behind a microphone plug.
Fortunately, you do not need to keep a pair of destroyed headphones plugged into your device in order to achieve these same results. Many companies offer "mic plugs" which virtually disable the working microphones of the device. Figure 2.01 Qeft) displays one of tl1ese options, a standard 3.5mm microphone plug made by Mic-Lock (http://amzn.to/2B6QvXw). This unit is larger than other flush-fitting models, but I have found it to be more reliable. When you plug this device into your phone, it tells the operating system that you just inserted a pair of headphones with an inline microphone. Therefore, it makes this new mic the default option and tells all applications to Jisten to it if audio is needed. Since a microphone does not actually exist within this device, only silence is de1ivered.
Newer mobile devices present another problem. Many do not possess traditional headphone jacks, and only offer a Lightning or USB-C connection. You have a couple of options if you want to block default microphone access in these devices. If you already have an adapter for standard headphones, you could attach a microphone blocker to this adapter, and insert the other end of the adapter into your phone. This should work, but would need to be tested. Alternatively, some microphone blocking companies are now creating plugs for these new connections. Mic-Lock offers a Lightning port to 3.5mm headphone port adapter with the inline microphone disabled. Figure 2.01 (right) displays this device. You plug it into the phone and plug your earbuds into the adapter. The advantage with this unit is that you could wear headphones (with or without a microphone) and disable the default microphone at the same time. The disadvantage is that a long adapter sticks out when only desiring the microphone blocking element, as seen in Figure 2.01 (right).
There are numerous "L-Shaped" and miniature microphone blockers which are much smaller and fit flush to the device. I avoid these for two reasons. First, many of these units unintentionally activate Siri or other apps because they send a virtual "long press" to the device. This causes battery drain and undesired Siri activations. Second, the smallest devices are often lost when removed. The larger plugs are easy to find and control. Also, their presence is obvious and you will know that you are protected.
Obviously, there are ways to defeat all of this protection. A truly malicious app or virus could be configured to ignore a headset microphone and force activation of internal mies. While possible, it is not very likely. I never consider these plugs to stop an extremely targeted attack. However, I believe they are valuable in blocking the common threats from social network apps and shady advertising practices. If you believe you would never be targeted for surreptitious video or microphone monitoring, consider the accidental "butt dial".
Most of us have accidentally dialed someone from our mobile device while placing it into our pocket or a bag. That person can then listen to us without our knowledge. A microphone blocker prevents this unintentional transmission of audio. Have you ever participated in a group FaceTime call or conference chat and accidentally pressed the option to activate your device camera? I lmow I have. Fortunately, my camera blocker stopped any video transmission to the other participants. Hopefully, you will never need to rely on the protection of a camera or microphone blocker. Proper protection eliminates threats and provides peace of mind.
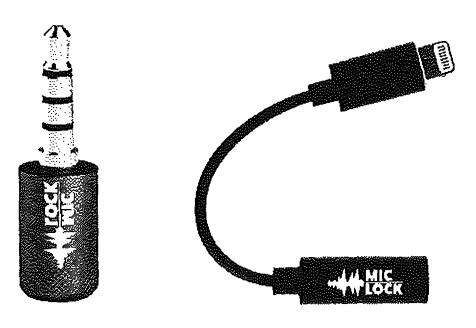
Figure 2.01: Microphone blocking devices.
Mobile Device Firewall
When you launch an application within your mobile device, several network connections are executed. By default, we do not know much about these transmissions. Obviously, communication apps need to connect to servers in order to function. However, what else is happening behind our backs? Is your favorite "privacy app" sending data to social networks without your consent? I was surprised to learn of the number of privacy violations occurring when popular applications where opened. This is the reason I rely on a firewall on all of my devices. Let's start with the iPhone.
Lockdown (lockdownhq.com) is a simple firewall which is free and completely open-source. Installation from the App Store is easy, but the software is not activated upon installation. Enabling the Firewall adds a virtual VPN configuration to your device. This connection intercepts all local network traffic and provides an option to block any undesired transmissions. Clicking on "Block List" reveals various collections of invasive tracking services which are commonly present within mobile applications. This includes tracking URLs from Facebook, marketing companies, and user trackers. My preference is to "Enable" every list. Next, it is time to test.
Open an application on your device, allow it to load, and close it. Open Lock.down and identify the blocked connections within the "View Log" option. This will disclose any suspicious traffic being blocked from that application to the tracking recipient. Repeat the process for each app on your device to discover any concerning activity. Anything you see in the log was blocked by the firewall. When an application attempts to send data to tracldng companies such as Facebook, the transmission is blocked. You can also add any custom domain desired. I allow Lockdown to tun at all times, and visit the log weekly to preview the content being restricted. The additional batte1y drain is minimal without any noticeable impact.
The business model of Lockdown is their paid VPN service visible within the firewall app. I find it to be overpriced and a bit "generic", but I understand the need to make money on that service in order to keep the firewall free. Android users might consider NetGuard (netguard.me) which seems to provide similar protection. It is free, open-source, and does not require "rooting,, in order to function.
Wi-Fi & Bluetooth Tracking
There is a new trend in customer tracldng which concerns me. Many retail stores, shopping malls, and outlet centers have adopted various wireless network monitoring technologies in order to follow customers throughout a shopping area. These rely on your Wi-Fi and Bluetooth emissions from your mobile device. When you enter a store, your signals are collected and stored. As you move around, various sensors attempt to identify your exact
location and length of time within a specific area of a store. If you leave without purchasing any items, you might be tracked by the neighboring store and your pattern is helpful to their customer analytics. This may sound too futuristic, but it happens eve1y day. Random spoofing features being adopted by Apple and Android help with this invasion, but companies always find new ways to track us via the signals our devices broadcast at all times.
My solution to this is simple. The Bluetooth and Wi-Fi signals on my travel phone are always off. If you are using an iPhone, tapping the network options on the home screen will not suffice. You must go to the Settings application and manually disable both Wi-Fi and Bluetooth. Many will resist this, as keeping these connections enabled is very convenient. Your device will immediately connect to your car stereo and switch over to your work Wi-Fi when you enter the building. However, this comes at great risk. As stated previously, my travel phone never connects to any public Wi-Fi (or my home's network). I only rely on the cellular data package and I do not use my device for internet browsing or video streaming. When I want to connect my device to my car stereo, a USB to Lightning cable works flawlessly, and without requiring any wireless signals. Please eliminate any technologies which makes you easier to track.
Pagers
I received my first pager in the mid-nineties. It was amazing. I could be anywhere, and receive a ten-digit number requesting a callback. This sounds archaic today, but the technology was fascinating at the time. This eventually led to alpha-numeric pagers which could deliver full text messages from standalone devices connected to a landline. This may seem unnecessary today, but the technology still exists and pagers are still available. The biggest consumer is the medical industry, where pagers work well when cellular signals cannot reach portions of hospitals. I have had only one client request a pager for daily use, but I lmow of a few people in my circles who continue to carry these devices. I will explain some extreme use cases that may encourage you to investigate further.
The benefit of pagers over cellular telephones is coverage and privacy. Your traditional mobile device is constantly communicating with multiple cellular towers, all of which are documenting your location. Contrary, pagers receive communications without sending an exact location back to the tower. The outgoing message is sent like a "blanket" over the entire coverage area. This also occurs on a much lower frequency, allowing the signals to reach further than a traditional cellular carrier. This is over-simplified, and I am not a pager frequency expert. Overall, pager companies do not know exactly where you are, but can still get messages to you wirelessly.
There are three main types of pagers for our use, and each may have benefits and limitations for your needs. Each of these can possess various protocols for message delivery, and all have security weaknesses. It is common for network penetration testers to intercept pager messages.
Numeric: I can call your pager number, enter a telephone number, your device notifies you of the number entered. I also have the option of leaving you a voicemail message. If I do this, your pager presents your own number to you in order to call it and receive the message.
Alpha-numeric: I can send you a text message via email, internet, or standalone unit. I can also replicate the features of a numeric pager.
Two-way: You can receive messages via the previous options, and an attached keyboard on your device allows you to respond.
My client that desired a pager only required a numeric unit. He was an extremely high-risk target who did not carry a cellular telephone at all times. He subscribed to my Faraday bag usage and only removed his device when he needed to make a call. However, he had concerns about his children. The school was aware of threats made to the entire family, and had strict orders to contact my client if anything suspicious happened. The school possessed the number to his pager, and would leave a message when they needed to reach my client. His wife also had this number. If a voicemail was left on his account, he received notification of this almost instantly. I must confess that I do not possess or require a pager, nor do many people I meet. For those that need extreme privacy and security, it is a viable option.
Summary
Hopefully, you now possess a new phone with absolutely no public connection to you. It has service through a T-Mobile reseller which does not know your true identity. The service is paid through either prepaid cards or your Privacy.com account (explained later). The phone has never connected to any cell towers near your residence thanks to your new Faraday bag. There is no cellular location history associated with your home. Your secondary iPod Touch is the only mobile device used in your home and it possesses a unique Apple ID, while never leaving the house. Your old number forwards to Google Voice and eventually reaches both your prima1-y and secondary devices. This all happens with zero knowledge from your cellular carrier.
All mobile telephones are tracking devices. We can never change that. When there is no association to your true identity, the threat of this tracking is minimized. There will always be a digital trail, but these tactics make you a ve1-y difficult target.
CHAPTER THREE
PRIVATE DIGITAL LIFE
Your computers disclose a lot of details about you, your family, and your interests. The sites you visit can disclose the city where you live. The security of your systems, or lack of, decide whether you will become victim to a ransomware attack or allow a criminal to eavesdrop on your activity. The unpatched applications you use may expose you to automated attacks which tum your computers into senrants for criminal organizations. All of this can be avoided, but not with the stock settings provided to you by default. You must intentionally seek and change many configurations in order to possess true digital privacy. We should start with the primary computers used by anyone in your home or business.
In order to achieve extreme privacy, your choice of computer operating system is very important. My preference for my own use is Linux Debian .installed directly on the computer (not a virtual machine). I always push tech-savvy clients toward a full-time IJnux solution. If you fit into that group, you don't need me to tell you how to set up a Linux machine. Since Linux is often met with great resistance from my clients, and most demand a "traditional" operating system, my second choice is an Apple macOS device. Apple constantly collects user data for their own use, but supposedly does not sell this data to third parties (yet).
Most of my clients are familiar with Mac products, and I believe they possess much better overall security than a Microsoft Windows system. Some clients are stuck in the Microsoft environment and insist on a Windows machine. In the next several pages, I will explain my recommendations for each of these options, and explain each step I take before handing a computer to a client. The only system I refuse to incorporate into a client's new digital life is a Google Chromebook. There is simply no way to achieve any privacy within that operating system.
Similar to the previous chapter, a recurring theme is that a new device is optimal instead of trying to sanitize an existing computer. I briefly mentioned the risks of using recycled or reformatted phones in the previous chapter, but I would like to dive deeper into this concern here. The moment you connect any Apple computer, tablet, or smartphone to the internet, Apple collects all information associated with the Apple ID account (name, address, email, credit card, etc.). Apple then appends this record with the unique serial number of your device, all hardware details, and the IP address of your internet connection. Apple now has a nice dossier on you and your device. This information can be seen by Apple employees, anyone
with a court order requesting these details, or potentially through a data breach at Apple. As you continue use of this product, Apple stores much of your activity such as your desired podcasts, email contacts, wireless networks, and dozens of additional metrics.
If you were to format your computer and start over with an alias name, email, and home address, Apple would still see the unique serial number and have the ability to connect the user accounts together. Microsoft collects similar information through their Telemetry "feature", and Google products are even more invasive. Aside from corporate invasions into our data, I consistently meet clients which have various keyloggers, malicious software, and monitoring applications intentionally installed on their devices by stalkers, former lovers, and other adversaries. Because of this, I always demand that high-targeted clients receive all new computer equipment. I will begin with the most common option I see lately, which is Apple computers.
Feedback from the previous edition of this book was that this chapter is overwhelming. In my previous books, the topics presented here were stretched out over numerous chapters containing explicit details. I have attempted to condense some of these topics for easier digestion. Anything mentioned in this chapter can be further researched online, and you will likely find yourself diving into many new rabbit-holes. Remember, this book is about the advice I present to my clients desiring a complete privacy reboot. This chapter can be taken in small doses and I encourage repeated reading of the information. I present considerations in the following eight categories, with a very brief summary of each.
- New Computer Configuration: This section provides explicit tutorials in order to properly configure a new computer for ultimate privacy and digital security.
- Password Manager Usage: This section explains the importance, installation, usage, and archiving of a locally-stored password manager.
- Account Security: Account hardening with proper two-factor authentication is vital for overall security. The details here will ensure you are not compromised.
- Enc1-ypted Storage: You possess tons of sensitive data. This section explains how to properly protect your photos, videos, documents, and other valuable content securely.
- Web Browser Configuration: Your browser is the most common tool used against you online. Malicious ads, trackers, and other annoyances must be blocked.
- Virtual Private Networks (VPNs): Your internet provider issues you a unique number which can track your online habits. This section stops that practice.
- Email Strategies: While extreme at times, this section explains how to properly (and easily) create unlimited email accounts which all forward to one inbox.
- Travel Considerations: Border crossings, international flights, and other travel presents new challenges to the privacy enthusiast. These considerations should help.
New Apple Computer Crash Course
As stated earlier, my preferred computer for most clients is an Apple macOS device, It is targeted by malicious online attacks much less often than Microsoft Windows, and is considerably more secure than Windows, especially with default settings. Most clients are already familiar with the Mac environment and comfortable with the operating system. The following is my mandatory list of configurations and modifications when issuing a new Apple computer to a client.
Apple ID: When first booting a new or reformatted MacOS device, you will be prompted to provide an Apple ID, or create a new Apple ID account providing your name, physical address, and email address. You have the option to bypass this requirement, but you will be prohibited from using the App Store. This eliminates many software options and disables the ability to update and patch your App Store applications, An Apple ID is NOT required to download and install system updates. I no longer attach an Apple ID to my Apple computer, and I encourage my clients to do the same. If you never associate an Apple ID to your device, Apple has no easy way to store any of the activity to a profile. It also prevents accidental iCloud activation. I encourage you to skip the Apple ID creation process and proceed to the File Vault step in the next pages. You can always add an account later if absolutely required. However, if you know you will need the App Store or iCloud (neither of which I recommend), use the following procedure for obtaining an anonymous account. I repeat the following for clarity. An Apple ID is required for iOS devices, but not macOS computers.
Please note that Apple will store the IP address of the internet connection you use to complete this process. In an optimal scenario, you will be connected to either a public network (such as a coffee shop) or behind a home firewall (as explained later). Ideally, you would never give Apple your true home internet IP address. When I configure hardware for my clients, I occasionally do so from the Apple store where the devices were purchased (with cash). Since there is already a trail to where the computer was purchased, I see no harm in using the instore Wi-Fi to complete the following tasks.
When prompted to provide an active Apple ID, click the "Set up later" option near the top. Confirm this decision if prompted. Apple will then demand a full name, account name, and password. Choose something generic for the full name such as Office Laptop which will also populate a similar username. Choose a strong password which you can remember, but is not in use anywhere else. More details on passwords are provided later.
Next, choose "Customize Settings" and be sure to disable location services and all analytics on the following screens. If prompted, choose to set up Touch ID later. You should now see your desktop and have full access to the operating system. However, you still do not have the ability to update stock apps or download any software from the App Store. In order to do
this, Apple demands that you possess an Apple ID account. If this is desired, open the Safari web browser and navigate to appleid.apple.com and select the Create Your Apple ID option. This following specific process is very intentional.
When you create an Apple ID through traditional methods such as the MacOS installation screen, Apple is very likely to demand a cellular telephone number as part of the process. They will also send a verification text to that number which must be entered to complete the registration. When registering online through their website, Apple usually offers an option to enter a land.line number in lieu of a cell. This could be a direct line at a hotel, library, or other public building. A public number should only be used for an Apple laptop, desktop, 01· iPod Touch, and should never be used as part of Apple's two-factor authentication. You should only use this method when you will never need to access to the number after the initial verification. I do not like that Apple is demanding telephone numbers in order to use their products, but it is the reality in which we live. When forced to create an Apple ID, I choose the following for clients.
- Name: Generic name such as Jane Smith
- Address: Any large hotel address in the country of residence
- Telephone: Number associated with a public landline
- Email: Valid ProtonMail account created exclusively for this purpose
- Password: Secure password generated by a password manager (explained later)
Any time I configure a new machine for a client, I also create a new ProtonMail email address. This free address will only be used in association with the device, and allows me to confirm the address as active, which almost always eliminates any demand for a cellular telephone number. This email address can be used later to register third-party software if needed. I will discuss secure email later, but know that you should have a dedicated account for this purpose.
Once you have your Apple ID account created, use the credentials to sign in to the App Store. This will allow you to update any stock applications and install new software desired. From the System Preferences menu, launch Software Update and allow your system to apply all updates. Next, launch the iCloud utility. Make sure you are NOT logged in to iCloud. If the login process for the App Store also logged you into iCloud, be sure to sign out on the iCloud screen. Since Apple associates all iCloud content to the dossier created about you previously, we will not use their services for any storage. I encourage clients to avoid creating an Apple ID for any computer unless it is absolutely necessary in order to use a specific software application.
You should now have an Apple device which offers full functionality. Apple does not know your identity and you have not provided any personal data through the Apple stock applications. I do not recommend use of the Apple Mail, Contacts, Calendar, iCloud,
Reminders, Messages, Facetime, iTunes, News, Time Machine, or Siri applications. We will use more private and secure options. We only need the core operating system from Apple.
File Vault: The next step I take is to apply full-disk encryption to any new Apple device. This process is extremely easy by opening System Preferences and selecting Security & Privacy. Choose the File Vault option to see the current state of encryption on your device. By default, this is disabled. File Vault is a built-in full-disk encryption utility that uses AES-256 encryption. Enabling FileVault requires you to create a recovery key and gives you two options through which to do so. The recovery key is an emergency, 24-digit string of letters and numbers that can be used as a recovery option should you forget your password. The first option is to store the recovery key in your iCloud account, which is not advised. The second recovery option is the most secure. Your device will display the 24-digit series of letters and numbers. This code is not stored with Apple or in you1· iCloud account. I copy this key, paste it into a TextEdit word processor document, and save the file into an encrypted container, as explained later. Alternatively, you could store this key in your password manager, which is also explained later.
Once you have enabled FileVault's full-disk encryption, your system possesses an extremely important level of security. The entire contents of your computei"'s storage can only be read once your password has been entered upon initial login or after standby login. If I steal your device and attempt to extract your data via forensic process, I will only see unreadable data. By default, every computer's hard drive is ready to give up all of the secrets until you apply full-disk encryption.
While we are in the System Preferences, let's make a few more changes. Back in the Privacy & Security option under General, change the "Require password" option to ''immediately". This will ensure that your laptop requires a password any time you shut and open the lid. Next, choose the Firewall option and enable it. Note that you may need to click the padlock in the lower left in order to make changes. The firewall blocks incoming connections to the computer. This is especially important if you use public networks.
Antivirus: There is likely no need for anti-virus applications on an Apple device, especially if you practice safe browsing habits. I never recommend commetcial anti-virus products for Mac. If you insist on Anti-virus being present, consider ClamA V, an open-source free solution. The following will install Brew and ClamA V to your Mac.
First, you must install a package manager called Brew. This program is very beneficial when there is a need to install programs which would usually already be present on a Linux computer. It also happens to have a pre-configured version of ClamA V ready to go. The easiest way to install Brew is to visit the website brew.sh and copy and paste the following command into the Terminal application (Applications> Utilities> Terminal).
After Brew is installed, type the following commands, hitting "Return" after each line, into the same Terminal application used previously. The first command disables Brew's analytics program, which relies on Google's services.
- brew analytics off
- brew install clamav
- sudo mkdir /usr/local/ sbin
- sudo chown -R \vhoami':admin /usr/local/sbin
- brew link clamav
- cd / usr/local/ etc/ clamav /
- cp freshclam.conf.sample freshclam.conf
- sed -ie 's/"Example/#Example/g' freshclam.conf
These steps will install ClamA V, switch to the installation directory, make a copy of the configuration file, and then modify the configuration file to allow ClamA V to function. You are now ready to update your antivirus database and conduct a scan. Type the following commands into Terminal.
- freshclam -v
- clamscan -r -i /
The first option will download all virus definition updates, and should be executed before each scan. The second option conducts a scan of the entire computer, and will only prompt you with details of found viruses. While it may appear to be dormant, it is working, and will notify you upon completion. All of these commands must be exact. In order to assist with properly copying and pasting these commands, I have created a web page with every step at https:/ /inteltechniques.com/ clamav.
ClamA V may occasionally present a false-positive report of a virus. Do not panic. Research the file on the internet and identify the issues. If you receive reports of malicious files within email, simply delete those messages. Note that the above scans only SEARCH for viruses, they do not REMOVE threats. If you would like to conduct a scan and automatically remove suspicious files, you must conduct a different command. Please note this could be dangerous, and could permanently remove necessary files. I always run a scan, research the threats found, and execute the following scan ONLY if I am confident the files should be removed.
• clamscan -i -r --remove=yes /
The use of ClamA V on Mac and Linux computers is more about preventing the spread of bad files to Windows users instead of protecting your own machine, but viruses do exist for non-Windows systems. I try to scan my entire drive at least once monthly on all machines.
AntiMalware: Windows users are likely familiar with the need for malware-scanning applications. This is not as necessary with macOS, but there is one malware detection application I highly recommend. KnockKnock scans the applications set to persistently run on your machine and verifies they are clean through the online service VirusTotal. If you have malware running on your machine, KnockKnock should detect it (but will not eliminate the threat). Full details can be found at objective-see.com/products/knockknock.html. I run this application weeldy, but I have yet to find anything malicious. However, it has opened my eyes to the number of undesired plugins, extensions, and launch items which are snuck into the operating system without explicit consent. The following explains steps to take in order to execute a scan and remove undesired content.
- Download, install, and open the software. Click the "Start Scan" option in the center.
- Research all extensions, plug.ins, and launch items. Identify anything undesired.
- Click the "show" icon to the right of anything you do not want present.
- If identified as malicious, delete the item. If unsure, rename and move to another location and reboot your machine. This could break any applications requiring the deleted item, but may identify undesired software which is present unknowingly.
Little Snitch: This software, upon first installation, is easily the most annoying application to my clients (and myself), but may provide more privacy than anything else we can install. I already mentioned how Apple constantly collects data from your machine about your usage. Little Snitch can block any outgoing data desired. It acts as an outgoing firewall. Instead of trying to block data from coming in to your machine, it stops data from being sent out. After installation and configuration instructions, I will explain a typical scenario.
- Navigate to https://obdev.at and download the Little Snitch application.
- Launch the program and accept defaults. When prompted, click "Open Security Preferences", then "Allow", and close the "Security & Privacy" window. Your computer will reboot upon successful installation.
- Upon reboot, take the tour of the application. Choose "Alert Mode" and disable the "iCloud Services" option.
If you wanted to be more aggressive, you could have disabled the Apple core services option along with the iCloud Services feature. These two settings block all Apple core services, but may break many things. Since we do not want to use iCloud, disabling that feature is fine, It provides an extra layer of protection in case iCloud should become accidentally enabled. If you choose to block all Apple services, practically every stock application will refuse to connect to the internet, and you will have issues. We can always make changes later. Let's look at a few examples where Little Snitch should allow and block access to specific applications.
First, launch Firefox. You should immediately be prompted by Little Snitch aslcing if Firefox should be allowed to send out data to the internet. We want this to happen, so you should select the default "Forever", then "Any connection", and finally "Allow". You should never be prompted about Firefox again.
Now assume that you want to add information into the stock Apple Calendar. This will only be stored on your laptop, and it should not be synchronized to an Apple server or anywhere else. When you open the calendar app, Little Snitch notifies you that the Calendar is attempting to connect to caldav.icloud.com. Even though you are not logged in to an iCloud account, and you have never asked Apple to sync anything for you, it sends data to their servers many times throughout every day. Little Snitch can block this. When prompted, choose "Forever", then "Any Connection", then "Deny". Little Snitch will quietly block these attempts every time. If you only wish to block the domain connecting to Apple, in case you add your own calendar later, you could select tl1e second option, "Only domain icloud.com", as seen in Figure 3.01 (left).
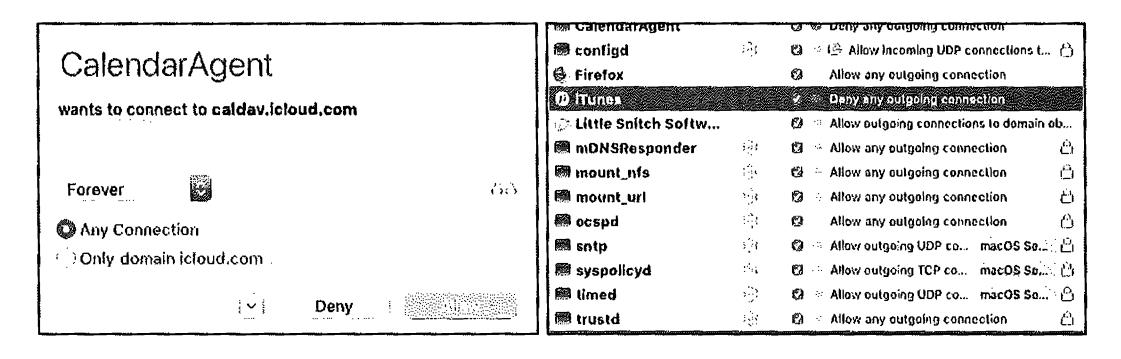
Figure 3.01: Little Snitch menus.
If you click the new menu icon in the upper right of your Desktop, you can select "Little Snitch Rules" and customize every aspect of this software. The window seen in Figure 3.01 (right) highlights my iTunes setting to block all outgoing connections. Double-cliclcing this ent1y opens the options for this configuration and allows me to change the setting or delete the rule altogether. This application requires much time for proper configuration. Once set up, you will possess a more private operating system which shares much less data with Apple and other applications. As another example, I have my Mac set to block all outgoing connections to Microsoft when I open Word, Excel, or any other Office application. Microsoft does not need to be notified about my usage.
Note that this free trial is limited to three hours during each boot. After that time, the software shuts off and you are exposed. If you reboot your computer every few homs, this may work for you, but it is not feasible for most users. I highly recommend purchasing this application, as it is affordable and provides a permanent license. I purchased my own copy under an alias name, and receive nothing to promote this product.
OverSight: Another privacy application from objective-see.com (maker of KnockKnock previously mentioned) is OverSight. After installation, you will observe a small umbrella icon in the upper right menu of your Mac. By default, it is now monitoring for any application which attempts to receive input from sound or video devices. In other words, if a program surreptitiously enabled your microphone in order to capture a conversation, OverSight would display a notification. If an application enabled your webcam, OverSight would let you know. While OverSight is free, a paid alternative made by the same company as Little Snitch is called Micro Snitch, I slightly prefer Micro Snitch over OverSight, but both offer the same features.
Regardless of your technology solution, you should always physically cover your web cam with some type of temporary sticker. You may also consider a physical microphone blocker. I previously explained both of these options. You can find links to these products on the "Links" tab of my website at https:/ /inteltechniques.cotn. Other software I occasionally add to a client's Apple machine is as follows.
Onyx (https://www.titanium-software.fr/en/onyx.html): If your Apple operating system is behaving strangely, Onyx may be able to correct the issue. This maintenance program should not be executed on a schedule, and should be reserved for situations of undesired behavior. On occasion, my fonts become corrupted and my menus become unreadable. Onyx fixes this.
VirtualBox (https://www.virtualbox.org): If a client will ever need to launch a Windows machine, VirtualBox is a free virtual machine software application. It is also valuable for testing other operating systems before committing within a designated computer. I explain my usage of virtual machines in Chapter Sixteen.
MacUpdater (https://www.corecode.io/macupdater): This program scans all installed applications and provides a notification if an update is available. While I do not use the program's feature of automatically updating software on my computer, the notice allows me to manually update any outdated software on my own terms.
Carbon Copy Cloner (https:/ /bombich.com): This is the best full-disk backup software I have found for Mac. It allows me to create a cloned drive of my client's machine, which can be used to restore the computer back to the original state it was in during the clone. The clones can also be used as a bootable drive in case the computer operating system is completely corrupt. This is not traditional file synchronization software, which will be explained later,
New Microsoft Windows Computer Crash Course
Many readers may be more comfortable with the \Vindows environment, and choose it over Apple devices. Most businesses require Windows in order to use specific software or more controlled network management. Some may want a more affordable computer and never consider the overpriced Mac line of products. Regardless of your reason, Windows might be the more appropriate option for you. In my previous books, I presented privacy and security options for Windows 7, which is a much less invasive operating system than Windows 10. Windows 7 will no longer receive support or scheduled security updates as of January 2020. Therefore, I no longer recommend Windows users continue to possess Windows 7 as an operating system. Unfortunately, we must embrace Windows 10.
The good news with Windows 10 is that you can bypass account creation altogether. An active Microsoft account is not required in order to complete the installation and receive important software updates. This eliminates the need to provide Microsoft with your name, home address, and email account. However, there is much worse news. Microsoft's Telemetry service continuously collects the following data, plus numerous additional details, sending it to their corporate servers in Seattle.
- Typed text on keyboard
- Microphone transmissions
- Index of all media files on your computer
- Webcam data
- Browsing history
- Search histo1-y
- Location activity
- Heath activity collected by Health Vault, Microsoft Band, other trackers
- Privacy settings across Microsoft application ecosystem
This data would make it very easy to identify you, your location, and all online activity. Microsoft claims this collection of data is only to enhance your experience. I find this invasive, and I will present options to disable much of the data collection. First, we must complete the installation process. If you have a new computer or are reinstalling the operating system, you will be prompted to choose "Express Settings" or "Customize Settings". Choose the custom option which will present many choices for your new system. Disable each option presented on the screen. This will disable some of the most intrusive privacy violations such as the ability to collect keystrokes as you type and sending usage data to Microsoft.
Your computer should now boot into the account creation screen. Choose the Skip this step option to bypass this intrusion. You must now submit a username. Much like the Apple instructions, I suggest a generic account such as Office Laptop and choosing a strong password which you can remember. If required to provide a "Hint", simply type the word NONE. Your computer should finish the initial boot process. After booting, enter the Control Panel and apply all system updates.
Similar to the Apple configuration, I want to possess full-disk data encryption. My preference for Windows 10 Pro machines is to use Microsoft's Bitlocker. This is a proprietary encryption program for Windows which can encrypt your entire drive as well as help protect against unauthorized changes to your system such as firmware-level malware. If you have the Pro version of Windows 10, you only need to activate Bitlocker in the Control Panel by following the directions, which are similar to the Apple option. Unfortunately, if you have a Windows 10 Home version of the operating system, Bitlocker is not available to you. In this common scenario, or if you do not trust Microsoft to provide your encryption, I suggest using VeraCrypt for full-disk enctyption. The following explains the entire process.
Download VeraCrypt from https://www.veracrypt.fr. Execute the installer and select the "Install" option. You can accept all the default settings in the installer.
Once VeraCrypt is installed, launch the program.
Click System> Encrypt System Partition/Drive in the VeraCrypt window.
You will be asked whether you want to use "Normal" or "Hidden" system encryption. The Normal option encrypts the system partition or drive normally. When you boot your computer, you'll have to provide your encryption password to access it. No one will be able to access your files without your password. The Hidden option creates an operating system in a hidden Vera Crypt volume. You will possess both a "real" operating system, which is hidden, and a "decoy" operating system. When you boot your device, you can enter the real password to boot your hidden operating system or the password to the decoy operating system to boot it. If someone is forcing you to provide access to your encrypted drive, such as a border crossing mandate, you can provide the password to the decoy operating system. In terms of encryption, using "Normal" encryption keeps your files just as secure. A "Hidden" volume only helps if you are forced to disclose your password to someone and want to maintain plausible deniability about the existence of any other files. If you are not sure which you want, select "Normal" and continue.
Select "Encrypt the whole drive" and choose "Single-boot".
Choose the encryption standard of the default setting.
Enter a password. It is very important to choose a strong password which is unique and can be remembered. I will discuss more on this later. VeraCrypt will ask you to move your mouse randomly around inside the window. It uses these random mouse movements to increase the strength of your encryption keys. When you have finished, click "Next".
The Vera Crypt wizard will force you to create a Vera Crypt Rescue Disk image before continuing. If your bootloader or other data ever gets damaged, you must boot from the rescue disk if you want to decrypt and access your files. The disk will also contain a backup image of the contents of the beginning of the drive, which will allow you to restore it if necessary. Note that you will still need to provide your password when using the rescue disk. VeraC1-ypt will create a rescue disk ISO image at C: \ Users \NAME\Documents \ Vera Crypt Rescue Disk.iso by default. You can either create a CD using this image, or simply save the ISO in case of emergency. Note that the file should be saved somewhere other than the drive which is being enct-ypted.
When prompted for "wipe mode", choose none, especially if this is a new computer,
VeraCrypt will now verify everything is working correctly before it encrypts your drive. Click "Test" and VeraCrypt will install the VeraCrypt bootloader on your computer and restart. If Windows doesn't start properly, you should restart your PC and press the "Esc" key on your keyboard at the VeraCrypt bootloader screen. Windows should start and ask if you want to uninstall the VeraCrypt bootloader.
Enter your VeraCrypt encryption password when your computer boots, Sign in to your device when the normal welcome screen appears. You should see a "Pretest Completed" window. Click the "Encrypt" button to actually encrypt your device's system drive. When the process is complete, your drive will be encrypted and you'll have to enter your password each time you boot your computer. If you decide you want to remove the system encryption in the future, launch the VeraCrypt interface and click System > Permanently Decrypt System Partition/Drive.
After successfully encrypting your drive, you now possess a huge layer of security. If I steal your device, I cannot access your content without the password. If I remove the hard drive and connect it to a secondary forensic machine, I have no way of reading the content. This process may seem like a hassle, but the benefits are worth the effort.
Windows absolutely requires some type of anti-virus solution. I prefer the default Microsoft Defender over any commercial options. Some will say this is recldess as Microsoft Defender collects user data and submits it back to Seattle. This is true, but no more invasive than the other data collection which is default with Windows 10. Basically, Microsoft already knows what you are doing. Microsoft Defender has less overhead than most commercial solutions; it is completely free; it is included with Windows 1 O; it automatically applies updates from Windows; and it is designed specifically for threats toward Windows 10. Therefore, I prefer it over anything else for Windows 10 users. The default settings are acceptable.
In previous books, I recommended a cleaning application called CCleaner. I no longer use this product because of some unethical practices of its owner Piriform. Some versions of CCleaner contain Ad-ware which has been accused of collecting user metrics. My preference today is to use BleachBit (bleachbit.org). BleachBit is very similar to CCleaner, but can be a bit more aggressive. I select all available options with the exception of "Wipe Free Space". Choosing this would ove1write all free space on the hard drive which is time consuming. BleachBit removes leftover internet history content, temporary files, and many other types of unwanted data. I execute this program weekly.
Next, I strongly advise users to attempt to minimize the amount of data Microsoft collects about your computer usage. I already explained a few options during the installation process, but there is much more content which needs blocked. There are many free utilities which assist with this, but I have found O&O Shut Up 10 to be the most effective and current. Download the latest version at www.oo-software.com/ en/ shutup 10 then install and launch the software. You will see many individual options which can be enabled or disabled. A red icon indicates that feature is disabled while green indicates enabled. The wording can be murky. In general, anything red indicates that data about that topic is being sent to Microsoft while green indicates the service is blocked. As an example, the first option states "Sharing of handwriting data disabled". The default option is disabled (red). Switching to green tells us that this threat is disabled, and we are protected.
Some may want to play with each individual setting. Most choose a pre-determined level of privacy. In the Actions option at the top, you will see three categories of "Recommended", "Recommended and somewhat recommended", and "Apply all settings". The first option is very safe and applies normal blocking such as disabling advertisement IDs. The second option is a bit stricter and blocks everything except automatic Windows updates, Windows Defender, and OneDrive. The last option blocks everything possible. My preference is to select the "Recommended and somewhat recommended" option, and then enable the Microsoft OneDrive Disabled option. This leaves updates and Defender running.
After you have made your selections, close the program and allow Windows to reboot. Open the application again to make sure your desired settings were maintained. Every time you update the Windows operating system, take a look to see if you need to re-enable your choices here. If you ever have troubles because of your level of protection, you can reverse these changes any time from within the application.
If you want to replicate the abilities of Little Snitch on Windows, check out Glass Wire (glasswire.com). If you want to scan for software updates, consider Patch My PC (patchmypc.com). Since I encourage clients to avoid Windows if possible, I do not provide a tutorial for either application here. I find these useful, but both feel like bandages blocking holes on a sinking ship. Hopefully, you now possess a system with full-disk encryption, an anti-virus solution, a software update policy, and an overall hardened configuration for your daily needs. These basic tutorials will likely apply to over 95% of this audience. I rarely meet a client willing to ditch Apple or Microsoft completely. However, I refuse to complete a section about new computers without promoting Linux as a primary opemting system.
New Linux Computer Crash Course
In 2018, I switched to Linux full-time, and now only use an Apple machine for production (generating press-ready PDF files, website management, recoding training videos, and other tasks which are more difficult on Linux). My daily driver is a Debian Linux machine. However, that is not my recommendation for those new to Linux. If you have a strong opinion of one flavor of Linux over another, I respect your choice and you do not need the following tutorial. If you are new to Linux and desire a version which may provide an easy transition, I recommend Ubuntu. I can hear the sighs coming from tech-savvy readers who disagree, but consider my reasons.
- Ubuntu allows easy access to software packages in a graphical interface.
- Ubuntu has some of the highest compatibili~, with existing computers.
- Ubuntu provides easy software update options.
- Ubuntu has a large portion of Linux users, and online support is abundant.
- Ubuntu has fewer driver issues than other systems when adding new hardware.
If you are using ANY version of Linux instead of Microsoft or Apple, you are probably achieving better privacy and security in regard to your digital life. Unlike Apple, Linux does not require an online user account in order to use core services and upgrade applications. Unlike Microsoft, Linux does not demand personal usage data. Unlike both commercial options, Llnux is open-source, and the code is vetted by many professionals before each release. If you are interested in achieving extreme privacy, I hope you will consider Linux as your primary computer. The following tutorial will create a new Linux machine with slight modifications for privacy and security.
- Navigate to https:/ /www.ubuntu.com/ download/ desktop and download the latest Long-Term Support (LTS) Desktop version. At the time of this writing, it was 20.04. This will save a large ISO file to your computer.
- Visit https:/ / tutorials.ubuntu.com/ tutorial/ tutorial-how-to-verify-ubuntu and verify the download based on your current operating system. This is optional, but important. This will confirm that the version you downloaded has not been intercepted, potentially possessing undesired software. If this sounds unnecessary to you, research the Linux Mint hack of 2016 when this exact scenario happened.
- Create a bootable USB device from the ISO file.
- If on an Apple computer, download Balena Etcher (https://www.balena.io/etcher/), launch the program, select the ISO, select the USB drive, and execute the "Flash" option.
If on a Windows computer, download Etcher as mentioned above or Rufus (https://rufus.akeo.ie), install and launch the program, select your USB device and select the ISO file using the small button in the lower right. Execute the creation.
You should now possess a USB device which is ready to install Ubuntu Linux onto a computer of your choice. If you have an old unused computer collecting dust, that is a great opportunity to try Ubuntu without committing heavily. If you only have your primary machine, you may be able to "dual-boot" both your current operating system and Ubuntu. There are numerous online guides for this. For our purposes, I will assume you are installing Ubuntu as a primary (and only) operating system directly to a machine. I have successfully installed Ubuntu on practically every Windows or Mac machine I have seen. If you are considering purchasing a new machine specifically for Linux, I highly recommend System76 (system76,com). All of their laptops have the Intel Management Engine disabled. This tiny operating system within the firmware of the processor could potentially allow unrestricted, and unknown, remote access to your machine. There is much debate about the likelihood of this happening, but I welcome the paranoia. I use a System 76 machine as my daily driver. This is NOT a paid endorsement, and I purchased the machine myself (through anonymous payment of course). The following will install Ubuntu Linux to your machine and harden the settings.
- Insert the USB device and power on the computer. If the device is not recognized, research the appropriate option to select a boot device for your computer.
- On the Welcome screen, select your language and choose "Install Ubuntu".
- Choose "Normal Installation" and check both download options under "Other".
- If you no longer need any data on the drive inside your computer, choose "Erase disk and install Ubuntu". This will destroy any data present, please be careful.
- Select both "Encrypt the new..." and "Use LVM..." on this screen.
- Enter a strong password which you can remember and is not in use anywhere else.
- Choose a location in your time zone, provide a generic name such as "Ubuntu Laptop", and select a password. If desired, it could be the same as the password chosen to encrypt the operating system. For ultimate security, it could be different. You will need both passwords upon each boot.
- Click "Install Now" and "Continue". Allow the installation to complete.
- Click "Next" twice on the welcome screen.
- Select "No, don't send system info", "Next", and "Done".
- If you receive a notice about updates, click "Install Now" and allow to reboot.
- Upon reboot, click the nine dots in the lower left, and open Software Updater. Verify the computer is up to date.
You now possess a full Ubuntu Linux installation. Right away, you are very private and secure, but I always make a few modifications before introducing Ubuntu to a client. The first priority is to remove the Amazon Launcher and all traces of Amazon from the machine. Ubuntu receives a kickback when Amazon is used within this operating system, and I do not tolerate that type of forced-tracking. Ubuntu claims they cannot see purchase data, but the software is still unnecessary and invasive.
- Click the nine dots (lower left) to open the applications menu.
- Scroll down to "Terminal" and click it.
- Enter "sudo apt purge ubuntu-web-launchers", and provide password.
- Enter "y" when prompted for confirmation.
This completely removes the Amazon package and provides a small additional layer of privacy.
AntiVirus: This is optional, but an occasional scan for viruses is not a bad thing. Similar to Apple, I install ClamA V, but the directions are substantially simpler.
- Open Terminal and enter "sudo apt install clamav clamav-daemon".
- Confirm installation with 'Y',
The commands to update and scan are identical to the Apple tutorial.
- sudo freshclam -v
- sudo clamscan -i -r /
- sudo clamscan -i -r --remove=yes /
System Cleaner: Similar to Windows, I recommend BleachBit as my daily system cleaner. Type the following into Terminal to install the application.
• sudo apt install bleachbit
Clicl<lng the nine dots in the lower left will present two BleachBit applications. The second icon executes the software with administrative privileges and is the option I choose. Upon first launch, click "Close" to accept default configuration. Similar to Apple, I select eve1y option except the "Free disk space" feature.
You can customize the Ubuntu interface any way desired. I like to remove unnecessary icons from the favorites bar (left) and add more appropriate options. I also change the wallpaper and screen saver to a solid dark colot. Play with these features to find your preferred look. If you desire a program similar to Little Snitch for Linux, you can research Open Snitch. I have
tested this software, but found it unnecessary. Linux does not collect information in the same way Apple does, and most applications I use on Linux do not send data without my knowledge. Your level of paranoia may demand this free application.
You should now have a very stable, and very secure Linux operating system. The entire disk is encrypted, and you possess basic settings which will prevent most online attacks. Using Linux instead of Windows will dramatically decrease the likelihood of a virus impacting your usage. Many clients believe they cannot work in Linux because it does not offer some premium software applications. Some are surprised to discover that the vast majority of their usage is within a web browser, which they find faster in Linux than other options. Regardless of your choice of Mac, Windows, or IJnux, you are only as secure as your online habits. Linux is not a silver bullet which allows you to let your guard down while online.
Password Vulnerabilities
In 2018, I had a client that kept getting "hacked". Someone was accessing her email, calendar, and private messages. Changing her password never helped much, and her stalker was showing up any time she had plans with her friends. Her mistake was the use of recycled passwords. She had a single word that she liked to use, and simply added the name of the website after it. If her word was "privacy", her passwords were "privacyfacebook", "privacygmail'', and "privacyapple". It was easy for her assailant to access her accounts. He knew the main word in her password because of data breaches.
There are thousands of breached databases floating around online, and you are likely in one or more of them. Searching your own email addresses or usernames on websites such as haveibeenpwned.com may reveal the places you are exposed. However, none of these sites reveal the password. For that, you would need to collect the breaches yourself or pay for one of the premium lookup services. Most popular and known data breaches can be found online easily, including the plain text passwords associated with each.
For our purpose, it will not matter whether you are exposed. Assume that all of your passwords have been compromised. During an initial visit with a client, I determine the important sites which will need to be accessed, and begin the process of changing every password in his or her digital life. This will require a password manager.
This is where I try desperately to avoid a debate about which password manager is best. Simply choosing a side of offline or online managers is likely to get me in trouble quicldy. Remember, we want extreme privacy and security. Therefore, all of my clients in immediate danger transition to an offline password manager, specifically KeePassXC.
Password Manager Crash Course
KeePassXC is an open-source password manager that does not synchronize content to the internet. There are many convenient online password managers that are secure and keep all of your devices ready for automated logins. Those are great for entry-level security, and millions of people are safely using them. It is not enough for our needs. Furthermore, I believe that my clients should choose an individual machine for sensitive account access, eliminating the need for synchronization between devices. My clients all receive a tutorial on KeePassXC.
KeePassXC is cross-platform and free. It will work identically on Mac, Windows, or Linux. Download the software from https:/ /keepassxc.org, and conduct the following as an exercise.
- Launch KeePassXC and select Database > New Database.
- Provide a name to your new password database, such as Passwords.
- Move the encryptions settings slider completely to the right and click Continue.
- Assign a secure password which you can remember but is not in use anywhere else.
- Click Done and select a safe location to store the database.
- Close the program and verify you can open the database with your password.
You now have a secure password manager and database ready for use. Assume you are ready to change the password to your email provider. Navigate to the menu which allows change of password for your provider. Next, conduct the following within KeePassXC.
- Right-click within the right column and select New Group.
- Name the group Email and click OK
- Select the Email group on the left menu.
- In the right panel, right-click and select New Entry.
- Provide the name of your email provider, username, and URL of the site.
- Click the black dice icon to the right of the Repeat field.
- Click the eyeball logo underneath the black dice logo.
- Slide the password length slider to at least 40 characters.
- Copy the generated password and paste into the Password and Repeat fields.
- Change your email password to this selection within your email provider.
- Click OK and save the database.
You successfully created a new, secure, randomly generated password for your email. You will not remember it, but your password manager will. From this moment forward, you will change every password to any site that you access upon logging in. The next time you log in to your secure sites, change the password. Allow your password manager to generate a new random password containing letters, numbers, and special characters. If the website you are using allows it, choose a password length of at least 50 characters. When you need to log in, you will copy and paste from the password manager. For each site which you change a password, your password manager will generate a new, unique string. This way, WHEN the site you are using gets breached, the password collected will not work anywhere else. There should be only a handful of passwords you memorize, which brings us to the next point.
The password to open your password manager should be unique. It should be something you have never used before. It should also contain letters, numbers, and special characters. It is vital that you never forget this password, as it gives you access to all of the credentials that you do not know. I encourage clients to write it down in a safe place until memorized.
Finally, it is vital to make a backup of your password database. When you created a new database, you chose a name and location for the file. As you update and save this database, make a copy of the file on an encrypted USB drive. I will explain more about this later, but be sure to always have a copy somewhere safe, and not on the internet. If your computer would completely crash, and you lose all of your data, you would also lose all of the new passwords you have created. This would be a huge headache. Prepare for data loss now.
Personally, I keep my KeePassXC database within an encrypted VeraCrypt container within a laptop drive with full-disk encryption. I then backup this entire drive to an external hard drive with full-disk encryption. This external drive is left with a trusted friend who could ship it to me if ever needed. Without knowing the passwords to the encrypted drive, VeraCrypt container, and KeePassXC database (all unique), this drive is useless. These three passwords are the only passwords in my life I keep in my memory.
If you want integrated browser support, KeePassXC has this option. You can install the browser extension into Firefox (addons.mozilla.org/ firefox/ addon/keepassxc-browser/) or Chrome and easily populate passwords into websites without leaving the browser. I believe this is safe, and that passwords never travel over the internet from the app, but I do not use it. I believe that copying passwords into websites should be a deliberate act that requires effort. I don't want a machine doing this for me. However, many clients insist on having this convenience, Therefore, let's walk through the process.
Once you have KeePassXC installed, configured, and in possession of your passwords, install the KeePassXC Browser extension into the browser of your choice (I prefer Firefox).
In the "Preferences" or "Options" of the KeePassXC application, click the "Browser Integration" option in the left menu. Select the "Enable browser integration" option and select your browser.
Return to your browser and open the KeePassXC Browser menu. Choose to connect to the database, and authorize this connection within the KeePassXC application. Provide a name, such as "Firefox", in order to identify this pairing.
If desired, select the "Never ask before accessing credentials" option in the Advanced menu of the Browser Integration menu within KeePassXC. This will prevent the application from requiring your authorization for every website you visit.
You should now be able to populate passwords for various websites directly within the browser. Note that the URL field within an entry on KeePassXC must contain the exact address of the login page of the site you arc visiting. This will take some tweaking over time, but will eventually provide a seamless experience within the browser. Remember, the benefit of this scenario is that your password database never leaves your computer. It is never stored online anywhere.
The concern I often hear from clients is how they should sync their offline database to their other devices. While you could copy the database and manually sync it to other computers and mobile devices, is that really necessa1y? My stance is that you should only log in to sensitive accounts from a single trusted computer. My primary laptop possesses my KeePassXC program and database. This is the device I use when I need to log in to an account of any type. I never log in to anything from my phone(s) or other devices and computers. I realize this is limiting, but I also remind you that we are only considering extreme privacy techniques. If you insist on possessing your password database on a mobile device such as an iPhone, I recommend Strongbox (https:/ /strongboxsafe.com).
Strongbox is a free iOS application with premium purchase options. The free version allows you to open any KeePassXC database on your mobile device, and copy passwords from it into other applications, such as your browser. There are two big advantages to this scenario. Obviously, you have the convenience of passwords being present on your mobile device. This allows easy login to various apps and websites. Second, it provides a backup in case of corruption on your primary device, such as a laptop. Once you have Strongbox installed on your mobile device, the following steps will copy your database over.
- Connect your iPhone to a laptop with iTunes.
- Launch iTunes and click on the device icon.
- In the left menu, click "File Sharing".
- Select Strongbox in the right window and click the "add" button.
- Select your KeePassXC database and click "Add".
- Close iTunes and disconnect your device.
You can now open Strongbox on your mobile device and access your KeePassXC database. You will need to supply the password to this database each time you open it. You can make this easier by allowing your biometrics options, such as a fingerprint, to automatically log you in, but this is a paid feature. While convenient, it adds more risk. Changes made to your primary database on your laptop will not be applied to this mobile version. You would need to replace the mobile version with a new copy on occasion.
There are numerous customizations you can make within Strongbox. The most important option for my clients is to make the database read-only. This is to ensure that they do not accidentally modify this database and present a conflict between their database on their laptop. They should only make changes on that primary database, and consider the iOS version as a read-only backup. If you want to replicate this, click on the "Database Management" option in the lower left of the KeePassXC database, and enable the "Open as Read-Only" setting.
Again, I want to stress that browser extensions and mobile solutions are optional. In a perfect scenario, you do not need access to your passwords on a mobile device or within automated browser extensions. Only you can decide the balance of security versus convenience which is best for you. If these conveniences are required to ensure you use a password manager for all of your accounts, I believe they are justified. If you can get by without them, even better.
The attraction to online password managers such as Lastpass and Dashlane is the ability to sync the password database to all devices over the internet without manual interaction. I understand the benefits of these features, but it also comes with risk. All reputable online password managers encrypt the passwords locally on the user's device before syncing with their own servers. Theoretically, no one at the password manager company would have the ability to see your individual passwords. However, nothing is hack-proof. It is only a matter of time before something goes wrong.
By keeping your passwords in an offline database such as KeePassXC, you eliminate this entire attack surface. However, I respect that some clients do not want to apply the time and effort of maintaining a secure password database locally. If you insist on using a cloud-based password manager, I highly recommend Bitwarden (https://bitwarden.com/).
Bitwarden is open source software with all of their source code free for anyone to review. They have been audited by reputable third-party security auditing firms as well as independent security researchers. While nothing is bullet-proof, I believe this is the most secure option for an internet-based solution. Bitwarden does not store your passwords in plain text. It stores encrypted versions of your passwords that only you can unlock with your master password. Your information is encrypted locally on your device before being sent to their cloud servers. Most of my clients rely on the free version of this product, but advanced users may require a paid tier. Installing the Bitwarden application on all of your devices simplifies the synchronization of your database. It eliminates the headaches of manual updates.
Creating and storing secure passwords through Bitwarden, or any other online service, should be similar to other password managers, such as KeePassXC. Due to constant user interface updates, I will not present detailed usage instructions. It is vital that you feel comfortable with the application you choose, and that you understand how to update and save any changes.
If you choose to rely on an online password manager, be sure to export all of your data on occasion. If the service should shut down, terminate your account, or experience data corruption, you might find yourself in a bad situation. If using Bitwarden, the following steps will download an offline copy of your passwords.
- Log in to your web vault at https:/ /vault.bitwarden.com.
- Click "Tools" in the top navigation bar.
- Click "Export Vault" under the side navigation.
- Choose a file format, type in your master password, and click "Export Vault".
I recommend placing your backup within your VeraCrypt protected container. In the worstcase scenario, you could import this backup into another password manager solution and have the ability to access all of your accounts. I have had three clients who lost access to their passwords through their online password managers and had to attempt password resets through every account. A backup would have prevented this frustration.
Again, I do not use cloud-based password managers, and I encourage my clients to avoid them, but I respect those who require this level of convenience. ANY reputable password manager is better than none at all. Regardless of the password manager route you choose, you want to slowly change all of the passwords you use to unique, random replacements. This does not need to be done overnight, but I encourage you to start with the most important accounts such as your primary email addresses and any online calendars.
Make sure you are using a trusted device, such as your new laptop, while making these changes. If you change all of your passwords from your old Windows machine which possesses a keylogger or other malicious software, you could be sending your changes to an adversary . .Also, make sure you are on a secure network. Never change passwords while on public Wi-Fi. In a moment, you are going to be switching to new accounts, but it is vital to protect any of the old accounts before moving on.
Two Factor Authentication (2FA) Crash Course
You are likely already using some form of 2F A without asking for it. Have you ever logged in to a financial institution website and then be told to check your email for a code? That is 2F A. It is something you know (such as a password), and something you have (such as access to your email address or cell phone number). It is vital to enable 2F A anywhere possible. This includes banks, email accounts, social networks, credit card companies, and sometimes software applications. 2FA is mostly associated with receiving a six-digit temporary code via text message any time you need to log in to an online service. This is actually the least desired method. My preferences, in order, are the following.
Hardware Token: I use a Yubikey (yubico.com) daily. This small device which plugs into my USB port is required before I can access my business email and other sensitive accounts, When I log in to a website set up for 2F A through Yubikey, the site waits until I touch my finger to the device, which sends a one-time code to the service. The online site confirms the correct Yubikey was used and provides me access to the service. Without the presence of this physical USB device, I cannot gain access to my accounts. The configuration instructions for adding a Yubikey to any online service varies, but you should find instructions on the appropriate websites for each service.
Software Token: If a service does not support a hardware token, then I prefer using Authy (authy.com) as my software-based 2FA. I choose Authy over open-source options simply because it is easier on my clients. I have learned that mal<lng anything overly complicated will result in lack of use. I do believe that options such as FreeOTP are possibly more private, but they are more difficult to use on multiple devices. Authy works on macOS, Windows, iOS, and Android, and you can use a tempora1-y code from any device at any time. The following explains my method of configuring Authy for a client.
- Download the Authy application to both the new laptop and new iPhone.
- Through the iOS app, create a new account with the Authy service.
- Under Devices (lower right) enable Allow Multi-Device.
- Open the desktop Authy app and follow instructions to connect to an account.
- Once you successfully have Authy working on both devices, disable Multi-Device.
You can now add any services you use which allow a software-based 2FA. When configured properly, you will log in to a service and it will prompt you for a six-digit code. Opening Authy on either device will present a new code every thirty seconds. Entering that code completes the login process. You will likely find the necessa1-y instructions within the security options of each service. You can also visit authy.com/ guides for details about the most popular services.
SMS Token: If an online service you use only supports 2FA via a text message, it should still be used. While not optimal, it is better than no protection at all. I never recommend using your cellular number provided by your carrier, as it is prone to SIM swapping attacks. Instead, I use Google Voice. Th.is may seem surprising due to my criticism of Google's privacy policies, but their security is top-notch. Their Google Voice service is free and can be protected by a hardware token, such as a Yubikey.
- Create a Google account or preferably use an account already active.
- Navigate to google.com/voice and request a new number (if you do not have one).
- When prompted, provide a landline number for verification, such as an office number.
This will provide you unlimited use of a new virtual telephone number. You can provide th.is new Google Voice number whenever prompted for a 2F A option within an online service. Be sure to secure the Google account with a hardware or software token, preferably a Yubikey. If you set up your phone as mentioned previously, the codes will be sent to your email as you request them. Some readers of the previous edition of th.is book expressed concern over the ability of companies to track us through use of a single hardware token (Yubikey) across multiple accounts. This is a valid concern if you are using the One Time Password (OTP) option of Yubikey, but not a big concern if using the more secure Universal 2nd Factor (U2F) option. I will explain each.
OTP provides a unique code every time you touch your Yubikey. You can test th.is while within a text processing application. Every time you activate the Yubikey, a new line of data is entered. However, the first 12 characters are always the same and represent the serial number of the Yubikey. This is concerning, as it could associate two accounts with the same device; therefore, associating multiple accounts to the same individual (you). It could also leak your Yubikey serial number upon accidental touch during a text conversation or make you slightly more prone to a phishing attack when someone attempts to steal a valid token in order to access your account. However, most sites do not use OTP today. If they do, they also offer a U2F option.
U2F creates a unique challenge and response each time it is configured for an account. There is no static line of text which can be misused. Google, Twitter, and others offer hardware token service through U2F only. Therefore, using the same Yubikey within multiple Google accounts does not clearly connect them to each other. Always look for a U2F option when registering a Yubikey with a service. If no clear protocol is identified, do your research.
The bottom line is that ANY 2FA is better than NO 2FA. Practically every"hacking" scenario which happens to a client could have been preyented by using 2F A. Hardcore privacy and security enthusiasts should look into the OnlyKey, which is explained toward the end of the book. While I use one, I have yet to have a client commit.
Encrypted Storage & Backup Crash Course
I mentioned encryption earlier, and it has been a popular hype word over the past few years. Encryption can mean many things, depending on how it is applied. Previously, we applied full-disk encryption to the entire drive of the computer. In this section, it refers to software encryption on a physical device, such as a USB drive. This works by automatically converting data on a drive into a form that cannot be understood by anyone who doesn't have the password to reverse the conversion. Without the proper password, the data remains inaccessible. This is extremely important in case you lose a device, especially a portable drive used as a backup. If I steal your USB device, and you did not apply encryption, I can access all of your files without the password to log in. If you encrypted your data, I cannot extract anything. I apply the following backup and encryption practices for the removable devices for each client.
I first choose a backup device appropriate for the situation. For most clients, I choose a SanDisk Ultra Fit USB drive. These can be easily found in 16GB, 32GB, 64GB, and 128GB options, and I choose the largest possible. These are small and reliable. If my client only needs to access this device on an Apple computer, then I apply FileVault encryption to the USB device as explained previously. If my client needs access to this drive on a non-Apple device, I create an encrypted container through VeraCrypt by conducting the following.
- Click "Volumes" > "Create New Volume" > "Create an Encrypted File Container".
- Choose "Standard VeraCrypt volume".
- Click "Select File", choose a name such as "Backup", and select your USB device.
- Click "Save" > "Next" > "Next".
- Enter the volume size lower than the specified limit (round down to nearest number).
- Choose a strong password for this container and click "Next" > "Next" > "Next".
- Move your cursor randomly as the pool completes. When finished, click "Format".
You now possess an encrypted container on a USB device. You can store anything within this container once it is mounted. To do this, open VeraCrypt, click Select File, choose the "Backup" file on the USB, select Mount, enter the password, and you should see that container as a new drive on your computer. Now that the device possesses an encrypted container ready for storage, we need to establish a backup solution. I prefer an open source solution rather than proprietary offerings from Apple or Microsoft. For my clients, I recommend Free File Sync (freefilesync.org). This site possesses free tutorial videos which demonstrate usage better than I can explain in a couple of paragraphs. Always understand your backup solution before relying on it.
The vital lesson here is that you should have a backup strategy which involves encrypted data. Backup anything important often, and only backup to an encrypted drive. If, or more likely when, this USB device is lost or stolen, you will not panic. The content can never be visible without your password. If your primary computer suffers a hard drive crash, you have a backup to restore the data. I am a bit extreme on my own backup solution, and whenever I have a highly-targeted client, which I will explain next.
First, my computer possesses full-disk encryption. Within that drive, I possess a VeraCrypt encrypted container 128GB in size. Within that container is eve1-ything important to me including photos, videos, documents, business data, and even my password manager. You must know the computer password and the VeraCrypt password to see anything. I possess a 128GB USB drive with full-disk encryption. It then contains a 127GB VeraCrypt container. I use Free File Sync to occasionally backup the content of the container on my computer to the content of the container on my USB drive. I then replicate this process with an additional external media which is stored off-site in case of true emergency. Is this overkill? Maybe. I would rather be safe than sorry. My clients store sensitive information which would be very valuable in the wrong hands. I take every precaution I can.
In 2019, I was forced to test my encryption and backup strategy during a series of unfortunate events. I had recently updated my password manager, KeePassXC. This new version possessed a bug in the code which would delete the database if stored on a Mac computer but inside another operating system file structure. Since my KeePassXC database was stored within a VeraCrypt container on my MacBook Pro, I was part of a small minority of users who experienced this flaw (this problem was patched a few days later by KeePassXC). When I closed KeePassXC, the database was completely deleted without any possibility of recovery. There was no warning, and I was unaware of the issue. When I conducted a daily backup of all data to my USB drive, it removed the copy of the KeePassXC database on it and replaced it with an empty folder. I now had absolutely no copy of my KeePassXC database, which was a catastrophe. When I opened my password manager, there was no option to see my passwords. After a brief moment of panic, I reached out to a friend who could help.
In my previous example of how I store my data, I mentioned an off-site external media which possessed a duplicate copy of all vital data. This is in the form of a 1 GB micro SD card which contains a single 1 GB VeraC1-ypt container. The password to open this container is unique from anything else, and I have it memorized. Without this password, the data is useless to anyone who takes possession of the card. This card was placed inside of a "hollow nickel" and stored secretively inside the home of a friend and former colleague. This is a real U.S. nickel which is made from two unique coins. Each coin is die-cut in order to create a top piece (heads) which fits into the bottom piece (tails) and allows for a hollow space in between, large enough to store a micro SD card, as seen on the next page in Figure 3.02. These cost approximately $20-$25 online.

Figure 3.02: A hollow nickel with a micro SD card stored inside.
I called my friend and told him I was in a serious situation, and I needed his help without asking many questions. This person works in the intelligence community, so the request was well-received. I advised him to go into his upstairs bathroom and remove the power receptacle cover next to the mirror. He would then notice a nickel resting on the bottom of the outlet box within the wall. Remove that nickel and tap the edge of it on the bathroom sink. The top of the nickel will come loose and can be removed, revealing an SD card. The SD card should be inserted into a computer and the 1GB file should be uploaded to my own web server in a specific directory.
My friend agreed and completed each step. I then asked him to place everything back where it was, and that I would explain everything more over a beer the next time I was in town. Whenever I visit my friend's home, I update the contents of this drive without anyone's knowledge. It is much smaller than my other backup, but only contains the absolutely necessary data I would need in case of an emergency. This includes a current copy of my password manager, client documents, business files, and scanned copies of any identification I may need while abroad. I chose this friend carefully, as I know he is home often, he is extremely trustworthy, and he respects my extreme privacy antics. Hopefully you have someone similar in your life.
After he uploaded the 1GB VeraCrypt file, I was able to open it and destroy the online copy. I then had access to my password manager and could now access my passwords. This version of the database had not been updated in a few months, so I was still missing some recently changed passwords, but my email archive identified those accounts quickly. I was relieved to have my accounts back, as many of them date back over ten years.
I hope this serves as a reminder to the importance of an offline backup away from your home. If I ever find myself overseas with a lost passport, my friend can give me the data I need to obtain a new copy. If my hotel is burglarized and all of my data is stolen, my friend can get the essentials to me. I also maintain a hollow nickel near my home which contains a 128GB card with a full backup of all data. It takes me at least 20 minutes to retrieve it from my property. If someone can find my home, locate this nickel, open it to reveal the card, and beat the encryption, I deserve to be hacked.
Private Web Bl'Owsei' Cmsh Coutse
Before we consider connecting to various websites in order to harden our accounts, we should configure a secure web browser. I recommend, and solely use, the Firefox web browser at all times. Your new Apple computer has its own browser called Safari, but I rarely touch it. Windows possesses Microsoft Edge, which I have not opened in several years. The only time I would consider using these options is to connect to https://www.mozilla.org/firefox and download Firefox. Once Firefox is installed and configured, I hide any references to Edge or Safari on my clients' machines. Installation of Firefox is easy and guided, and you can accept all default options. Once installed, execute the application and consider the following modifications.
- Click on the menu in the upper right and select "Options" (Windows) or "Preferences" (macOS).
- In the General options, uncheck "Recommend extensions as you browse" and "Recommend features as you browse". This prevents some internet usage information from being sent to Firefox.
- In the Home options, change "Homepage and new windows" and "New tabs" to "Blank page". This prevents Firefox from loading their own site or services in new pages and tabs.
- In the Search options, change the default search engine to DuckDuckGo and uncheck the "Provide search suggestions" box. This prevents queries from going directly to Google, and blocks the Google API from offering search suggestions.
- In the Privacy & Security options, select the "Strict" option under Content Blocking.
- Check the box titled "Delete cooldes and site data when Firefox is closed".
- Uncheck the box titled "Ask to save logins and passwords for websites".
- Change the History setting to "Firefox will use custom settings for histoty".
- Uncheck the boxes "Remember browsing and download history" and "Remember search and form history".
- Check the box titled "Clear history when Firefox closes". Do not check the box titled "Always use private browsing mode", as this will break Firefox Containers.
- Uncheck "Browsing history" from the "Address Bar" menu.
- In the Permissions menu, click "Settings" next to Location, Camera, Microphone, and Notifications. Check the box titled "Block new requests ... " on each of these options.
- Uncheck all options under "Firefox Data Collection and Use".
- Uncheck all options under "Deceptive Content and Dangerous Software Protection". This will prevent Firefox from sharing potential malicious site visits with third-party services. This leaves you more exposed to undesired software attacks, but protects your internet history.
Firefox allows users to modify many configuration settings, and some of these deal with privacy and security concerns. Though some of these changes can be made in the menu of Firefox's preferences, changes made through about:config tend to be more durable and granular. To access the list of configuration settings, open Firefox: and type "about:config" into the URL bar. You will receive a warning about making changes within this area, but the modifications we make will be safe. Choose to accept the risks. Some of these about:config settings may already be on the "correct" setting, but most probably will not. To change most of these settings you can simply double-click the setting to toggle it between "True" and "False". Some may require additional input, such as a number. Because the list of about:config settings contains hundreds of entries, you will probably wish to search for all of these through the search bar in the about:config interface.
- geo.enabled: FALSE: This disables Firefox: from sharing your location.
- browser.safebrowsing.phishing.enabled: FALSE: This setting disables Google's "Safe Browsing" and phishing protection. If this setting is "true" Google will be able to scan (and store) the sites that you visit for the presence of malware.
- browser.safebrowsing.malware.enabled: FALSE: Again, this disables Google's ability to monitor your web traffic for malware, storing the sites you visit.
- media.navigator.enabled: FALSE: Website operators will identify your computer as unique to enable tracking around the web. One such tactic is to track the status of your webcam and microphone (ON/OFF). This disables the ability for website operators to see this information.
- dam.battery.enabled: FALSE: Another technique used by website operators to track you is to view your exact battery levels. This setting blocks this information.
- extensions.pocket.enabled: FALSE: This disables the proprietary Pocket service.
- network.trr.mode: Change from O to 2. This will be used for encrypted DNS.
- network.security.esni.enabled: Change from False to True, also for encrypted DNS.
WebRTC: These settings address a potential vulnerability of leaked IP addt"esses.
- media.peerconneccion.enabled: FALSE
- media. peerconnection. turn.disable: TRUE
- media.peerconnection.use_document_iceservers: FALSE
- media.peerconnection.video.enabled: FALSE
It is not vital that all of these security settings be applied to your systems. Firefox natively respects your privacy and security more than other browsers. These recommendations are for those that want to tweak additional settings that may provide a layer of protection, even if minimal. Next, I will discuss the abundance of helpful browser extensions called add-ons.
In the previous edition of my (now outdated) book Hiding from the Internet, I recommended NoScript as the ad-blocker of choice. Not only does NoScript block ads, it also blocks any other type of script that is attempting to run on the page. This helps prevent tracking, malicious code execution, location sharing, and a number of other processes that could undermine your privacy and security. However, NoScript comes with its own problem, which is that it is notoriously difficult to use. I have found a simpler alternative called uBlock Origin. uBlock Origin is completely free and open source. It blocks a number of tracking behaviors and security vulnerabilities. It is highly customizable, while remaining relatively easy to work with. uBlock Origin works from blacklists which block trackers specified in the list(s). The add-on comes with several lists enabled, but there are several more that can be added through simple checkboxes in the preferences. Keep in mind that the more blacklists you enable, it may be more difficult to work with the browser. This section may seem a bit overwhelming but experimenting with the advanced settings should help you understand the functionality. Let's start with the basics.
Install uBlock Origin from the Firefox add-ons page or directly by navigating to the application's website at https:/ / addons.mozilla.org/ en-US/ fire fox/ addon/ublock-origin/. You are now protected on a basic level. By default, most known invasive advertisements, tracking code, and malicious content is blocked. This step alone would provide much needed protection from the internet. However, we can take it a step furthet.
Click on the uBlock Origin icon in the menu and select the Dashboard icon to the right. This will open a new tab with the program's configurntion page. On the Settings tab, click the option of"I am an advanced user". Click on the Filter lists tab and consider enabling additional data sets that will protect your computer. I select all options within the Ads, Privacy, Malware Domains, and Annoyances categories. After you have made your selection, click the Update Now button at the top of the page. This will refresh all of the data and apply your new settings. You now have extended protection that will be applied to all visited websites without any interaction from you. When you encounter a web page with a lot of advertisements, such as a news media website, it should load much faster. It will block many of the pop-ups and autoplay media that can be quite annoying when conducting research. This protection will suffice for most users, but dedicated privacy enthusiasts may choose to take a more advanced approach.
After you have enabled the Advanced settings as explained above, clicking on the uBlock Origin icon should now present an expanded menu which will change as you visit different sites. In order to explain the function of this menu, I will conduct a demonstration using the website con.com. Scrolling down this list of scripts that have either been loaded or blocked, you can see several questionable scripts such as Facebook, Shatethrough, and Turner. These scripts allow tracldng across multiple websites and are the technology responsible for monitoring your interests, web history, and shopping habits.
This menu is split into three columns. The first simply identifies the type of code or domain name of the script. The second column is global settings. Anything changed here will apply to all website visits. The third column contains settings for the current website. A single plus sign (+) indicates that less than ten scripts were allowed from that specific option. Two plus signs indicate that between ten and one hundred scripts were allowed. The single minus sign (-) indicates that between one and nine scripts were blocked from that domain, while the dual minus signs tell us that ten to one hundred scripts were blocked. This is all default behavior and provides a balance of functionality and security. uBlock Origin decides which content should be allowed and which should be blocked.
Using this same page, let's modify the options. Click on the far-right portion of the first cell in the third column. This turned the entire third column red in color. This action activated an option to refresh the page (middle arrows) and an option to save the change (upper left "padlock"). Since I blocked eve1y script, the page would not fully execute, It could not load images, design scripts, or any JavaScript. This is not useful at all, so I disabled my actions by clicking on the middle section of the top cell in the third column, which turned the entire column back to grey in color. Saving these changes and refreshing the page brought me back to the original site.
We can also take this to the opposite extreme. Click on the far-left portion of the top cell in the third column. This turns the entire column green in color, and allows all scripts to load on cnn.com. This includes the dozens of intrusive scripts that could load advertisements on the page. You can also see that small plus signs confirm that scripts were allowed to run while the minus signs state the opposite. For most users, this allowance would seem irresponsible.
Next, we will modify the second (middle) column, which will apply the settings globally. By default, all options are grey in color. This indicates that the default block list is applicable, and only invasive scripts will be blocked everywhere. Click on the far-right portion of the top cell in the second column. This turns the entire column red, and indicates that all scripts across all websites will be blocked. After saving changes, every website will only load the most basic text content.
Loading a page such as a Twitter profile results in no usable content. By clicking on the uBlock Origin icon and clicking the middle sections of specific cells within the third column, you can enable those scripts without allowing everything on the page. In this example, the entire second column is red. This indicates that all scripts are blocked globally. The third column is mostly red, but the options for twitter.com, twimg.com, and others are grey. Those scripts will be allowed, if approved by uBlock Origin's rules, only for that domain. If you loaded a blog that has scripts from Twitter, they would still be ignored.
These are extreme examples. Let's bring this back to some sanity. The following is how I recommend using uBlock Origin. Install, enable advanced options, and proceed with your work. When you arrive at a website that is blocking something you want to see, open the menu, and click on the far-left section of the top cell in the third column. That will allow everything to load on that page, and that page only. When you are about to navigate to a questionable site that may try to install malicious code 9.n your machine, click on the far-right section of the top cell in the second column. That will block all scripts on all pages. Conduct your internet usage and reverse the change when you are finished. Remember to click the save button (padlock) after each change.
I also use this plugin to bypass website restrictions. As an example, consider my local newspaper, The Chicago Tribune. When you navigate to chicagotribune.com, you are allowed to view three articles before being blocked with a message which states 'You've reached your monthly free article limit. To continue reading, subscribe now". Clicking any further articles blocks your access. You may have seen similar messages from websites when using any type of ad blocker. Clicking the uBlock Origin icon reveals it is blocking 14 scripts, but something is still running in order to know the number of articles I have read. Choosing the far-right option (red) within the line titled "Inline scripts" blocks these types of annoyances from this domain. Clicking the lock (save) option and reloading the page eliminates the barrier permanently. It also makes the page load much faster. I can now browse this website with unlimited access.
Hopefully, you are practicing these settings and learning how this program functions. It is an amazing option that has protected me many times. If you are doing things right, you have likely completely messed-up your settings and are now blocking things you want while allowing things you do not. Don't worry, we can reverse all of our mistakes by first making the global (second column) settings back to grey (middle section of top cell). Next, return to the dashboard settings of the add-on, and click on the My Rules tab. In the second column (Temporary Rules), click Edit, highlight all of your customizations, and delete them. Click the Save button in this same column and then the Commit button to apply these settings everywhere.
The huge benefit of uBlock Origin over other options is the simple ability to block malicious scripts without customization, while having an option to allow or block any or all scripts at our disposal. This is a rarity in these types of add-ons. The images in Figure 3.03 display these options with scripts allowed ~eft) and disabled (right).
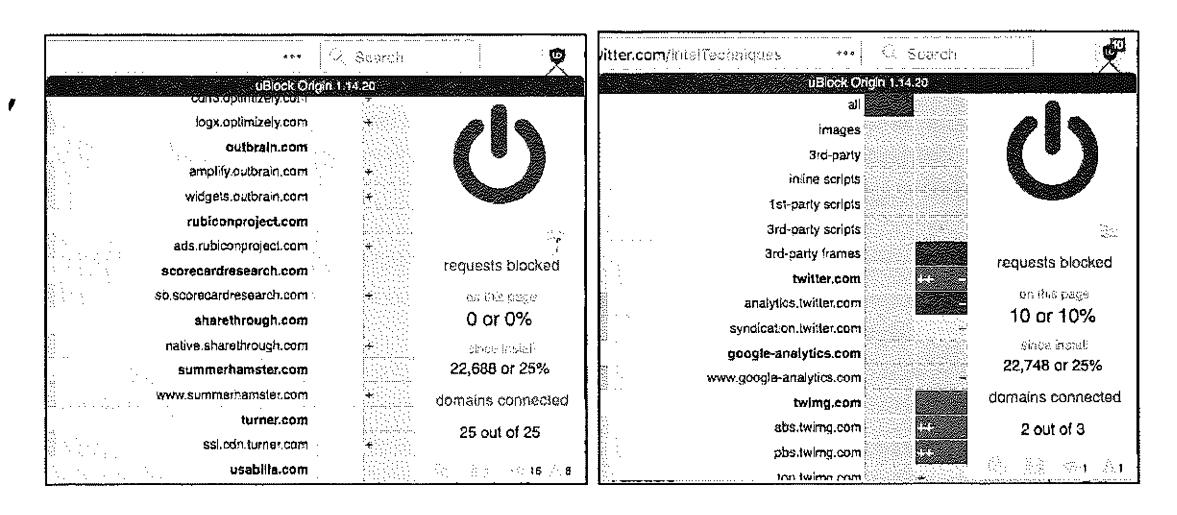
Figure 3.03: Menus of uBlock Origin.
The next Firefox add-on which I use daily is the Multi-Account Containers option from Mozilla. It can be found at addons.mozilla.org/firefox/addon/multi-account-containers. Multi-Account Containers allows you to separate your various types of browsing without needing to clear your history, log in and out, or use multiple browsers. These container tabs are like normal tabs except that the sites you visit will have access to a separate slice of the browser's storage. This means your site preferences, logged-in sessions, and advertising tracking data will not carry over to the new container. Likewise, any browsing you do within the new container will not affect your logged in sessions, or tracking data of your other containers. Below is an example. · ·
I have a container tab open which I use to log in to my email provider. I have my inbox open in this tab. I want to order a product from Amazon, but I do not want them to see any cookies stored by my email provider. I also want to conduct a Google search, but do not want Google to see any data present from my Amazon search. I simply open a unique container tab for each of these events. Each sees the session as unique, and no data is shared from one service to another.
Once installed, you will see a new icon in the upper right which appears as three squares. Click on it and select the container you want to open. Default options include choices such as Personal and Shopping, but you can modify these any way you desire. I have over twenty containers titled Private01, Private02, etc., as well as options titled Email, Amazon, and Banking. You can create, delete, and edit containers from the Containers menu. When you click the Edit Containers or the + buttons, you can change the color or icon associated with a container or change the container name.
You can open links in a new or different container. Right-click on any link, select Open link in New Container Tab, and then select the desired container tab. The new tab will open within the same container as the previous tab. This includes both the default container and in any of the predefined containers. There are many ways to take advantage of this add-on. The following are a few suggestions.
- Log in to multiple accounts on a single website at the same time. For example, if you have a personal Gmail account and a work Gmail account, you can log in to both accounts in separate containers.
- Protect yourself against tracking without needing to log out of websites while you browse. Websites in one container can't track your activity in other containers.
- Protect yourself against web security attacks. Any harmful clicks will be kept within that website's container, so attackers won't be able to hijack your information in other containers.
- Assign a website to a container, so that a specific website will always open in a specific container. I use this for Face book. If I ever visit Facebook as part of an investigation, the site will open in a new container tab which I designated Facebook. This is regardless of which tab I try to use.
The final Firefox add-on I recommend is Decentraleyes (https://decentraleyes.org), which complements uBlock Origin. Websites have increasingly begun to rely on large third parties for content delivery, such as tracking software supplied by Google, Microsoft and various content delivery networks. Blocking this specific code which tracks your activity can often break the website you are visiting. Decentraleyes provides local files to replace the otherwise necessary content in order to improve online privacy. An example should help explain.
When I connect to riverfronttimes.com, the site requires some code called ]Query. This site loads JQuery from Google's servers, and Google collects usage data about my activity on this site, If I block the request to download JQuery from Google, the site will not load properly. The ]Query code is simply required for this site (and many others). With Decentraleyes installed, it intercepts the request to download J Query from Google and provides a locally stored option instead. The ]Query code is loaded from the browser extension without the need to involve Google. The site loads properly, and Google does not track me with this download. Decentraleyes does not require any configuration. It starts working the moment it is installed.
Some readers may be frustrated with my setup for Firefox and may insist on using a Chromium-based browser. I completely respect this, and offer the option of Brave Browser. Brave is based on Chromium, which is the bones of the Google Chrome browser. Brave insists they have removed all calls to Google which Chromium makes by default, including the use of Quad9 as the DNS provider (instead of Google). If you NEED a Chrome-like browser, I recommend Brave. If you can use Firefox, I find it to be much more privacy-focused. Regardless of your chosen web browser, you should test your configuration for any potential leaks. I rely heavily on the free service Browser Leaks at https:/ /browserleaks.com. There are numerous options within this site, and I outline my favorite below.
- https:/ /btowserleaks.com/webrtc: This page displays whether your browser is blocking WebRTC IP leaks as previously mentioned. The goal is to receive all red "False" responses.
- https:/ /browserleaks.com/ geo: This page identifies whether your browser is sharing location data. The optimal response is a red "Denied" result.
- https:/ /browserleaks.com/proxy: This page discloses any unique filtering within your network which could make you a more unique visitor to a site. The goal is to receive all red "not detected" results, unless you approve of the technology filter. You may see uBlock filters, which eliminate specific data from entering your session.
- https:/ /browserleaks.com/ social: This page displays any social networks or online marketplaces which place a login cookie on your machine. As an example, if you are logged in to an Amazon account, you should see evidence of that here. This is a good test to ensure your Firefox containers are functioning properly.
- https:/ /browserleaks.com/javascript: This page displays the information available about your connection to any site you visit. Interesting areas include local time, browser identifiers, and operating system data.
- https:/ /browserleaks.com/flash: This page displays whether the Flash plugin is installed. My preference is that it is never used.
- https:/ /browserleaks.com/ silverlight: This page displays whether the Silverlight plugin is installed. My preference is that it is never used.
- https:/ /browserleaks.com/java: This page displays whether the Java plugin is installed. My preference is that it is never used.
- https://browserleaks.com/donottrack: This page displays your "Do Not Track" browser settings.
Again, this is not a comprehensive list of digital security best practices for various operating systems. This is the bare minimum recommendations in order to continue your journey through extreme privacy strategies. My scope here is to disappear completely and possess better privacy. My own education on digital privacy and security is never-ending. I learn a new or better way to execute my own strategies monthly. Toward the end of this book, I present an entire chapter on obtaining an "Advanced" private digital life. It introduces virtual machines, portable secure operating systems, Do-It-Yourself VOIP solutions, custom Android builds without Google services, and various hardware devices which elevate our privacy and security demands.
DNS Crash Course
I briefly mentioned two specific Firefox settings related to Domain Name System (DNS) queries, but we should have a more detailed conversation about this service. In the simplest explanation, DNS translates domain names, such as inteltechniques.com, into IP addresses in order to locate the appropriate content. In a typical home setup, your internet service provider (ISP) conducts your DNS queries. In other words, your ISP knows eve1y website you visit, regardless of SSL encryption, and knows your billing address. If you did not purchase internet service anonymously, then they also know YOU. ISPs collect a lot of valuable information about you this way, and often sell these details to third parties for marketing purposes. I want to stop that. Whether you use no VPN whatsoever (poor), rely on an application-based VPN directly on a computer (better), or execute a full home firewall as explained later (best), you should modify your DNS settings.
If you are on an Apple machine, enter your "System Preferences", open the "Network" option, select the connection (such as Wi-Fi), click "Advanced", and then "DNS". In the left pane, remove any entries and add 1.1.1.1 and 1.0.0.1. Click "OK" to save. If you are on a Windows 10 machine, open "Settings", then "Network & Internet'', tl1en "Change Adapter Options". Right-click your connection and choose "Properties". Click on "Internet Protocol Version 4" and click "Properties". Select "Use the following DNS server addresses" and enter 1.1.1.1 and 1.0.0.1. Click "OK" and repeat for "Internet Protocol Version 6". Your machine should now use the Cloudflare DNS service. As discussed later in the Home Firewall chapter, I recommend this service due to speed, stability, encrypted options, no-logging policy, and third-party auditing through KPMG.
There are a few caveats here. If you are using a VPN application on the computer, it will likely ignore your DNS choices and use its own server. This is acceptable for most. If your VPN crashes, you would fall back to Cloudflare for DNS, which provides better protection tl1an being exposed to your ISP. If you are connected to a home firewall, this is redundant, but not harmful. This prevents SOME snooping from your ISP.
We must now ensure that the connections are encrypted. If you applied the Firefox settings explained previously, you are ready to test your new configuration. The current version of Firefox should offer encrypted DNS by default, but I left the custom settings in the book to ensure we were protected. Navigate to https://www.cloudflare.com/ss1/enc1ypted-sni/ and conduct a test. You should see green checkmarks next to each of the four tests. If you do, you are hiding much of your internet traffic from your ISP and your VPN. I conduct this test monthly from all of my devices.
VPN Crash Course (Desktop)
I mentioned the importance of a VPN in the previous chapter in regard to your mobile device. This also applies to any computer you use. The same service you selected for your phone should provide an app for your computer. Most reliable VPN providers grant you multiple consecutive device usage. Thetefore, you can use the same account credentials on your laptop which you use on your mobile devices. Even if you choose to replicate the home firewall with constant VPN, as explained later, you should still possess a VPN application on your laptop for travel usage. When traveling, I rely on a VPN application any time I am connected to the internet. This is especially important if using any type of public Wi-Fi. Similar to the previous chapter, I rely on Proton VPN as my provider for my laptop(s). Let's walk through the three levels of VPN options as we did previously for mobile device usage.
Basic: For most readers, and almost ever}' client I have consulted, I recommend sticking with the standard desktop application provided by a VPN company. Whether this is a larger provider such as PIA and Proton VPN, or a smaller supplier such as Mullvad, the apps provided directly from the company should suffice for your needs. These can be downloaded from the provider's websites. Once installed, simply provide your account credentials and launch your VPN connection.
Intermediate: Similar to the previous chapter, the Open VPN application is available for Windows and Linux users. Currently, there is not an official Open VPN application for Mac, but the free app Tunnelblick replicates this protocol. Configuration will require some research, but most VPN companies provide explicit instructions for this option. This allows you to configure your VPN without downloading any closed-source software from the provider.
Advanced: Mac, Windows, and Linux users can manually configure a VPN within their operating systems. However, you may be limited with the protocols available. While I like this option for iOS users, I do not encourage clients to rely on an IPSec protocol within a desktop operating system. If you do not want to download a proprietary VPN application offered by your service providet, I encourage you to research the Open VPN option above. I believe the "Basic" option is suitable for most readers, especially if you plan to establish the home firewall explained later.
Relying on a VPN company is difficult. We place a lot of trust into the provider(s) we choose, without knowing much about the company or their financial backing. As stated previously, I had recommended PIA for many years. Their merger with Kape Technologies has urged me to slightly step away from this endorsement. Kape, previously known as Crossrider, has been heavily focused on advertising and data collection in the past. Access to millions of privacyminded VPN users' computers could be a goldmine to them. Therefore, I no longer install
the PIA application on my devices and only recommend their services within a firewall as explained later.
I believe all VPNs are flawed, but still a requirement for us. Almost every VPN provider relies on rented servers across the globe which are out of their control. Many providers unknowingly use the same servers as their competition. A VPN is simply a single layer of protection. Always purchase your subscription anonymously, and I present multiple options for this later. When using a VPN, you are simply placing your internet histoty into someone else's hands. This sounds bad on the surface, but it is better than doing nothing at all. Without a VPN, we know our ISPs are monitoring, collecting, and sharing our internet activity. With a VPN, we are told that this information is not logged or shared. Are we bullet-proof? No. However, I would rather make the attempt to hide my traffic than do nothing at all.
Some may question the amount of data shared about your online history when you send all of your traffic through a VPN versus your ISP. There are always vulnerabilities which could expose more data than intended, but we can discuss a few misconceptions about your internet traffic. First, we should tackle SSL/TLS. SSL (Secure Sockets Layer) and its successor, TLS (Transport Layer Security), are protocols for establishing authenticated and encrypted links between networked computers. This is related to the lock icon you see in your browser when on any website which begins with "https". This indicates a secure connection, but what does that really mean? I will simplify with a couple of examples.
Assume you are on your home computer connected directly to your internet service provider (ISP). You are not using a VPN. You connect to Google and conduct a search for "inteltechniques". The response URL presented to you, including the search results from the query, is https://www.google.com/search?q=inteltechniques. Does your ISP know you conducted a search on Google? Yes. Do they know you searched for "inteltechniques"? No. This is because Google enctypts the actual search URL. The provider of your internet connectivity can only see the domain name being accessed. It cannot see any details about specific pages or any credentials entered. This is why https versions of websites are so important. Your browser can see this entire URL, but it does not directly share any details with your provider. Now, let's introduce a VPN.
After connecting to your VPN, such as Proton VPN, you conduct the same search. Does your ISP know you conducted a search on Google? No. Does your VPN provider know you conducted a search on Google? Yes. Does your VPN provider know you searched for "inteltechniques"? No. Why does this matter?
Everyone has a unique threat model, but I will present a few scenarios where you may be concerned. First, consider that I am suing you civilly, and I have convinced a judge to grant me a court order to collect your internet activity. Since I know where you live, I can assume
the provider of your internet service. A court order is issued to your ISP for your internet activity. If your ISP logs your traffic, which most do, the response would tell me every domain which you visited and the dates and times of occurrence. I could use this to prove you were visiting specific websites or transmitting large amounts of data to designated services. If you had a VPN enabled, I could only prove your device(s) were connected through a VPN. I would not know any domains from your activity. A second court order to the VPN provider would not reveal this data. Reputable VPNs do not log this traffic, and IP addresses are shared between thousands of users.
Next, assume I want to know where you live. I know your email provider is Gmail, and a subpoena to them would reveal your IP address at a specific date and time. If this IP address belongs to your internet service provider, a second subpoena will disclose the address of service (your home). If the IP address belongs to your VPN provider, it will not disclose any details about you or the VPN account. A subpoena to the VPN for information about the IP address will reveal no logs and an education about IP address sharing between thousands of strangers.
Now, let's combine the strategies mentioned previously to thwart this behavior. Since you are always connected to a VPN, your ISP knows nothing about your internet traffic. A subpoena to them would not reveal the sites you visit. Since ProtonMail does not log your IP addresses in clear text, they cannot determine your true IP address. Since Proton VPN and ProtonMail are Swiss-based companies, they would not respond to a subpoena from the U.S. If you purchased a VPN service without providing your name, there is nothing to glean from the VPN provider about your account (such as a personal credit card number or home address). I hope that you now see that all of these strategies strengthen each other.
What do I do? At home, my entire network is behind a fail-proof VPN. I will explain each detail in a later chapter. I do not need individual VPN applications running on my devices while at home. While traveling, I have the Proton VPN desktop application ready on my laptops. As mentioned previously, I have Proton VPN servers manually configured on my iPhone.
Many readers may be tired of my promotion of Proton VPN. After all, it requires a valid email address and some type of digital payment (Bitcoin is accepted). If you want a stronger solution for privacy, and one that accepts cash, consider Mullvad (mullvad.net). On their website, you generate an account without providing any personal details. A unique account number is issued to you. Once you make payment for that account number via Bitcoin or mailed cash, the account is enabled. This is likely overkill for most people, but a truly anonymous solution is nice. Current annual pricing for Proton VPN is $48 and Mullvad is $65. However, your VPN choice should never be based on price alone.
Email Usage Crash Course
All of my clients are given a new primary email address through the service ProtonMail (protonmail.com). This free service provides Switzerland-hosted communications with true zero-knowledge data. This means that your email is encrypted from your device before it is stored on their servers, Even with a court ore.let, an employee of ProtonMail would be unable to view your message contents. If an email is sent from one ProtonMail user to another, it is never exposed to interception from a third party. Is this bulletproof? No, nothing is. There will always be some slight chance that an adversary could compromise your communications. However, it is extremely unlikely. On the other side, a court order to Google will hand over all of yout account details and email communications stored with them.
While I am not concerned about court orders being executed on my clients' accounts, I am very bothered by data breaches. If a breach occurs at ProtonMail, the thief gets a bunch of encrypted data that is of no use. The breach at Yahoo practically handed over full accounts to the culprit. A big part of being private is simply making better choices, even if they are not fool-proof.
I have a few opinions on email that may not be accepted by the security community. First, email is broken. It is outdated and was never meant to be private. I assume every email I write could be seen by someone else. I also trust services such as ProtonMail ovet any other mainstream provider. Some will wonder why I don't use Tutanota or othet zero-knowledge providers. It is mostly due to adoption. Most people in my circles have ProtonMail and no other secure options. The more messages I can keep within one single encrypted ecosystem the better.
The personal ProtonMail address will be used only for communications associated with your real name. This could include your physician, bank, insurance provider, or any other service that knows your true identity. This is your new primary email account. It will possess a very strong password and two-factor authentication. I prefer Authy for this, as explained previously, but you can find full details with several options at the following address.
https:/ / protonmail.com/ support/knowledge-base/ two-factor-authentication/
While ProtonMail possess great privacy and security with the default settings, there are things which can be improved. The first is to disable remote images. Many email images contain tracking pixels which identify the IP address and device information when opened. Click on "Settings", "Account", then change "Load Embedded Images" to "Manual". Next, change "Request Link Confirmation" to "Enabled". This will prompt you for authorization to open any links within a message. This prevents accidental link clicking, and displays the entire URL before opening.
Email Forwarding
You likely have a current personal email address that you have been using for several years. This may be a Gmail, Yahoo, Hotmail, or other free provider. I recommend ceasing all outgoing activity from these accounts. However, I never recommend deleting the accounts. If you start using your new ProtonMail account for all of your personal communication, that does not eliminate the need for your old accounts. You will continue to receive desired email through these accounts, and you may need to use an old account to verify your identity to a service such as your bank. Instead of manually checking these accounts, consider forwarding all of your email to your new ProtonMail account.
All major email providers allow you to forward incoming email messages to another address. This allows you to receive the emails being sent to your old accounts without logging in to the set-vices (and providing details about your computer and connection). You will not be able to send email from these old accounts, but that should be avoided anyway. All of your email to old accounts will appear in your new ProtonMail account. Any outgoing message will be from this ProtonMail account. The following steps will forward your email from the old accounts. If yours is not listed, an internet search will provide all you need.
- Gmail: Settings > Forwarding and POP /IMAP > Add a F01warding Address
- Yahoo: Settings> Accounts> Forward
- Hotmail/Live: Settings > Options > Mail > Fo1warding > Start Forwarding
Overall, think of your new ProtonMail address as your primary email account, replacing anything previously used, such as a Gmail account. It should only be used for desired communications. Try to avoid using this address for newsletters and junk accounts. You should consider creating a forwarding account for anything that is not vital to you. You will need additional email services for use with this junk mail. I use a mix of free email accounts from Blur, AnonAddy, 33:Mail, SimpleLogin, and my own domains. I will start with Blur.
All of my clients receive a free account from Blur (dnt.abine.com). This company provides an email masking senrice which protects your personal email account. Blur allows you to create numerous unique email addresses, such as jifgfghf@opayq.com, and any email sent to that address will be forwarded to your personal email account. These prevent merchants and services from knowing your real email address, but allows you to receive email communication and confirmation links. I prioritize Blur because of its mobile app which makes email address creation easy and fast.
All of my clients also receive a free account from AnonAddy (anonaddy.com). It also provides an email masking service, but allows more leniency with the addresses, AnonAddy defaults to a username-based service. If my username were inteltechniques, any email sent to an address
at @inteltechniques.anonaddy.com would be forwarded to my real email address. For example, any email sent to a forwarding address of junkmail@inteltechniques.anonaddy.com or amazon@inteltechniques.anonaddy.com would be forwarded to my real address on file. Additionally, AnonAddy provides a randomized and completely private address such as 48cd7fa8-o234uyuo245@anonaddy.me. The username-based addresses are created on the fly while the randomized addresses must be generated within their website.
In 2020, I began incorporating SimpleLogin (simplelogin.io) into my own privacy strategy. This service offers free and premium tiers, and the free option is usually sufficient for my clients. Similar to AnonAddy, you can choose between a custom keyword username, such as contact.boatkeeper@simplelogin.co, or something random such as 98f11458-7c6f-457f-a045 c58d05ccf70@simplelogin.co. Both allow unlimited incoming messages and outgoing replies to incoming mail, but the free plan limits users to five alias addresses.
33Mail (33mail.com) has been a staple for myself and my clients, but many services now block accounts from this provider. It works much like AnonAddy. You select a username and can start receiving any email messages sent to that account. As an example, if my username were inteltechniques, any email sent to test@inteltechniques.33mail.com would be forwarded to my real email account.
While some clients prefer all messages to be forwarded to their personal ProtonMail account, I prefer to create a second ProtonMail account just for junk that is in an alias name. For ultimate privacy, I believe that all alias email from services such as Blur, AnonAddy, and 33Mail should also be sent to an alias ProtonMail account. Isolation will be a key part of the instructions in future chapters. This will be explained further in the anonymous payments chapter and the anonymous home purchase options. Until then, I will summarize my minimum recommendations for an email strategy at this point.
Primary ProtonMail Address: This is in your true name, and may appear similar to the email address of mbazzell@protonmail.com (not my real address). It is used for all personal communications and is the only address associated with important online accounts such as financial, insurance, and employment. Your old personal email accounts forward to this single address. All outgoing mail is from this new address.
Primary Forwarding Address: This is a "junk" account that can be used for items in your real name, but not vital to be received. This could be for accounts with poor privacy policies which share your information with third parties, such as PayPal or Amazon accounts in your true name (we will eliminate these later). It can be a Blur, AnonAddy, SimpleLogin, 33Mail, or other fo1warding service. The addresses should not include your real name similar to jifgfghf2jhee 11 gjhg234@opayq.com, amazon@mynewprivateusername.anonaddy.com, or amazon@mynewprivateusername.33mail.com.
Alias ProtonMail Account & Forwarding Address: This is a second "junk" account which should only be used for items in an alias name. This could be for websites that demand registration in order to view content, newsletters, or anything that does not need your true name. It can be a Blur, AnonAddy, SimpleLogin, 33Mail, or other desired forwarding service which sends incoming messages to a secondary ProtonMail account.
Most importantly, NEVER use a forwarding or masking email service for anything vital. I would never recommend a Blur, AnonAddy, SimpleLogin, or 33Mail address for use with anything related to finances or banking. If these services should disappear tomorrow, you do not want to lose access to anything important. All of these providers have a free and premium tier. Most of my clients only need the free services, but I choose a paid plan for myself. This allows me to take advantage of all services provided and usually offers premium support. Paid AnonAddy plans allow me to send response emails from the alias addresses I create.
Let's pause and take a look at this strategy of email usage. In the following chart, your new personal email address is mb@protonmail.com. It is used for the important things in your life and has replaced the Gmail account you previously had. Any time you need to sign up for something in your real name that will likely send junk mail which is not vital to you, you have the forwarding account of mb.anonaddy.com. When you want to use an alias online, you have the 33mail, SimpleLogin, and Blur addresses at your disposal. These forward to another ProtonMail address exclusively for junk. All of these accounts deliver messages to your single ProtonMail inbox with a paid plan. In my opinion, this represents the minimal coverage you need. In a moment, we will escalate the protection.
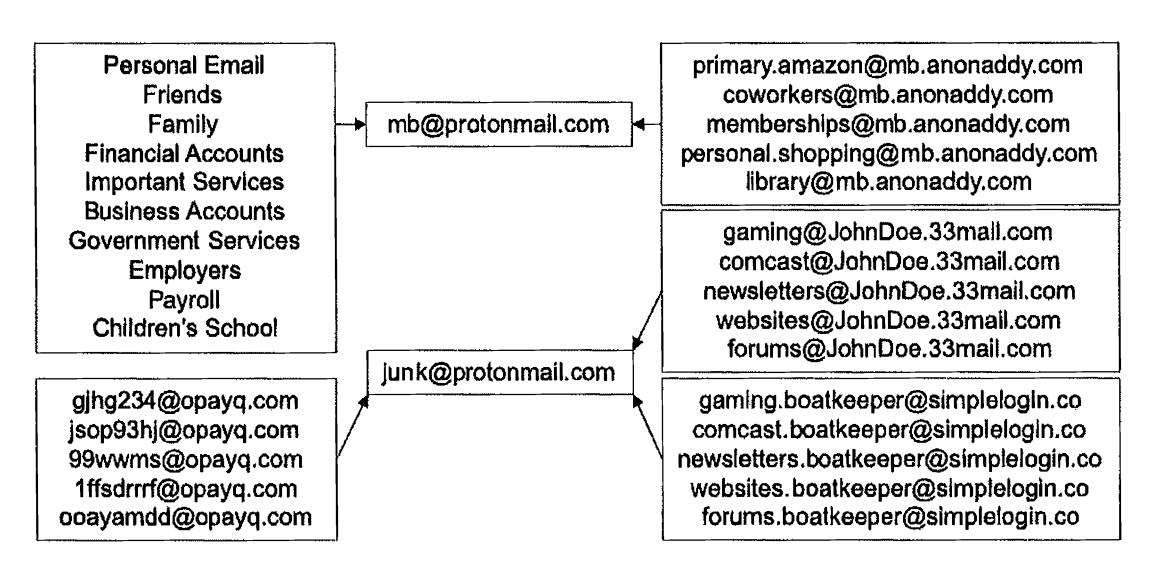
Intermediate Email Strategy
I possess a paid ProtonMail account, and I rely on this service for the majority of my petsonal email communications. The lowest plan costs approximately $50 annually and prnvides six email addresses. You can choose alias addresses for various needs, and check only one in box. When I conduct a full reboot for my clients, I genernte an email strategy similar to the following, and do not rely on free email fo1warding options. I find the simplicity of one inbox and ability to send emails from multiple addresses within a single web client or mobile application to be more favorable to some clients. There is no need to overly complicate things, and convenient options will be used more consistently than difficult tasks,
- Real.Name@protonmail.com: This account is considered a public email address, and is provided to businesses, such as banks, as a primary email address for communication. It is an address that will be publicly visible eventually. Data mining companies and credit bureaus will eventually identify this as your primaiy email account, which is desired.
- Nick.Name@protonmail.com: This account is exclusively for close friends and family. It is less likely to leak publicly, It can be nice to have isolation between personal life and everything else.
- Alias.Name@protonmail.com: This account is in the name of the alias used by the client. This allows sending and receiving mail in a unique alias name. This can be vital when a home is titled in an alias name and the client wants to have immediate access to email messages intended for that recipient.
- purchasesl 980@protonmail.com: This account is used for all online purchases, The generic name allows usage with any alias or real name. This will likely be shared with third-party affiliate services and data mining companies.
- travel1980@protonmail.com: This account is used exclusively for travel needs such as airlines, hotels, and vehicle rentals. The generic name allows usage with any alias or real name, You might need immediate access to this email account during hotel check- .ins, car rental processes, or airline flight changes.
- number@protonmail.com: This is a generic account with no personal identifiers, similar to 1980@protonmail.com. It can be used for practically any purpose without disclosing any name. It is often used for items which are not vital, but need to be received, such as a receipt from an in-store digital purchase.
- Employment.Name@protonmail.com: Many clients work for themselves or participate in full-time employment. Either way, I ask them all to consider an email address dedicated to any communication regarding employment.
It is important to note that ProtonMail will assign whichever name you provided during registration to each of these accounts. Therefore, log in to your account and navigate to Settings > Account > Select an Address. Select each alias address and modify the actual name as desired. I recommend keeping the generic accounts simple. My travel account is similar to travel1980@protonmail.com and the name associated with it is simply "Travel". When I send an email from that account, the "from" appears as "Travel (travel1980@protonmail.com)".
The next step I recommend is to create folders for every alias. This will make it easier to identify which email is associated with a specific account. Navigate to Settings > Folders/Labels > Add Folder. Create a new folder for each email account. Next navigate to Settings > Filters > Add Filter. Create a new filter for each email address. The following is an example which will route all mail to travel1@protonmail.com to the folder I created titled Travel 1.
Name: Travell
Conditions: If the recipient is exactly travel1@protonmail.com
Actions: Move to Travel1
Repeat this for each email alias. When finished, you should have all alias accounts listed in the lower left corner of your email page. You can now easily identify which alias account received a message, and will be less likely to respond as your real name. No messages will appear in your global inbox, which provides isolation.
Email f01warding services such as Blur, AnonAddy, SimpleLogin, and 33Mail could also be incorporated into this strategy. Unless my client will be joining numerous online services, forums, newsletters, and other annoyances, I prefer to stay away from these unless the person understands how they work. I find the simplicity• of the single inbox with numerous addresses to be more beneficial than the burden of numerous fo1warders. The only downside is the annual expense for the paid tier.
The ProtonMail paid plans include unlimited usage of the Import-Export utility available on their website at https://protonmail.com/blog/import-export-beta/. This tools easily exports all of your messages for archival purposes. More importantly, it allows you to import all of your content from your previous email provider. If you had a Gmail account for several years, you likely possess messages which need to be accessed on occasion. You can import all of this content into your ProtonMail account for easy access without logging in to your previous account(s). Be sure to pay close attention to the storage requirements.
Advanced Email Strategy
If the previous two scenarios do not quite scratch your itch for ultimate digital privacy and security, I present the strategy I use for my email communications. It is a bit extreme, but provides a new level of digital security which is missing from the previous examples. In both of those, you are relying on third-party services outside of your control for your email communications. This alone is not that bad, as we always rely on SOMEONE to host our email. What if you should lose your access to that account? In those scenarios, I chose ProtonMail as my email provider. What if they disappeared, terminated your account, or suspended your access due to suspicion of fraud? While all of this is extremely unlikely, the chance still exists. Therefore, I prefer to take advantage of the secure hosting provided by ProtonMail while controlling the avenues of communication with my own domain. This will require several complicated steps, but the end result is worth the effort.
First, a paid ProtonMail plan is required in order to bring in your own domain. I prefer to pay via Bitcoin, but an "anonymous" debit card could also be used (both are explained in Chapter Nine). A paid domain registrar is also required in order to secure a custom domain name. For domain registration, I prefer Namecheap. However, I do not recommend any of their other products. I find their web hosting to be awful compared to other providers, but their domain services are ideal. Namecheap provides affordable domains and includes their own WholsGuard service for free. This masks your registration information from public view. Some registrars charge up to $20 annually for hiding these details. Our first step is to secure a domain name. What should you choose? Here are three considerations.
- Don't Choose Your Name: You may be tempted to secure your real name within the domain, similar to michaelbazzell.com, but this has many disadvantages. While it works well when giving out an email address while using your true identity, it appears suspicious when trying to use an alias. Bob.Smith@michaelbazzell.com would raise some eyebrows and give away your real name.
- Keep It Generic: I prefer a domain name which could be associated with any real or alias name I choose. I also prefer to stay away from privacy-themed domain names, as they can also raise suspicion during online purchases. Generic domains including the term "mail" work well for me. During this writing, I purchased the domain "securemail.work" from Namecheap for $2.88 with a $6.88 annual renewal. Trying to obtain a short domain name with a ".com" extension can be difficult as most good options are taken. I can now be myself with michaelbazzell@securemail.work, create an alias email account such as bob.smith@securemail.work, or become generic such as office@securemail.work.
- Top Level Domain (TLD): There are many ways to end your domain such as .com, .net, .biz, etc. In the previous example, I chose ".work" in order to test my strategy cheaply. However, this extension may confuse people. If you are choosing a domain
name which you will use for many years, a ".com" TLD is probably most appropriate. For daily use, I rely on inteltechniques.com for all work email.
During checkout, Namecheap will demand to know your real name and physical address. While they do not share this publicly, they can sell and share it with third-party partners. Using John Doe at 1212 Main Street will earn you a quick account suspension from Namecheap, as false information violates the rules imposed by the Internet Corporation for Assigned Names and Numbers (!CANN). Their policies require you to be honest about the details you provide. This puts us in quite a predicament, but I have a solution that may work well for some.
During my purchase, I created a new Namecheap account, provided my first name as "M", my last as "B", and placed my order with a Privacy.com card (Chapter Nine). During checkout, Namecheap demanded a full name, physical address, telephone number, and email address of the registrant for the domain. While you could lie on each of these, you risk losing the domain and you would be violating ICANN rules. Instead, I again provided "MB" as my name, and the full mailing address of the hotel where I was staying at the time. I even included the room number in order to be transparent. Technically, this was my current physical residence. I supplied an AnonAddy forwarding email address and a VOIP telephone number which I could access if needed. I executed the purchase, and my new domain was generated. My total cost was $3.06. I provided my true initials, my true current physical address, an email address which forwarded to my ProtonMail inbox, and a VOIP number which forwarded messages to my email. I believe all of these details were accurate at that moment in time, and I violated no ICANN rules. You may disagree.
Next, I needed to configure this new domain to fotward messages to my ProtonMail account, and configure my ProtonMail account to receive the messages sent to that domain. The following steps walk through the process at the time of writing.
In the Namecheap dashboard, I clicked the "manage" button next to my new domain.
In ProtonMail, I clicked "Settings", "Domains", then "Add Custom Domain".
In the ProtonMail pop-up menu, I entered securemail.work as my domain.
In the Namecheap Domain settings, I clicked "advanced DNS".
I then clicked "Add New Record" in the "Host Records" menu.
As instructed by ProtonMail, I chose "TXT Record","@", and the values presented in the ProtonMail configuration pop-up within the Namecheap settings.
In the ProtonMail dialogue, I clicked "Next".
In the "Add Addresses" dialogue, I entered EP@securemail.work and a name of Secure Mail. I clicked next and allowed ProtonMail to generate my new keys.
I clicked the "IVIX" button in the ProtonMail configuration menu.
In Namecbeap, I chose "Custom lv.lX" in the Mail Setting menu. I then provided the custom settings displayed in the ProtonMail dialogue, visible in Figure 3.04.
I added the SPF record into Namecheap as instructed by the ProtonMail dialogue.
I added the DKIM record into Namecheap as instructed by the ProtonMail dialogue.
I ignored the DMARC options and closed the ProtonMail pop-up window.
When finished, I checked the "Catch All" option next to my new email address.
Within two hoU1's, all of the settings were applied and ProtonMail was happy with my configuration. Figure 3.05 displays my TXT records, which were applied with the previous instructions.
| Type | Valtt <t< th=""> | 'Ill. | </t<> | 'Ill. | |
|---|---|---|---|---|---|
| MX Record | i' | ||||
| MX Record |
Figure 3.04: MX records for a custom domain.
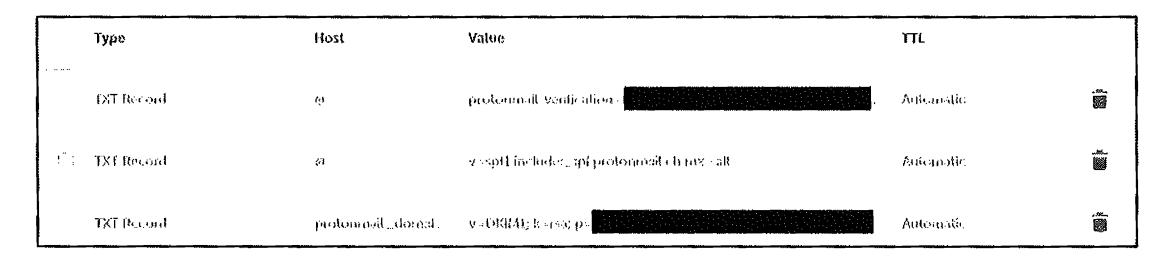
Figure 3.05: TXT records for a custom domain.
Let's pause and reflect on what we have accomplished. I purchased a domain name of securemail.work semi-anonymously. The details of this registration are hidden from the public. I created a paid ProtonMail account. I forwarded the mail servers of the domain name to the ProtonMail service. I configured both a real email address and a wildcard address within ProtonMail. Any email sent to my domain is received in my ProtonMail account. If you send an email to EP@securemail.work, 12@securemail.work, or ihatethisbook@securemail.work, it will get to me. I can provide an unlimited number of email addresses for this domain, and all will end up in my inbox. This is very similar to the way email forwarders work, but I have all control.
I can also incorporate the techniques mentioned in the previous strategies. Any email fotwarders I use can be sent to either a real ProtonMail address or a securemail.work address. I can import my old email from another provider and export all content to possess a full backup (explained in a moment). My email content is stored as encrypted data, and no one at ProtonMail can view my messages. I have a mobile app on my phone which accesses my ProtonMail account, and the web interface is available through my browser. I can send and receive mail from accounts in this new domain name. If ProtonMail should ever become unavailable, I can forward my domain within Namecheap to a new email provider and continue to access my accounts.
Practically every email I send is from an address of my own domain which I own. If sent to other ProtonMail users, the content never leaves their systems and stays fully encrypted to the recipient. I believe it is vital for extreme users to own the domains which are used for emails. It looks more professional and gives you permanent control of the content. You can have the best of both worlds with a custom domain within ProtonMail.
Encrypted Calendar and Contacts
In 2020, ProtonMail began offering an encrypted calendar service. I believe that possessing an encrypted, zero-knowledge calendar is more vital than private email. Consider the amount of sensitive information stored in your calendar. Your doctor appointments, blind dates, work schedule, job interviews, and travel plans disclose a lot about you. The details entered within the notes of these entries can identify your location, medical history\ or desire to leave your current employer. Do you want all of that data visible to Google or Microsoft? I know I don't. Therefore, my calendar is protected through ProtonMail and only visible to me.
ProtonMail has always supplied encrypted contacts as part of their email packages. These details are also extremely sensitive. I would never want to expose the cellular telephone numbers, home addresses, and employers of my friends and family. Storing this content within products provided by companies which make profits from data sharing is irresponsible. The default configurations of ProtonMail's calendar and contacts is sufficient for most, but I prefer to make one modification.
• Settings > Account > Automatically Save Contacts > Disabled: By default, ProtonMail saves the contact details of any outgoing messages, including responses. This leads to a contact list full of people who are rarely contacted and leaves potential evidence of sensitive associations. I prefer to disable this option completely.
ProtonMail Alternative (Tutanota)
I mentioned Tutanota briefly in an earlier section of this chapter. They provide a very similar service to ProtonMail and I believe that you could replace "ProtonMail" with "Tutanota" in most of the previous details to produce a similar result. Tutanota also delivers end-to-end encrypted email, contacts, and calendar services. They are based in Germany and have a strong history of respect for privacy. However, they are based in a Fourteen Eyes country, which may make a few readers nervous. They provide a mobile application and have a nice web-based interface.
Why do I choose ProtonMail over them? Adoption. Currently, 70% of email correspondence from my Proton:Mail account is to other ProtonMail users. Less than 5% is to Tutanota addresses. Therefore, it simply makes more sense to stick within the ProtonMail ecosystem (for now). Tutanota offers a free tier, and I encourage you to create an account and test their services. I have found their web interface to work well, but the mobile app is quite slow.
Account Summary
Hopefully you now have an email, calendar, and contacts solution which is private and secure. We should bring absolutely nothing from our past life into our new private life. Once you have new hardware and new accounts for communication, my preference is that you never access the old accounts from your new devices. The previous forwarding strategies are fine, and should work without logging in to your old accounts. This is especially important for mobile devices, and I insist that Google apps are never installed anywhere. This would immediately associate the new device with the old Gmail account, and ruin the isolation created.
I realize that the previous email strategies can seem overwhelming. This is why I present them as basic, intermediate, and advanced options. Privacy is a marathon, not a sprint. Each step you take makes you more private and secure. You can always upgrade your strategy once you have an understanding of the basics. You may also tweak pieces of each option and create your own solution. My goal is to simply present numerous ideas to aid in your own execution.
I encourage you to begin visually creating your own email strategy. I often draw diagrams, using pencil and paper, until I have created a workflow that makes most sense for a specific client. This may seem archaic, but the visual representation helps me. My overall strategy has changed considerably since I began this journey. I would anticipate changes to your own plans as your digital life is hardened.
Data .Archiving
Whether you use a Mac, Windows, or Linux machine, I highly recommend possessing a backup of all email, calendars, and contacts. I mentioned Mac options in the previous section, but I only rely on those strategies when a client insists on using the stock Mac apps. Personally, I do not store my email, contacts, or calendars within any Apple application. This is because Apple constantly sends data home to their servers, regardless of your iCloud or Apple ID settings. I do not want to take the chance of unknowingly sending sensitive details to Apple as part of their analytics collections. Therefore, I rely on an open-source third-party solution called Thunderbird (thunderbird.net). This product, which is made by Mozilla, is a very minimal and somewhat ugly email, contacts, and calendar application. I do not recommend using it for daily access to these services, but only as an archiving solution to make sure you always have a copy of your data. First, let's discuss why this is so important.
Consider your primary email account. What do you possess inside of it? You likely have years' worth of valuable emails, important documents, priceless photos, and evidence of practically every online account. Could you replicate your contacts list from memory? Do you know all of your upcoming appointments without relying on your online calendar? What if it all disappeared tomorrow? If your service unexpectantly shut down, ldcked you out, or was "hacked", you would not have access to all of this data. This is why everyone should always possess a full backup of all of this content.
If you use Fastmail, Gmail, or any other standard email service, you can connect through a protocol known as IMAP. Clients such as Thunderbird allow you to specify the settings of your accounts, and then keep your entire email, contacts, and calendars synced to your computer for offline use. If your online accounts disappear, you still have access to your offline copies of all the data. Every reputable email service provides tutorials for connecting your client, such as Thunderbird, to their service via IMAP. Calendars sync via CalDAV and contacts sync via CardDAV.
Encrypted email providers, such as ProtonMail, present a difficult scenario. Since the email is fully encrypted, they do not allow standard IMAP access from a third-party client. However, ProtonMail addresses this with their bridge and export applications. Available only to paid accounts, these utilities allow an email client to download all messages from their servers. This provides a full backup, the possibility of offline access, and full search capabilities within the content of the messages. You can find full details for download, installation, and configuration of the Bridge client at https: / / protonmail.com/bridge. It supports Thunderbird natively. The export client is still in beta, but available to the public on their blog. Regardless of your chosen email, contacts, and calendar strategy, please make sure you have a continuously updated backup of your data. Hopefully, you will never need it. Once configured, sync your content weeldy and verify you can access the data without an internet connection.
File Sharing
Occasionally, you may need to send large files to someone remotely. Most email providers have a 25MB limit on attachments. If you need to transmit a 750MB video, large PowerPoint document, or any other file exceeding the email limits, consider the free option Firefox Send (https://send.firefox.com). This service allows you to upload a file up to 1GB in size and generates a link to share. The recipient to whom you provide the link has only 24 hours to download the file. It is permanently deleted after the first successful download or the 24-hour limit, whichever happens first. Furthermore, the content you upload is protected with end-toend encryption. This prevents Firefox employees or anyone else with se1ver access from the ability to see your content. This system is not perfect, and I would never use it for extremely sensitive content, but it works well for daily sharing tasks.
Notes
Applications such as Evernote, OneNote, and Apple's iCloud Notes are extremely convenient. They also store your sensitive content in an unencrypted state for employees, criminal hackers, and third-party companies to abuse. I never recommend any of these services to clients. Instead, I rely solely on Standard Notes (standardnotes.org) for all of my notes and task lists. This service, with free and paid tiers, provides an elegant application for all major platforms, including mobile devices. All notes are end-to-end encrypted with zero-knowledge from the provider. The free plans are sufficient for most users, but power users may want the paid features. Notes updated on one device synchronize securely to all other devices. Many of my clients share a single account with multiple family members as a way to keep track of upcoming events and tasks. I have never reached any limits of shadng a single free account with multiple devices. My notes, outlines, and "to-dos" for this book were stored completely within Standard Notes at all times.
Traveling with Devices
When you travel, especially internationally, you increase your chances of an encounter with a government official who demands access to your data. This could be an extremely minimal risk during a traffic stop while being suspected of drug trafficking, or a much more likely scenario of being intercepted while entering another country. Regardless of your likelihood of being detained and questioned, you should be prepared for an unfortunate encounter. When I travel, I assume that I will be asked for access to my data at some point. Therefore, I prepare for this possibility in advance in order to avoid temptation to submit to a search of my data.
Some may fall back on the "I have nothing to hide" argument when being asked by an immigration official for full access to personal devices. I believe it is very inappropriate to hand over your data to any third party, especially a foreign government upon entry into a new
territo1y. Many countries are embracing new technology such as Cellebrite forensic acquisition devices which suck up all data from a mobile device in minutes. This data is stored indefinitely, and likely insecurely. The country you entered may have little interest in the data they collected about you, but the intruder who later steals that data can abuse it without your knowledge. My preference is to avoid any data collection which may violate my privacy.
Domestic Travel (Vehicle): I have never encountered a situation while driving throughout America where my data was in jeopardy. I obey all most traffic laws and try to minimize any interest from law enforcement. I keep all of my data encrypted and backed-up, so theft is not a huge concern. Unless you are under arrest, or a search warrant has been issued, law enforcement has no right to take custody of any devices. If you are under arrest, a search warrant will be required to legally extract the data from any confiscated devices. Consent may be requested, which you can deny. If probable cause that you have committed a crime has been established, you begin to lose your rights to privacy. If a search warrant for your devices has been obtained, you have big problems.
Currently, the Cellebrite I mentioned previously is suspected to have the ability to bypass the enc1yption of both Android and Apple devices. This is usually short-lived, as device manufacturers and forensic companies play cat-and-mouse with their abilities to protect data and defeat encryption. Some judges have ruled that fingerprints CAN be obtained by police in order to unlock a phone (U.S. Supreme Court Riley vs. California) while other magistrates declare that officials CANNOT force you to give up biometrics (U.S. Northern District of California Case # 4-19-70053). In other words, there is no clear answer. This is one reason I require a PIN to unlock my iPhone. I have the fingerprint and face identification options disabled.
Readers who are in law enforcement may scoff at my remarks here, but there is no ill-intent, As a retired law enforcement officer, I understand that people can get caught up in investigations surrounding illegal activity without committing any crimes. In 2016, I was in a vehicle driven by a ride-sharing contractor, hailed through the official mobile application for that company. After picking me up, the vehicle was stopped by under-cover police detectives and the driver was arrested. He was wanted on serious drug conspiracy charges and likely headed to prison. Understandably, the detectives questioned me sternly at the scene of the arrest. I was able to explain my presence, display visual proof of the hired ride on my device, and justify that I was not involved in their investigation. However, a detective requested to connect my device to a Cellebrite in order to prove my innocence and later critique my story if needed. I declined consent to the data acquisition, which was met with great skepticism. I politely explained my former career and stance on privacy, and insisted I would not voluntarily grant access to my device, My retired badge and credentials likely aided this conversation, which may seem unfair to civilians in the same predicament.
I completely understand the request for my data, and I would have probably acted similarly when I was investigating felony and federal crimes. On the surface, I appeared to be connected to a major felony drug trafficking investigation. Detectives must exhaust all investigation tactics, which includes a thorough look into anyone contacted during the arrest. I was in the wrong place at the wrong time. If I had allowed my device to be extracted, the data would have been stored at the police department; provided to the prosecutor and defense during the discovery process; and accessible to countless attorneys, clerks, interns, and the defendant. I lose all control, and my identity, messages, emails, contacts, and history could be exposed publicly. Realistically, no one would have paid much attention to me as I was cleared in the investigation. However, I simply refuse to expose my personal data.
This may all seem far-fetched, but scenarios such as this play out every day. This is why I enable the best possible encryption I can on any devices with me while I travel. This includes laptops. I will obey all legal demands, I will cooperate with law enforcement, but I will not unnecessarily associate my personal data with unrelated investigations. If you find yourself in a similar situation, I encourage you to be polite and helpful, but also to understand your rights and know your boundaries for consent. You can't call them later and ask them to delete the data.
Domestic Travel (Air): I fly a lot throughout America, and I pass through Transportation Security Administration (fSA) checkpoints more than I desire. I remove my laptop and mobile device from my bag, place them in the worn grey containers, and hope I am not pulled aside for secondary inspection. Fortunately, I have never been asked to unlock my devices during domestic air travel, but I know others who have. Prior to 2010, TSA agents were asking people to unlock their laptops and mobile devices as proof they functioned properly. This was due to a specific threat about explosives being stored within electronic devices. I have never heard of any data acquisition during this time, which was short-lived. The greater concern is the reported incidents where domestic travelers were required by TSA to unlock their phones and these devices were taken out of sight of the civilian for several minutes. There is speculation that TSA possesses mobile device forensic acquisition units, but I have no evidence of this.
TSA officials have responded to these allegations stating it "does not search electronic devices for electronic content that may be contained on the device, and does not extract data from passenger electronic devices" and that physically analyzing the devices "is solely in.tended to verify that there has been no physical tampering or hidden threat placed within the electronic device".
In my experience, your chances of being asked to unlock any type of device during domestic travel is extremely rare. I almost always travel with my primary laptop (full-disk encryption) and my travel mobile device (iPhone with default encryption and 12+ digit PIN). The role of the TSA is to scan people and luggage for physical threats. Any interest in your data will likely be very targeted and searches would probably be conducted by another organization such as U.S. Customs and Border Protection (CBP). That brings us to international travel.
International Travel (Vehicle): This is where things can get tricky. The moment you leave one country and enter another, you are at a higher risk of data interception and acquisition. When leaving America and entering Mexico -via vehicle, your chances of any demands to access your devices is very minimal. This can change if you are on a "list" of suspicious individuals, but most people should have no issues. Canada is a different matter. I have found the Canada Border Services Agency (CBSA) to be more scrutinous than most other countries,
In my experience, entering Canada by vehicle provides just as high of a likelihood of secondary screening as air travel. Many people refer to their "rights" prohibiting the search of their devices, but this is inappropriate thinldng. You can absolutely refuse to allow a search of your data at the Canadian border. In return, Canada can refuse you entry into the country. If you are demanded to unlock a device and refuse, you will not likely be arrested. You will simply be shown the way back across the border into America.
For the record, I have never received a demand to unlock a device by the CBSA. I have received my share of secondary interrogation due to some questionable border crossings, but my devices were never compromised. However, the CBSA is fairly transparent about their rights to inspect the content on your devices, The CBSA can search any device entering the country without any specific suspicion. However, CBSA policy states that officers should only "take a quick look" at each document before moving on to the next. For example, they should only look at documents or photos "for long enough to determine that they do not contain contraband such as child pornography or hate literature". If the CBSA officer sees something that raises their suspicions, a more thorough search may be conducted. CBSA agents can also demand a password or fingerprint to unlock a phone. The Canadian Customs Act states that travelers are required to "open 01· unpack any package or container that the officer wishes to examine". The CBSA points out that not handing over a password could create a variety of problems, including denial of entry into Canada.
Fortunately, CBSA agents cannot always download photos, text messages or emails from the device. According to the British Columbia Civil Liberties Association (BCCLA), "If the CBSA wants to search information on the phone that is only accessible once it is connected to the cloud, the agency must first obtain a warrant issued by a judge". However, this provides little protection. The CBSA's policy is that officers should set the device to airplane mode before searching to "reduce the possibility of triggering remote wiping software, inadvertently accessing the Internet or other data stored externally or changing number versions or dates", according to internal guides.
Officers are allowed to read emails which have been downloaded and opened, and they are supposed to assess this by seeing whether the emails have been marked as read. The BCCLA assumes this also applies to text messages. Agents can also copy the contents of the device or keep the phone for further inspection. The Customs Act gives the CBSA the "power to detain goods if the officer is not satisfied that the goods have been properly screened for admission into Canada, including the contents of electronic devices", according to the BCCLA guide. Because of these issues, I follow a strict personal set of rules when traveling to Canada, which will be explained after the next section.
International T1·avel (Air): You are at most risk of a demand to unlock and present your data when you are traveling via air to other countries. You basically have no rights. Some locations in the middle east or near China may be more demanding toward seeing your digital content than popular European countries which are targeted by tourists. Regardless of your destination, you are always at risk of being denied entiy if you refuse to allow a border agent to inspect your unlocked devices. Therefore, I possess a very specific protocol for ALL travel outside of the United States.
Laptop: I almost always bring a laptop when I travel internationally. Whether for my own work or to be used during a presentation, I simply need a computer with me at all times. When leaving my country, I make an assumption that I will be forced to unlock the device at any border. First, I completely wipe out my Debian Linux machine and install a fresh copy. I enable full-disk encryption and install any software necessary for my trip. I do NOT load any personal data. While still at home, I identify all of the personal data I may need such as my password manager, client documents, PowerPoints, etc. I encrypt these into a VeraCrypt container and store the container in my SpiderOak account, which is zero-knowledge with end-to-end encryption. If I am asked to unlock my laptop, I do. There is no personal data on it, and nothing sensitive to be exposed. When I arrive at my final destination, I download the VeraCrypt container and place it on my device. Before I leave the count1y, I wipe the hard drive and re-install Debian Linux from a USB drive containing the official ISO file.
Mobile Devices: When traveling in North America, I usually bring my travel iPhone. However, I do not bring the SIM card. The device basically has no internet connectivity. I then force close all of my apps and make sure I am logged out of everything. If I am forced to unlock the device, my email and communication apps will only load a login screen. Once in Canada or Mexico, I purchase a new SIM and log in as necessary. I repeat the process when leaving. When traveling outside of North America, I never bring a mobile device. I can use my laptop for almost all of my communication needs. If I need a mobile device, I can purchase an affordable ''burner" with a new SIM card.
Some may believe that possessing a hidden partition on a laptop or a hidden VeraCrypt container would eliminate the need to upload and download the data. I disagree with this tactic
as some border agents are trained to look for this data. If you are found to possess anything "secret", you are more likely to be denied entry or detained. I prefer to enter "clean" and simply not wony about anything. Some will argue that you appear more suspicious if you enter a country without a mobile device. I have never received any resistance with this. My valid response is that I have no service in the country I am entering, so I did not bring my phone. Obviously, your mileage may vary.
The final consideration is the border crossing into the United States. If you are a U.S. citizen, you will likely be waived through with little hassle. If you are not a citizen, expect issues. The U.S. has some of the most invasive privacy practices when it comes to entry by foreigners. You may be asked about your social networks and email accounts, and be prone to the search of your devices. The lessons explained previously may be beneficial.
Tor Browser (https://www.torproject.org)
You may be wondering why I did not mention the Tor Browser during the previous private web browsing section. This software has many valuable privacy-related uses, but also just as many hindrances. First, we should understand what the Tor Browser does. It is open-source software for enabling anonymous communication over the internet. It directs all internet traffic through a free volunteer net\vork consisting of thousands of international "relays" to conceal a user's location and usage from anyone conducting network surveillance or traffic analysis. Similar to a VPN, the Tor network disguises your identity by moving your traffic across different servers, and encrypting that traffic so it is not traced back to you. The Tor Browser is free and can be downloaded on Windows, Mac, and Linux. It relies on a hardened version of Firefox and appears similar to a standard browser in many ways.
The Tor Browser is present on every machine I use, but I do not use it every day. In fact, my hardened Firefox browser receives far more usage than the Tor Browser. This is due to many hurdles associated with web browsing over the Tor network. Any time you connect to a website while using the Tor Browser, that site absolutely knows you are on the "anonymous" Tor network. Unfortunately, there is a negative connotation associated with Tor. Many companies still believe it is mostly used by online drug dealers, credit card thieves, and criminal enterprises. While crime is still very present within the Tor network, it is no longer the majority of traffic. Many traditional sites will scrutinize traffic from this network and present difficulties while attempting normal internet usage across standard websites. Many websites present multiple captchas from Google in order to load a page. Online marketplaces such as Amazon tend to block payments. Some web firewalls throttle traffic from Tor users making it difficult to load web pages. Many social networks suspend accounts after a Tor-enabled connection. Because of these reasons, I am hesitant to encourage clients to make the Tor Browser their primary internet connection. However, I stress the importance of possessing this option and relying on the Tor network in the following scenarios.
- International Travel: There are many countries which block access to VPN connections. Furthermore, many public Wi-Fi connections block VPN software from securing a private connection. In many of these instances, the Tor Browser will bypass these restrictions. You may need to reconnect many times until you find a connection which is allowed and not blacklisted within an internal database.
- Sensitive Content: My job requires me to investigate dark areas of the internet. If I expect to encounter criminal activity, stolen data, or counter-surveillance, I am always connected through the Tor Browser (on my VPN-protected machine).
- Tor Content: There are thousands of websites which can only be accessed within the Tor network. This browser can access these sites as well as all open internet sites.
- Restricted Content: Some public networks filter internet traffic such as dating websites, social networks, and mature content. My library blocks Craigslist for some reason. Some countries block news or content which contradicts their own agendas. In 2019, Russia was blocking access to ProtonMail. Tor eliminates these roadblocks.
If you anticipate extensive travel to countries which block open internet access, I would configure a pluggable transport within the Tor Browser before travel. I use Meek. Meek is an obfuscation layer for Tor designed to evade internet censorship. Traffic is relayed through a third-party server which is difficult to detect and block. More details can be found on the official Tor website at https://trac.torproject.org/projects/tor/wiki/doc/meek.
Summary
- New clients receive all new devices and any forced registration is in an alias name.
- Full encryption is mandatory on all devices including portable storage.
- Stock browsers should be replaced with custom options.
- Password managers are vital, and I prefer offline storage.
- Old email addresses should be forwarded to a secure new account.
- Clients need multiple email addresses within a single login.
- Consider potential data invasions while traveling.
You can never have privacy unless you possess secure digital devices and connections. This chapter is the backbone for all of the upcoming work you will complete in order to become invisible. As a final note, please remember that technology changes quickly and often. The exact digital tutorials explained in this book ffift-Y will become inaccurate over time. If you encounter differences during your replication of the steps, online research of the topic should quickly identify new solutions. Later in the book, I present the next level of digital strategies.